Enabling (Turning ON) / Disabling (Turning OFF) ECM TX (Send)
If there is noise on the phone line, the faxes received by the other party may include white horizontal lines across the page (like missing lines) or compressed lines. Enabling ECM TX image quality may improve the print results. In some cases, it may be necessary to disable ECM TX. For example, when your fax machine is connected to an Internet Phone line (also referred to as VoIP or Internet Phone).
1. Press the <FAX> button, then press the <Menu> button . The Fax menu is displayed.
2. Press the

or

button to select
Maintenance/settings, then press the
OK button.

The Maintenance/settings screen is displayed.
3. Press the
or
button to select
Device settings, then press the
OK button.

The Device settings screen is displayed.
4. Press the

or

button to select
FAX settings, then press the
OK button.
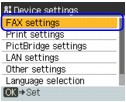
The FAX settings screen is displayed.
5. Press the or button to select TX settings, then press the OK button.
6. Press the or button to select [ECM TX], then press the OK button.
7. Press the or button to select [ON] or [OFF], then press the OK button.
Note: The default setting is [ON].
Press the <Fax> button to return to Fax standby mode.
