
Sending Faxes
| Article ID: ART116740 | | | Date published: 05/12/2015 | | | Date last updated: 06/10/2019 |
Description
Sending Faxes
Solution
| Sending Faxes
ID : 8202152200 _ EN _ 1
|
|
| Solution |
Sending Faxes by Entering Fax/Telephone Number This section describes dialing and sending faxes directly by entering the fax/telephone numbers.
1. Make sure that the machine is turned on.
2. Load documents on the platen glass or in the ADF.
3. Select
 FAX on the HOME screen. FAX on the HOME screen.The Fax standby screen is displayed.
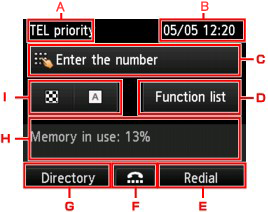 A. Receive mode
The receive mode selected currently is displayed.
B. Date and time The date and time are displayed.
C. Entry field of fax/telephone numbers
The entered numbers are displayed.
D. Function list
You can use the each fax function and change the setting for the fax.
E. Redial
Select to send faxes with redialing.
-> See [ Resending Faxes (Redialing a Busy Number) ] in this page.
F. On hook dial
Select to send faxes with the on hook dial function.
G. Directory
You can select a registered fax/telephone number.
H. Current state
The current state is displayed.
I. Scan contrast and resolution
4. Use the Numeric buttons to dial the recipient's fax/telephone number.
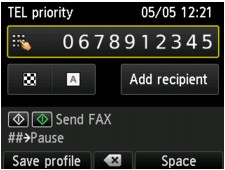 Use the following buttons to dial the recipient's fax/telephone number.
Enters the number.
Enters a space.
Deletes the last character you entered.
You can register the current print settings as a custom setting.
5. Press the Color button for color transmission, or the Black button for black & white transmission.
The machine starts scanning the document.
6. Start sending.
The machine scans the document automatically and starts sending the fax.
After scanning the document, the confirmation screen asking you if you load the next document is displayed. To send the scanned document, press the OK button to start sending it. To send two or more pages, follow the message to load the next page, and press the Color or Black button. After scanning all pages, press the OK button to start sending.
Resending Faxes (Redialing a Busy Number) There are two methods of redialing: Automatic redialing and Manual redialing.
If you send a document and the recipient's line is busy, the machine will redial the number after a specified interval.
You can redial to the recipients dialed by entering the fax/telephone numbers.
You can enable or disable automatic redialing. If you enable automatic redialing, you can specify the maximum number of redial attempts and the length of time the machine waits between redial attempts.
Enable and specify the automatic redialing setting on Auto redial in Advanced FAX settings under FAX settings.
Follow the procedure below for manual redialing.
1. Make sure that the machine is turned on.
2. Load documents on the platen glass or in the ADF.
3. Select
 FAX on the HOME screen. FAX on the HOME screen.The Fax standby screen is displayed.
4. Adjust the scan contrast and resolution as necessary.
5. Press the right Function button.
The Redial screen is displayed.
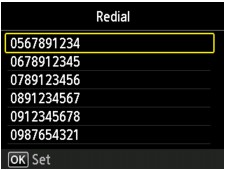
6. Use the
  button to select the recipient's number to redial, then press the OK button. button to select the recipient's number to redial, then press the OK button.
7. Press the Color button for color transmission, or the Black button for black & white transmission.
|
 to eject document. is displayed on the LCD. By pressing the OK button, the remaining documents are automatically ejected.
 to eject document. is displayed on the LCD. By pressing the OK button, the remaining documents are automatically ejected.
SIMS Doc Id
8202152200