|
|
Scanning Film (9950F)
| Article ID: ART161321 |
| |
Date published: 06/09/2015 |
| |
Date last updated: 08/18/2015 |
Description
Scanning Film (9950F)
Solution
This scanner can scan 35 mm film strips and slides, as well as 120 and 4"x5" format films. It can scan a 35 mm film strip up to six frames long or a single 35 mm slide.
The following four methods are available for scanning films. Scanning Films with the Scanner Buttons
 
This method scans 35 mm film strips and slides simply by pressing the [COPY] or [SCAN] buttons.
Scanning Films with CanoScan Toolbox

This method uses the CanoScan Toolbox buttons to scan 35 mm film strips and slides in a few simple steps
Scanning Films with ScanGear CS in Simple Mode

This method summons the ScanGear CS driver window from an application program and scans films in Simple Mode, allowing you to adjust a few settings.
Scanning Films with ScanGear CS in Advanced Mode

This method summons the ScanGear CS driver window from an application program and scans 35 mm film strips, slides, 120 and 4"x5" format films in Advanced Mode, allowing you to adjust various settings.  | * | Mounted 120 format films cannot be scanned. | | * | Only 35 mm color film strips and mounted positive slides can be scanned with the scanner buttons or CanoScan Toolbox. Monochrome films, mounted negative slides, 120 and 4" x 5" format films cannot be scanned with these methods. | | * | To scan monochrome films, mounted negative slides, 120 and 4" x 5" format films, start ScanGear CS from an application program and use the Advanced Mode to scan. | | * | Do not set positive and negative films in the same Film Guide. |
 | * | The estimated remaining time will display when film is scanned. The time shown here is a rough estimate that will vary according to your computer's environment and scan settings. It will take longer than the estimated time shown at first, especially when the scanned area is large, and/or resolution and scale are high, resulting in a large data size. | | * | If a portion of the film base outside the image or the Film Guide shows in the preview image, select a scan area with the cropping frame before scanning. Including a portion of the film base or the Film Holder in the scan may cause the coloration of the scanned image to be off. |
Top

This method of scanning is a simple and convenient way to print or load images into image editing programs, all with a single push of a button. With this method, you can scan without adjusting settings each time.
| * | To use the CanoScan Toolbox Copy function, the scanner and printer should be connected to the computer, all powered on, and the drivers should be installed properly and functioning. See the printer's instruction manual for printing preparation procedures. | | * | You cannot scan films with the [PDF] and [E-MAIL] buttons. | | * | The scanner buttons are designed to work with CanoScan Toolbox. After you change a CanoScan Toolbox setting, that setting is used to scan the next time a scanner button is pressed. | | * | Only 35 mm color film strips and mounted positive slides can be scanned with the scanner buttons or CanoScan Toolbox. Monochrome films, mounted negative slides, 120 and 4" x 5" format films cannot be scanned with these methods. | | * | Mounted 120 format films cannot be scanned. | | * | To scan monochrome films, mounted negative slides, 120 and 4" x 5" format films, start ScanGear CS from an application program and use the Advanced Mode to scan. | | * | Do not set positive and negative films in the same Film Guide. | | * | The estimated remaining time will display when film is scanned. The time shown here is a rough estimate that will vary according to your computer's environment and scan settings. It will take longer than the estimated time shown at first, especially when the scanned area is large, and/or resolution and scale are high, resulting in a large data size. | | * | If a portion of the film base outside the image or the Film Guide shows in the preview image, select a scan area with the cropping frame before scanning. Including a portion of the film base or the Film Holder in the scan may cause the coloration of the scanned image to be off. |
Top
Printing with the [COPY] Button - Prepare the printer for printing
| * | The scanner and printer should be connected to the computer, all powered on, and the drivers should be installed properly and functioning. See your printer's instruction manual for the print preparation procedures. |
- Remove the protective sheet from the document cover of the scanner.
- Set the film in the Film Guide, and position the Film Guide on the document glass of the scanner.
Refer to the Quick Start Guide for positioning film.
| * | To scan monochrome films, mounted negative slides, 120 and 4" x 5" format films, start ScanGear CS from an application program and use the Advanced Mode to scan. |
- Close the document cover.
 Press the [COPY] button on the front panel of the scanner. Press the [COPY] button on the front panel of the scanner.
The scanner will start automatically and scan the film (all frames) on the document glass.
The scanned frame will be sent to the printer as a photo size (4"x6") image, and print out when the scan is complete.
- After you have finished scanning film, put the protective sheet back on the document cover of the scanner.
| * | Always put the protective sheet when you are not scanning films to protect the light source of the document cover. |
Top
Loading Images with the [SCAN] Button
- Remove the protective sheet from the document cover of the scanner.
- Set the film in the Film Guide, and position the Film Guide on the document glass of the scanner.
Refer to the Quick Start Guide for positioning film.
| * | To scan monochrome films, mounted negative slides, 120 and 4" x 5" format films, start ScanGear CS from an application program and use the Advanced Mode to scan. |
- Close the document cover.
 Press the [SCAN] button on the front panel of the scanner. Press the [SCAN] button on the front panel of the scanner.
The scanner will start automatically and scan the film (all frames) on the document glass.
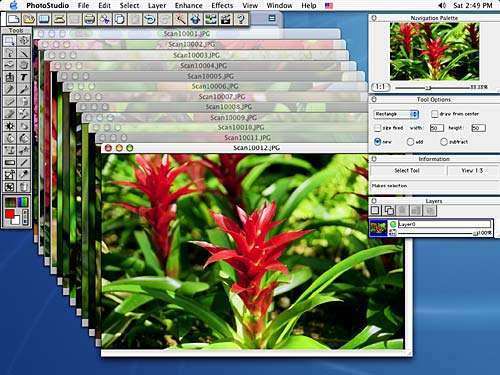
The scanned frame will be saved and sent to ArcSoft PhotoStudio.


| * | The SCAN button enlarges 35 mm film to the Photo Size (4"x6"). | | * | Scanned images are saved by default in a new folder created and named with the scanning date, found in the [My Pictures] folder in the [My Documents] folder. |

| * | The SCAN button enlarges 35 mm film to the Photo Size (4"x6"). | | * | Scanned images are saved by default in a new folder created and named with the scanning date. | | Navigate to this folder by opening the [Users] folder, logged in user account folder, [Pictures] folder, followed by the [My Pictures] folder. |
- After you have finished scanning film, put the protective sheet back on the document cover of the scanner.
| * | Always replace the protective sheet when you are not scanning films to protect the light source of the document cover. |
Top
You can scan 35 mm film strips and slides using the Copy, Print, Save, Scan-1 and Scan-2 buttons in CanoScan Toolbox. The procedures are similar for each button. | * | You cannot scan film with the Mail, OCR or PDF buttons. |
- Remove the protective sheet from the document cover of the scanner.
- Set the film in the Film Guide, and position the Film Guide on the document glass of the scanner.
Refer to the Quick Start Guide for positioning film. | * | To scan monochrome films, mounted negative slides, 120 and 4" x 5" format films, start ScanGear CS from an application program and use the Advanced Mode to scan. |
- Close the document cover.
- Start CanoScan Toolbox.
Click the [Start] menu and select [(All) Programs], [Canon], [CanoScan Toolbox 4.9] and [CanoScan Toolbox 4.9].
Open the [Applications] folder, and double-click the [CanoScan Toolbox 4.9] folder, followed by the [CanoScan Toolbox X] icon.
- Click a button on the CanoScan Toolbox main window to open the settings window for that button.
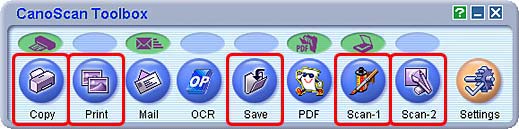
The above functions with red frames can scan films.
The example below explains using the Scan-1 button.
CanoScan Toolbox settings window will display.
- Select a [Select Source] option.

| Film | You can select the Image Quality setting in this mode. | | Auto mode | The film is scanned with an output resolution of 300 dpi. With the Copy function, the image is enlarged and printed at photo size (4"x6") in landscape orientation. Skip to Step 9 if you selected the Auto mode. |
| * | Platen is the default option for the Select Source category on the Save button. For this procedure, always select Film or Auto mode. |
- Select a [Scan Mode] option.

| Scan all frames | Scans all the frames it detects. Up to 30 frames can be scanned. | | Display thumbnails | Displays all the frames it detects as thumbnail images. You can remove the check marks from unwanted frames, so that only the required frames are included in the final scan. | | Index scan | Scans all the frames it detects and displays them in an index image. |
- Set the [Image Quality] if you selected Film in the Select Source category.

| High Speed (150 dpi) | Scans with an Image Quality of 150 dpi. Select this option to display the scanned image on a monitor or print at the photo size (4"x6"). | | Standard (300 dpi) | Scans with an Image Quality of 300 dpi. Select this option to print a high-quality print at the photo size (4"x6"). | | High Quality (600 dpi) | Scans with an Image Quality of 600 dpi. Select this option to print up to A4 (Letter) size, or for printing on a high performance color printer. |
| * | The Image Quality is automatically set to High Speed (150dpi) when the Scan Mode is set to Index scan. |
- Click the [Scan] button.
With the Copy Settings Window, click the [Copy] button.
If you selected the [Scan all frames] option, all frames will automatically be scanned.
If you selected [Display thumbnails], the image thumbnails will display.
If you selected [Index scan], all frames on the document glass will be scanned and displayed in an index image.
- If you selected [Display thumbnails], place a check mark beside the frames you wish to scan, and click the [Next] button.

The selected images will be scanned, loaded into the application and saved.
- After you have finished scanning film, put the protective sheet back on the document cover of the scanner.
| * | Always put the protective sheet when you are not scanning films to protect the light source of the document cover. |
Top
Scanning Films with ScanGear CS in Simple Mode
To scan 35 mm film strips and slides into an application program, you can start ScanGear CS from within the program.
In the Simple Mode, there are only a few simple procedures. - Remove the protective sheet from the document cover of the scanner.
- Set the film in the Film Guide, and position the Film Guide on the document glass of the scanner.
Refer to the Quick Start Guide for positioning film.
| * | To scan monochrome films, mounted negative slides, 120 and 4" x 5" format films, start ScanGear CS from an application program and use the Advanced Mode to scan. |
- Close the document cover.
- Start ScanGear CS from within the application program.
<PhotoStudio is used in this example>
- Click the [Start] menu and select [(All) Programs], followed by [ArcSoft PhotoStudio 5.5] and [PhotoStudio 5.5].
- Click the [File] menu and select [Acquire].
- Double-click the [PhotoStudio] alias on the desktop or open the [Applications] folder, and double-click the [PhotoStudio] folder, followed by the [PhotoStudio] icon.
- Click the [File] menu and select [Acquire].
The ScanGear CS window will display.
- If ScanGear CS is in the Advanced Mode, click the [Simple Mode] tab to display the Simple Mode window.
- Select the [Select Source].
You can select from the following options:
Negative Film (Color) / Positive Film (Color)
- Click the [Preview] button.
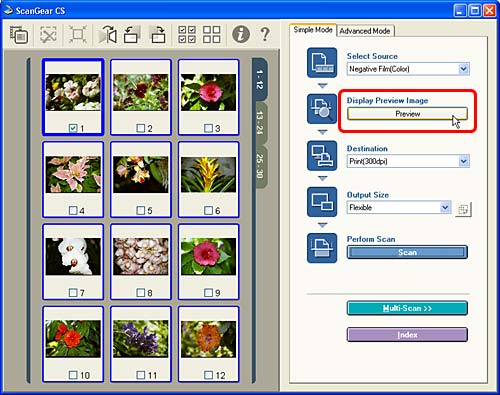
Thumbnails of the frames will display.
| * | The Preview Area displays up to 12 frames at once in the Thumbnail Display mode. To view additional frames, click a tab on the right (13-24, or 25-30). | | * | If the previewed image does not display correctly, adjust the position of the film in the Film Guide and click the [Preview] button again. | | * | Do not open the document cover while a scan is in progress. |
- Place a check mark beside the frames you wish to scan.

A check mark automatically appears on the first frame. If you do not need to scan a frame, click the check mark to remove it.
- Select the [Destination].
Select a Destination setting: either Print (300 dpi) or Image display (150 dpi). The Output Size options in the next step will vary according to the Destination setting selected.

- Select the [Output Size].
You can select from the following options.
| If "Print (300dpi)" is selected in step 9 |  | | If "Image display (150dpi)" is selected in step 9 |  |
*Selecting Flexible enlarges 35 mm film to the Photo Size (4"x6").
*Selections Other than Flexible: - When the Print (300dpi) option is selected, you can set the output size to match standard paper formats. The scan area is enlarged or reduced to fit the output to the specified paper size. You can set your own output sizes with the [Add/Delete] option.
- When you select Image display (150 dpi), you can select the Output Size according to its pixel dimensions (pixels are the picture elements used to display an image on a monitor). Since the pixel dimensions correspond to the dimensions of standard computer displays (monitors), you can use the images as "wallpaper" without adjustment. They also correspond to the dimensions to which digital camera images can be set, allowing you to manage and organize your scanned images along with digital camera images. You can specify the pixel dimensions of customized output sizes with the [Add/Delete] option.
| * | The selected Destination and Output Size settings will apply to all of the thumbnails surrounded by bold and thin blue frames. | | * | Only the settings you add with the [Add/Delete] option can be deleted. The preset options cannot be deleted. |
Steps 9 and 10 are conducted on each frame that is scanned.
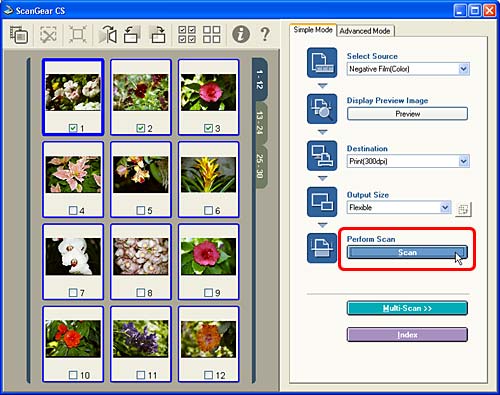
- Click the [Scan] button.
- After the scan is complete, click the close box
 (Windows) or (Windows) or  (Macintosh) to close ScanGear CS. (Macintosh) to close ScanGear CS.
The image will display in the application program.
- Save the displayed image.
- After you have finished scanning film, put the protective sheet back on the document cover of the scanner.
| * | Always put the protective sheet when you are not scanning films to protect the light source of the document cover. |
Top
Scanning Films with ScanGear CS in Advanced Mode
To scan films into an application program, you can start ScanGear CS from within the program.
In the Advanced Mode, you can change the resolution and use various functions to scan, including color correction and filters.
- Remove the protective sheet from the document cover of the scanner.
- Set the film in the Film Guide, and position the Film Guide on the document glass of the scanner.
Refer to the Quick Start Guide for positioning film.
- Close the document cover.
- Start ScanGear CS from within the application program.
<PhotoStudio is used in this example>
- Click the [Start] menu and select [(All) Programs], followed by [ArcSoft PhotoStudio 5.5] and [PhotoStudio 5.5].
- Click the [File] menu and select [Acquire].
- Double-click the [PhotoStudio] alias on the desktop or open the [Applications] folder, and double-click the [PhotoStudio] folder, followed by the [PhotoStudio] icon.
- Click the [File] menu and select [Acquire].
The ScanGear CS window will display.
- If ScanGear CS is in the Simple Mode, click the [Advanced Mode] tab to display the Advanced Mode window.
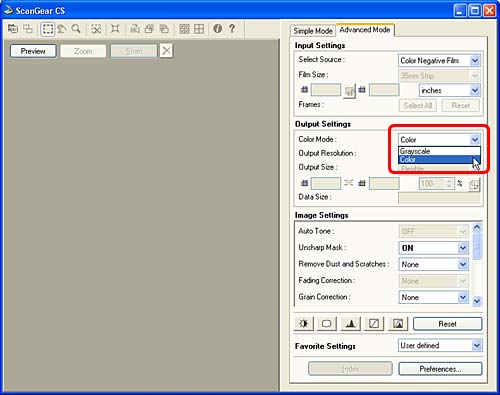
- Set the [Select Source] category corresponding to the film.
 - Set the [Color Mode] category corresponding to the image you want.
- Click the [Preview] button.

Thumbnails of the frames will display.
| * | The Preview Area displays up to 12 frames at once in the Thumbnail Display mode. To view additional frames, click a tab on the right (13-24, or 25-30). | | * | If the previewed image does not display correctly, adjust the position of the film in the Film Guide and click the [Preview] button again. |
- Place a check mark beside the frames you wish to scan.
A check mark automatically appears on the first frame. If you do not need to scan a frame, click the check mark to remove it.

- Select an [Output Size].
By default, the selected Output Size settings are applied to all frames. You can also adjust the settings individually for each frame.
Select a scan area as required.
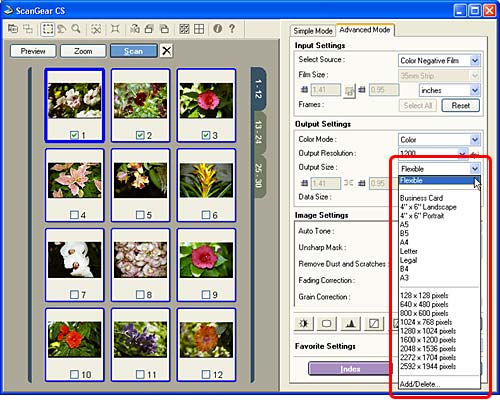
| Flexible | You can select the Output Resolution and the width, height and scale settings when you select the Flexible option. The default Output Resolution is 1200 dpi and the scale is 100%. Adjust these as required. | | Paper Format Sizes | You can select from the Business Card, 4" x 6" Landscape, 4" x 6" Portrait, A5, B5, A4, Letter, Legal, B4 and A3 options. The default Output Resolution is 300 dpi. The width, height and scale settings cannot be selected. The scale will automatically change according to the size of the area selected with the cropping frame. | | Image Display Sizes | You can select from the 128 x 128 pixels, 640 x 480 pixels, 800 x 600 pixels, 1024 x 768 pixels, 1280 x 1024 pixels, 1600 x 1200 pixels, 2048 x 1536 pixels, 2272 x 1704 pixels and the 2592 x 1944 pixels options. These dimensions conform to computer display sizes and digital camera output sizes. The default Output Resolution is 150 dpi. The width, height and scale settings cannot be selected. Choosing one of the image display sizes automatically crops the preview image to the corresponding size. The width-to-height aspect ratio will remain unchanged if you enlarge, shrink or move the cropping frame. |
| * | The Output Resolution can be set individually for any option within the Flexible, paper format sizes and image display sizes categories. The same Output Resolution is used within any one of the three categories. | | * | A warning message will display if you set the Output Resolution higher than necessary. If you proceed anyway, it may take an extremely long time to scan and yield a very large image file. | | Input Resolution and file sizes vary with the selected Output Resolution and scale settings (35 mm films). | | Output Resolution
(resolution of the image as passed to an application program) | Scale
(magnification setting) | Input Resolution
(actual resolution at which an image is scanned) | File Size
(rough estimate) | | 300 dpi | Approx. 400% | 1200 dpi
(300 dpi x 400%) | Approx. 6.5 MB | | 600 dpi | Approx. 400% | 2400 dpi
(600 dpi x 400%) | Approx. 25.9 MB | | 1200 dpi | Approx. 400% | 4800 dpi
(1200 dpi x 400%) | Approx. 105.7 MB | | 2400 dpi | Approx. 400% | 9600 dpi
(2400 dpi x 400%) | Approx. 414.7 MB | | 4800 dpi | Approx. 400% | 19200 dpi
(4800 dpi x 400%) | Approx. 1658.8MB |
|
| | * | The data volumes are shown for BMP and PICT format images. Images saved in compressed file formats, such as the JPEG format, will be smaller. |
|
- Set the other categories as required.
- Click the [Scan] button.

- After the scan is complete, click the close box
 (Windows) or (Windows) or  (Macintosh) to close ScanGear CS. (Macintosh) to close ScanGear CS.
The image will display in the application program.
- Save the displayed image.
- After you have finished scanning film, put the protective sheet back on the document cover of the scanner.
| * | Always put the protective sheet when you are not scanning films to protect the light source of the document cover. |
Top
|
