Sending images by email with ZoomBrowser EX 5.xx
This section contains precautions and procedures on how to send images by email with ZoomBrowser EX 5.xx.
IMPORTANT
-
Your email program needs to be MAPI-compliant in order to send images as attachments to email messages using ZoomBrowser EX.
-
MAPI is a standard Windows messaging interface that enables different email programs and other email-aware applications to exchange messages and attachments.
-
With MAPI-compliant email programs, you can send email directly from the menus of other applications.
-
One of the major MAPI-compliant email programs is Microsoft Outlook Express.
-
Your email program should be set up as a MAPI client in order to send images by email. For set up instructions, please refer to the documentation provided with the email programs.
|
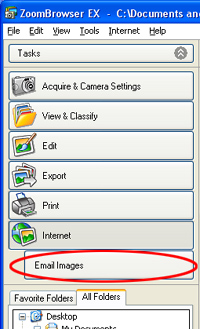
1. In the ZoomBrowser EX 5.xx main window, click [Internet].
2. From the menu that appears, click [Email Images].
-- Please note: if you do not see the [Email Images] button after clicking the [Internet] button, use the scroll bar to the right of the buttons to scroll down.
3. Click [1. Select Images], and then select an image in the ZoomBrowser EX Browser display area.
-- You can also select multiple images, or select a folder to specify all the images included in the folder.
4. Click [2. Change Image Size], and then specify the image's size and quality settings.
4a. Select either [Send images unchanged] or [Resize and compress images into JPEG format].
In general, select [Resize and compress images into JPEG format] if the image resolution is larger than 1024 x 768 (so that when the image is received, it is not larger than the recipient's computer monitor). If you do not wish to reduce the size of the image, select [Send images unchanged].
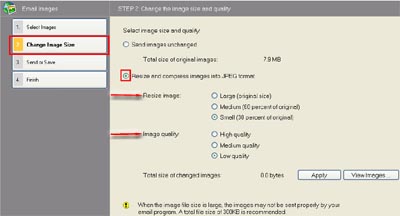
When you select [Resize and compress images into JPEG format], specify the size (a ratio of the original size) by selecting either [Large (original size)], [Medium (60 percent of original)], or [Small (30 percent of original)].
4b. Next, specify the image quality. Select either [High quality], [Medium quality], or [Low quality].
(The lower the quality, the grainier the image will appear; however, the size of the file will be reduced accordingly.)
Image File Compression:
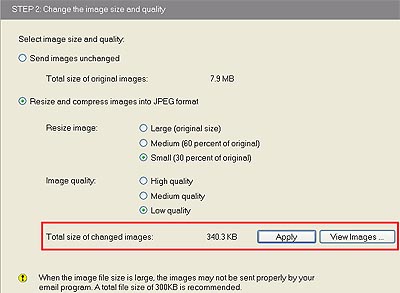
In general, it is advisable to limit the total size of attached image files to 300KB or less to ensure that the message can be sent and received easily. For broadband (i.e. DSL or cable) connections, this limitation is not usually necessary. Keep in mind the connection speed of the recipient and the sender.
5. Click [Apply]: Click this button to check the size of the compressed file.
-- The new file size will appear to the left of the [Apply] button
-- Click [View Images...]: Click this button to check the quality of the compressed images. (Preview images will be displayed.)
6. Click [3. Send or Save], and then choose whether to create a new email or save the images in a folder.
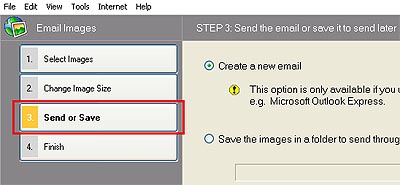
a) [Create a new email]: Select this option to start the email program and send email right away.
b) [Save the images in a folder to send through an email program]: Select this option to save the images on your hard disk to send later. If you select this one, click [Browse] to specify a destination for the files. (Select this option if your email program is not MAPI-compliant.)
If [Create a new email] is selected: Your email program will start and the images appear as attachments. Input the email addresses and your message, and then send the email.
If [Save the images in a folder to send through an email program] is selected: The images are saved where you specified. Start your email program, and then attach the images to your email message.
If an error message appears and you cannot send images using the procedures above, please try the following things to fix the problem.
2. Start Microsoft Internet Explorer, click [Internet Options...] from the [Tools] menu, select the [Programs] tab, and then check that your email program appears in the listing for E-mail.
3. If an email program other than the one you are using appears in E-mail, change it to the email program you are using.
After selecting your email program from the ones appear in E-mail, click [Apply] and then click [OK].
4. Start ZoomBrowser EX again, and then refer back to the procedures on sending images by email listed earlier on this page (Steps 1 through 6).
There are some non-MAPI-compliant email programs that might not start automatically via ZoomBrowser EX 5.xx.
In cases like this, save the image files on your hard disk once, start the email program, and then attach the image files to the email message.