Saving Scanned Images
If the free space of a computer is getting small, scanning cannot be performed.
In that case, it is necessary to delete unwanted application software or files, or change where to save the scanned image data.
-
Launch MP Navigator EX.
-
To open the Applications folder, click the icon of the hard disk where MP Navigator EX is installed.
-
Double-click the MP Navigator EX icon.
-
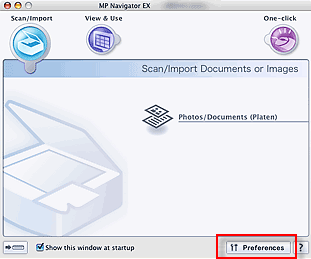
On the main MP Navigator EX window, click 'Preferences' to make advanced settings to MP Navigator EX functions. You can also use One-click mode to complete the scanning operation (including saving) by simply clicking the corresponding icon.
-
In Preference dialog box, click 'Browse' in Save in (My box) to save scanned documents and in Location of Temporary Files to save images temporarily.
-
Click 'OK'.

One-click Save Setup:
-
On the main MP Navigator EX window, point to 'One-click' icon.

-
On the Custom Scan with One-click sheet, click 'Save to PC' icon.
-
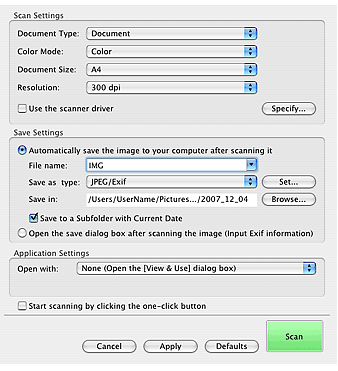
In Scan Settings, you can select the appropriate Document Type, Color Mode, Document Size and Resolution. You can also select Use the scanner driver to make advanced scan settings or Specify for simpler setting options.
-
In section Save Settings, select how to save the file.
- To save images automatically in the place where you specified in advance, click 'Automatically save the image to your computer after scanning it'.
- To select a file type to save the scanned image, select the appropriate type in the pop up.
- To specify where to save the image, click 'Browse' and select the appropriate drive and folder.