Printing from Memory Media
You can print data from a memory medium, such as an SD Card, by directly inserting it into the machine and selecting the desired image on the display. You do not need to connect the machine to your computer.
note:
The Direct Print function is available only for the Color imageCLASS MF9280Cdn.
Printing from Memory Media
1. Insert a memory medium into the slot.
2. Confirm that the access lamp has lit up.
3. Press  (Main Menu).
4. Use [  ] , [
] , [  ] or
] or  (Scroll Wheel) to select <Direct Print>, then press [OK].

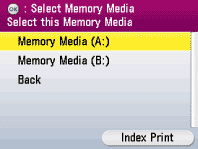
5. Use [ ] , [ ] or (Scroll Wheel) to select the memory medium that stores the data that you want to print, then press [OK].
6. Use [ ] , [ ] or (Scroll Wheel) to select the folder that contains the data that you want to print, then press [OK].
If you select data which is saved outside the folder, skip to step 8.

note:
If you want to select the data from the displayed images, press the left Any key to change the display method from <Folder/File Name Display> to <Image Display>, then press [OK].


You can select the desired data by sorting all data according to date or extension. If you want to sort data by date, see "Selecting Files by Date." If you want to sort data by extension, see "Selecting Files by Extension."
7. Use [ ] , [ ] or (Scroll Wheel) to select the data that you want to print, then press [OK].
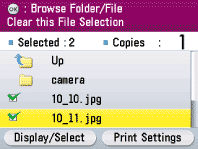
- In the <Image Display> mode, the screen below appears. Use [
 ] or [
  ] or (Scroll Wheel) to select the data that you want to print, then press [OK].

- You can select data by entering the desired copy quantity with
 -
-  (numeric keys) instead of pressing [OK].
- You can select multiple data at once from one folder.
note:
You can not select the data contained in other folders at once.
8. Press the right Any key to select <Print Settings>.

In the <Image Display> mode, the screen below appears.

9. Use [ ] , [ ] or (Scroll Wheel) to select the desired setting, then press [OK].
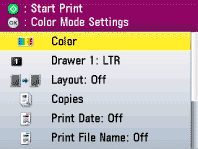
The followings are the settings that can be made:
- <Color>: Selects full color or B&W.
- <Drawer 1>: Selects paper for printing.
note:
You cannot set <Stack Bypass Tray> when the custom size is specified for the stack bypass tray.
- <Layout>: Specifies the layout.
note:
To make this setting, see the detailed procedures below.
- <Copies>: Selects print quantity.
- <Print Date>: Prints the shooting date on data.
note:
To make this setting, see the detailed procedures below.
- <Print File Name>: Prints the file name on data.
note:
To make this setting, see the detailed procedures below.
- <Vivid Photo>: Makes green and blue more lively.
- <Brightness>: Adjusts brightness.
- <Halftones>: Optimizes data for printing.
note:
- The <Halftones> default setting is <Auto>. <Gradation> is suitable for photos taken with a digital camera and <Error Diffusion> is suitable for scanned images. In <Auto> mode, printing from a memory card is automatically processed with <Gradation> and printing from USB memory is automatically processed with <Error Diffusion>. For optimal images, select <Error Diffusion> when printing scanned images stored in memory cards. When printing photos stored in a USB memory, select <Gradation>.
- Print settings cannot be specified to each file except for <Copies> (print quantity).
If you select <Layout>:
note:
- The print quantity is limited to one.
- Only JPEG data can be printed. Even if the selected files contain TIFF data, only JPEG data is printed.
- The print size is adjusted automatically to fit on one sheet of paper.
- The order of the images in the layout cannot be specified.
- This setting cannot be used with two-sided printing.
- A blank space for printing the date and file name is left below the printed image even if <Print Date> or <Print File Name> is set to <Off>.
1. Use [ ] , [ ] or (Scroll Wheel) to select the layout type, then press [OK].

2. Use [ ] , [ ] or (Scroll Wheel) to select <Yes>, then press [OK].

If you select <Print Date> or <Print File Name>:
note:
- Only JPEG data can be printed. Even if the selected files contain TIFF data, only JPEG data is printed.
- The file name can consist of up to 20 characters.
1. Use [ ] , [ ] or (Scroll Wheel) to select <On>, then press [OK].

10. Press  (Start) to start printing.
When printing is complete, remove the memory medium.
note:
Do not remove the memory medium when the access lamp is blinking. The blinking lamp indicates that the machine is accessing the data in the memory medium. The data may be damaged if you remove the memory medium at this point.
