How to burn a CD to backup images using ZoomBrowser EX ver. 5.x
You can copy or save images onto CD-R disks and CD-RW disks. The shooting information is saved along with the image.
IMPORTANT
- This feature is only possible with computers satisfying the following conditions.
-
- Windows XP is pre-installed
- A CD-R/RW drive is built-in
|
REFERENCE
- You can add additional images to a CD-RW disk that has been written to previously, as long as there is enough space.
|
1. Place a CD-R/RW disk in the drive.
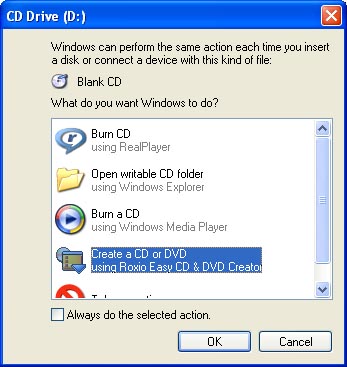
2. If a window like the one shown here appears, click [Cancel] and close the window.
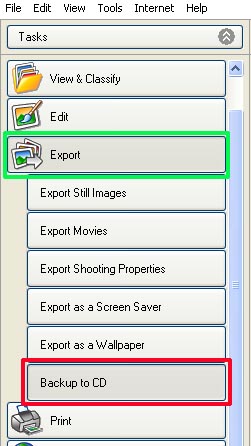
3. Click [Export] in the ZoomBrowser EX Main Window, followed by [Backup to CD].
- You can also save images to a CD by clicking the [File] menu and selecting [Backup to CD].
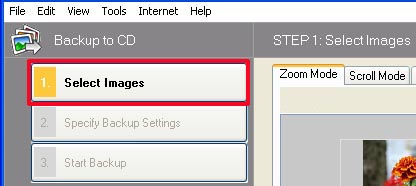
4. Confirm that [1. Select Images] is selected, and select the folder or image in the Browser Area.
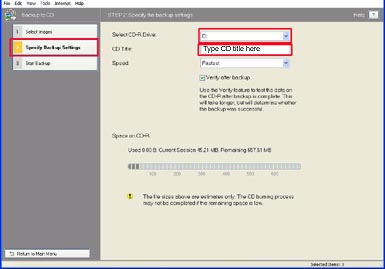
5. Click [2. Specify Backup Settings], select the destination CD-R/RW drive and input a CD title.

This back-up feature only allows data to be written to CD-R/RW and will not allow DVD burning. It should also be noted that there may be compatibility issues with DVD writing drives.
|
For more detailed information on the following options, click the respective link:
Select CDR Drive
CD Title
Speed
Verify after backup
Space on CDR
6. Click [3. Start Backup].
- This will copy the images to the CD-R/RW disk. The disk will be ejected from the drive when copying is complete.
Additional Information
Select CDR Drive - Select a CD-R drive from the drop down list.
Return to Step 5
CD Title - Specify a title for the CD in the text box. The existing CD title is displayed as the default.

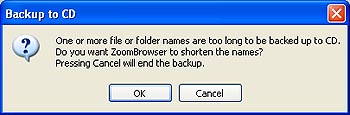
- A CD title cannot be longer than 11 characters. Any file name backed up cannot be longer than 64 characters.
- If a file name is too long, click [OK] on the following window to continue the backup process.
|
Return to Step 5
Speed - Select the speed to write the CD from the drop down list. The default is the last speed you selected. Fastest automatically chooses the fastest speed available depending on your drive and CD.
- Choosing a lower speed may increase backup time but will reduce the chance of errors.
|
Return to Step 5
Verify after backup - Turn verification on or off by checking or clearing this checkbox as required. The default is the previous setting.
-
On - Existing data files on the CD are saved to your hard disk before new files are added to the CD. After the new files have been added, all files are verified to ensure no data has been lost in the backup process. Note that only data accessed through standard Windows file operations can be verified.
-
Off - No files are verified.
Return to Step 5
Space on CDR - Space information for the current CD is displayed as a number. The number may be megabytes (MB), kilobytes (KB) or bytes (B).
-
Used - the blue part of the graphic indicates the number of MB/KB/B on the CD that have been used.
-
Current Session - the dark gray part of the graphic indicates the number of MB/KB/B required for backup in the current session. This is the space required for the folders and images you selected for backup.
-
Remaining - The pale gray part of the graphic indicates the space that will remain on the CD after this backup session is completed.
Return to Step 5
