If printed ruled lines are misaligned or print results aren't satisfactory, you can adjust the print head position.
 If the remaining ink level is low, the print head alignment sheet won't print correctly. You should first replace the FINE cartridge.
Before you begin
Print the alignment sheet
-
Make sure the printer power is ON.
-
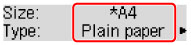
Load a sheet of A4 or Letter-sized plain paper in the paper tray (cassette).
-
When you insert the tray into the machine, a paper information registration screen displays on the printer panel. Select A4 or Letter for Size: and Plain paper for Type:, then press OK.
-
Pull out the paper support from the tray, and open the tray extension.
-
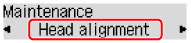
Press the Setup button, use the forward or back arrow  or
or  button to select Maintenance, then press OK.
-
Use the forward or back arrow or button to select Head alignment, then press OK.
The print head alignment sheet prints and looks similar to the image below.
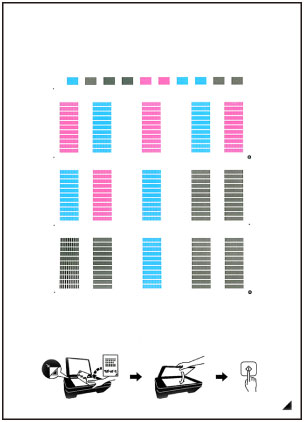
 Don't touch the printed part of the print head alignment sheet. If the sheet is stained or wrinkled, it may not scan properly.
If the print head alignment sheet doesn't print correctly, press the Stop button, then start again from the beginning.
Scan the alignment sheet
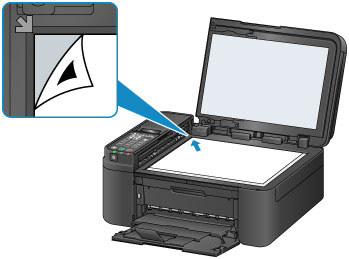
- Confirm the message on the printer screen, then load the printed alignment sheet on the glass surface of the printer.
The print head alignment sheet won't scan if you load it in the ADF (Auto Document Feeder).
-
Close the document cover gently, then press the Black or Color button. The machine scans the alignment sheet and automatically adjusts the print head.
Don't open the cover or move the alignment sheet until the adjustment finishes.
-
When the machine finishes, remove the sheet from the glass.
-
To check the current head position adjustment values, select Print align value from the Maintenance menu.
-
Print a test page that has both text and images. (You can print this instruction page since it has both.) If you still aren't satisfied with the results, follow one of the links below to manually align the print head.
Additional help
If print results are still not satisfactory after adjusting the print head position as described above, OR if the print head alignment process fails, adjust the print head position manually from a computer.

 at the bottom right of the sheet with the arrow mark near the glass surface
  .
.