
Setting the IP Address (LBP7200)
| Article ID: ART108861 | | | Date published: 05/11/2015 | | | Date last updated: 08/16/2015 |
Description
Solution
Setting the IP Address
There are three methods for setting the IP address.
If you changed the IP address of the printer after installing the printer driver, reset the port to be used for the printer driver.
For details on the procedure for setting a port, see "User's Guide" (HTML manual) in the CD-ROM supplied with the printer.
Setting the IP Address Using NetSpot Device Installer
If Windows Firewall is enabled
- It is recommended that you set the IP address using the ARP/PING command.
-
If you want to set the IP address using NetSpot Device Installer, you need to add "NetSpot Device Installer" to Windows Firewall in advance. Perform either of the following procedures.
- Adding "NetSpot Device Installer" to the [Exceptions] sheet in the [Windows Firewall] dialog box (For details on the procedure for adding "NetSpot Device Installer", see Readme of NetSpot Device Installer by clicking [
 ] in [NetSpot Device Installer for TCP/IP] in the [Additional Software Programs] screen in CD-ROM Setup.)
- Installing NetSpot Device Installer (You can add it to Windows Firewall during the installation.)
About the screenshots of NetSpot Device Installer
- The screenshots may be different from those actually you see on the screen.
How to install NetSpot Device Installer
- This section describes the procedure for using NetSpot Device Installer without installing it. For details on installing NetSpot Device Installer, see "User's Guide" (HTML manual) in the CD-ROM supplied with the printer.
1. Connect the LAN cable to the LAN connector of this printer.
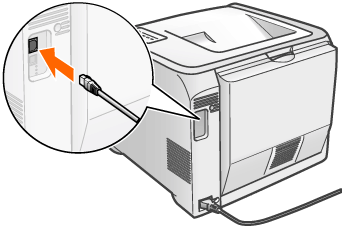
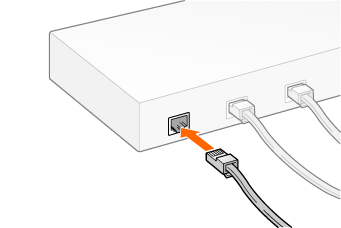
2. Connect the other end of the LAN cable to the hub.
3. Press the power switch to turn the printer on.

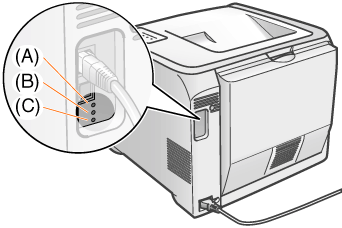
4. Make sure that the LNK indicator (B) on the printer's network board is on.
If the printer is connected by 10BASE-T
- If the LNK indicator (B) is on, the printer is connected properly.
If the printer is connected by 100BASE-TX
- If the LNK indicator (B) and 100 indicator (A) are on, the printer is connected properly.
note:
When all the indicators are off or when the ERR indicator (C) is on or blinking
- See "User's Guide" (HTML manual) in the CD-ROM supplied with the printer.
5. Turn on the computer and start Windows.
6. Log on as a user with administrative rights.
important:
If you are not sure about your administrative rights
Contact your system administrator.
7. Insert the supplied CD-ROM "LBP7200C User Software" into the CD-ROM drive of your computer.
If the CD-ROM is already in the drive, eject the disk and reinsert it into the drive.
m² CD-ROM Setup appears.
* It may take time to display CD-ROM Setup depending on your environment.
note:
If CD-ROM Setup does not appear
See "REFERENCE" at the end of this page.
If the [AutoPlay] dialog box appears
-
Click [Run AUTORUN.EXE].
If the [User Account Control] dialog box appears
-
Click [Continue] or [Yes].
8. Click [Additional Software Programs].
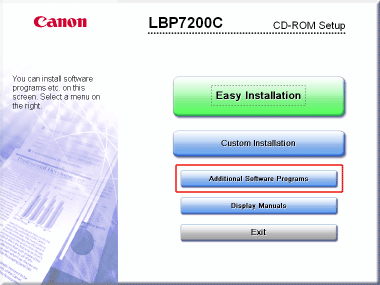
9. Click [Start] for [NetSpot Device Installer for TCP/IP].

m² NetSpot Device Installer runs, and the target printer search starts.
note:
If the [License Agreement] dialog box appears
Read the contents, and then click [Yes].
If the [User Account Control] dialog box appears
-
Click [Continue] or [Yes].
10. Set the IP address.
 If [Status] is set to [Not Configured], and the device of which [Device Name] is a MAC address is displayed
10-A-1. See Help of NetSpot Device Installer and specify the initial settings for the IP address.
* Help is displayed by clicking [Help] in the [Help] menu.
note:
If you changed the IP address after installing the printer driver
Specify the port to be used again in the printer driver. For details on the procedure for setting a port, see "User's Guide" (HTML manual) in the CD-ROM supplied with the printer.
If any devices in which [IP Address] is set to [192.168.0.215] are displayed
10-B-1. Select the device.
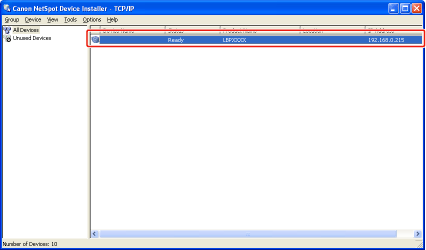
10-B-2. Select [Protocol Settings] from the [Device] menu.
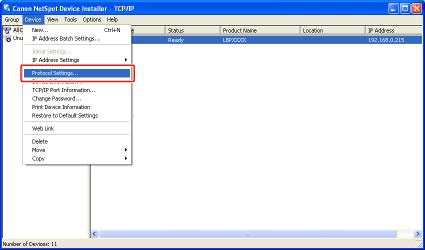
10-B-3. Set the IP address.
(1) Specify each setting.
(2) Click [OK].
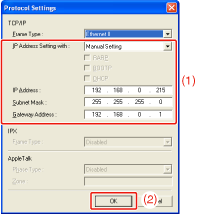
[IP Address Setting with]: Select the method for setting the IP address.
[Manual Setting]: Allows you to set the IP address directly. The IP address entered in [IP Address] is set for the printer.
-
[Auto Detect]: Obtains an IP address using RARP, BOOTP, or DHCP.
-
[RARP]: Obtains an IP address using RARP. (The RARP daemon needs to be running.)
-
[BOOTP]: Obtains an IP address using BOOTP. (The BOOTP daemon needs to be running.)
-
[DHCP]: Obtains an IP address using DHCP. (The DHCP server needs to be running.)
[IP Address]: Enter the IP address of the printer.
[Subnet Mask]: Enter the subnet mask as needed.
[Gateway Address]: Enter the gateway address as needed.
note:
When selecting [RARP]
- You cannot enter any values in [IP Address].
When selecting [BOOTP] or [DHCP]
-
You cannot enter any values in [IP Address], [Subnet Mask], and [Gateway Address].
If RARP, BOOTP, or DHCP cannot be used
-
Select [Manual Setting].
10-B-4. When the message <The device has been reset.> appears, click [OK].
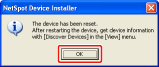
m² To perform a reset operation properly, wait for approximately 20 seconds or longer as is after clicking [OK].
After completing the reset, the settings are enabled.
note:
If you changed the IP address after installing the printer driver
Specify the port to be used again in the printer driver. For details on the procedure for setting a port, see "User's Guide" (HTML manual) in the CD-ROM supplied with the printer.
If your case falls within neither of the above cases
A device on the network may have the same IP address as that set for the printer. In this case, perform the following procedure.
10-C-1. Turn off the device that has the same IP address or remove the device from the network.
10-C-2. Repeat the procedure from the beginning.
10-C-3. After completing the settings for this printer, restore the devices to their original states.
* If you cannot set the IP address using NetSpot Device Installer including the case where this procedure is not possible, set the IP address using the ARP/PING command.
Setting the IP Address Using the ARP/PING Command
1. Connect the LAN cable to the LAN connector of this printer.
2. Connect the other end of the LAN cable to the hub.
3. Press the power switch to turn the printer on.
4. Make sure that the LNK indicator (B) on the printer's network board is on.
If the printer is connected by 10BASE-T
If the LNK indicator (B) is on, the printer is connected properly.
If the printer is connected by 100BASE-TX
-
If the LNK indicator (B) and 100 indicator (A) are on, the printer is connected properly.
note:
When all the indicators are off or when the ERR indicator (C) is on or blinking
See "User's Guide" (HTML manual) in the CD-ROM supplied with the printer.
5. Turn on the computer and start Windows.
6. Log on as a user with administrative rights.
important:
If you are not sure about your administrative rights
Contact your system administrator.
7. Run Command Prompt.
From the [Start] menu, select [All Programs] or [Programs] m² [Accessories] m² [Command Prompt].
8. Enter "arp -s <IP address> <MAC address>", then press the [ENTER] key on your keyboard.
<IP address>: Enter the IP address to assign to the printer. Specify the address with four numbers (from 0 to 255) separated with a period (.).
<MAC address>: Enter the MAC address of the printer. Separate the number every two digits with a hyphen (-).
Input Example: "arp -s 192.168.0.215 00-00-85-05-70-31"
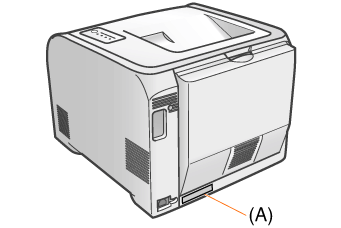
note:
MAC address location
The MAC address is listed at (A) on the printer.
9. Enter "ping <IP address> -l 479", then press the [ENTER] key on your keyboard.
<IP address>: Enter the same IP address as the one entered in Step 8.
* Enter a lowercase "L" for "-l".
Input Example: "ping 192.168.0.215 -l 479"
m² The IP address is set for the printer.
* The subnet mask and gateway address are set to [0.0.0.0].
10. Enter "exit", then press the [ENTER] key on your keyboard.
m² Command Prompt closes.
note:
If you changed the IP address after installing the printer driver
Specify the port to be used again in the printer driver. For details on the procedure for setting a port, see "User's Guide" (HTML manual) in the CD-ROM supplied with the printer.
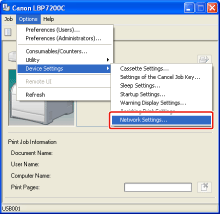
Setting the IP Address Using the Printer Status Window
1. Display the Printer Status Window.
Click [  ] in the Windows taskbar, and then select the printer name.

note:
When displaying the Printer Status Window from the printer driver
Click [  ] (Display Printer Status Window) in locations such as in the [Page Setup] sheet.
2. From the [Options] menu, select [Device Settings] m² [Network Settings].
3. Set the IP address.
(1) Specify each setting.
(2) Click [OK].
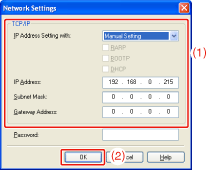
[IP Address Setting with]: Select the method for setting the IP address.
[Manual Setting]: Allows you to set the IP address directly. The IP address entered in [IP Address] is set for the printer.
-
[Auto Detect]: Obtains an IP address using RARP, BOOTP, or DHCP.
-
[RARP]: Obtains an IP address using RARP. (The RARP daemon needs to be running.)
-
[BOOTP]: Obtains an IP address using BOOTP. (The BOOTP daemon needs to be running.)
-
[DHCP]: Obtains an IP address using DHCP. (The DHCP server needs to be running.)
[IP Address]: Enter the IP address of the printer.
[Subnet Mask]: Enter the subnet mask as needed.
[Gateway Address]: Enter the gateway address as needed.
[Password]: Enter the administrator password for the printer (the password that is specified in the Remote UI). If the password is not specified, it is not required to enter any value.
note:
When selecting [RARP]
You cannot enter any values in [IP Address].
When selecting [BOOTP] or [DHCP]
-
You cannot enter any values in [IP Address], [Subnet Mask], and [Gateway Address].
If RARP, BOOTP, or DHCP cannot be used
-
Select [Manual Setting].
If you changed the IP address after installing the printer driver
-
Specify the port to be used again in the printer driver. For details on the procedure for setting a port, see "User's Guide" (HTML manual) in the CD-ROM supplied with the printer.
reference:
If CD-ROM Setup does not appear
Display it using the following procedure. (The CD-ROM drive name is indicated as "D:" in this manual. The CD-ROM drive name may differ depending on the computer you are using.)


1. From the [Start] menu, select [Run].
2. Enter "D:\English\MInst.exe."
3. Click [OK].


1. Enter "D:\English\MInst.exe" in [Start Search] or [Search programs and files] under the [Start] menu.
2. Press the [ENTER] key on the keyboard.