Batch Scanning
Save the captured image data in the specified folder. You can also save it as a PDF file
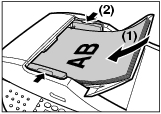
- Place the documents in the Automatic Document Feeder (ADF)
- To scan using the ADF, remove any documents from the platen glass.
- Open the document tray.
- Insert the documents face-up in the ADF (1) and then adjust the document guides (2).
Note:
When scanning using the ADF, the documents will automatically feed.
- On the Windows desktop, double-click 'MP Navigator 1.0'.
- Alternatively, on the Windows taskbar, click 'Start', point to '(All) Programs', 'Canon', then 'MP Navigator 1.0'.
- Then click 'MP Navigator 1.0'. MP Navigator opens.
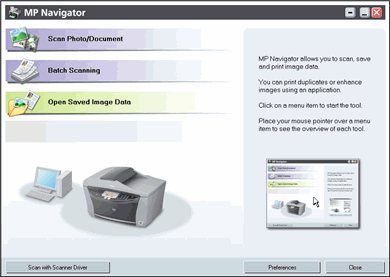
- Click 'Batch Scanning'.
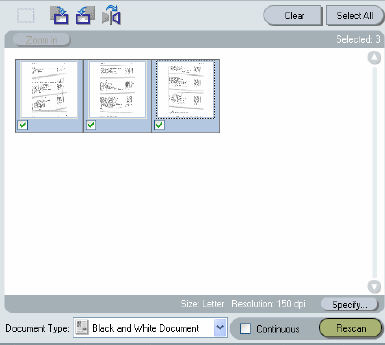
The below MP Navigator window will appear.
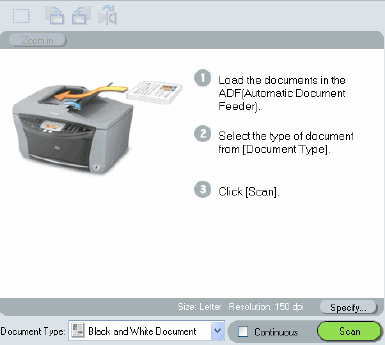
- Make setting changes such as Document Type or Specify. To scan multiple documents from the platen glass, Continuous Scan must be selected.
Document Type (drop-down arrow)
Select a document type to be scanned from Color Document, Black and White Document and Text (OCR).
Specify (button)
Change advanced settings for scanning such as Document Type, Document Size, Scanning Resolution, Reduce moire and Enhance contours.
Continuous (check box)
Check this to scan multiple documents continuously.Scan the images into MP Navigator, then select them in the preview area.
- After making the setting changes, click 'Scan'.
- When Continuous Scan is selected and the first document is scanned, a dialog box will appear indicating to load the next document.
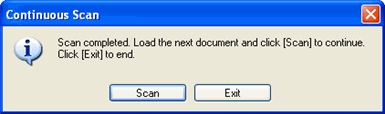
- After the next document is loaded, click 'Scan'.
- Repeat steps 8a and 8b until all documents have been scanned and then click 'Exit' to end the scanning process.
- After all documents have been scanned, ensure the documents, in the preview area, are selected (have a check mark).
- Click 'Save to PC' or 'Save as PDF file'. Save to PC is displayed when an image is captured with Scan Photo/Document or Batch Scanning.
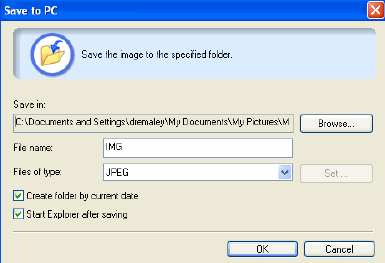
Save to PC dialog box

Save as PDF file dialog box
- Make settings to save a file. (Click File save settings for details.)
- Click 'OK' after all settings have been selected.
- Save in
Display the destination folder to save the scanned image. To change the destination, click 'Browse' and specify the destination folder. The MP Navigator folder in the My Pictures (Windows 98: My Documents) folder is specified by default.
- File name
Enter the file name of the image to be saved up to 32 characters long. When saving multiple files, 4 digits are appended to the file name.
- Files of type
Select a file type to save the captured image. JPEG, TIFF, BMP, PDF and Multi Page PDF are available on the Save to PC screen. PDF and Multi Page PDF are available on the Save as PDF file screen.
You cannot select 'PDF' or 'Multi Page PDF' when selecting an image scanned at 6000 pixels or more in a vertical direction. Multi Page PDF is displayed when multiple images are selected. You cannot select 'JPEG' when Document Type is Text (OCR).
- Set
A setting is made to save a file as a searchable PDF file.
You can configure these settings when Files of type is PDF or Multi Page PDF.
- Create folder by current date
Select whether to create a subfolder named with the current date (for example, '2004_10_01') to save the scanned image in.
- Start Explorer after saving
Use this to set whether to open the destination folder by starting Explorer.
- Start PageManager after saving
Use this to set whether or not to start PageManager after saving the scanned image.
PDF file setting
Configure the indexing settings when saving as a PDF file.

- Enable keyword search
Checking this setting converts characters in a document to text data to enable an easy search by keyword.
- Document Language
Select a language for the text data to create a keyword searchable PDF.
You can select this setting when Enable keyword search is selected.
