Acquire Text
The following instructions will give you the basic instructions to acquire text from a scanned document in Office Word 2007 using OmniPage SE.
- Ensure the Canon scanner driver and OmniPage SE are installed and that your scanner has been setup.
Note:
* If OmniPage SE is not installed, the required Add-in for Office Word 2007 will not be installed.
* It may be necessary to reboot your computer after OmniPage SE is installed.
- Place the document(s) to scan on the platen or on the Automatic Document Feeder (ADF) (if applicable).
- Open Office Word 2007.
- From the ribbon menu, select the 'Add-Ins' tab.

- In the Add-Ins tab, click 'OmniPage' and then select 'Acquire Text Settings (OmniPage SE)'.
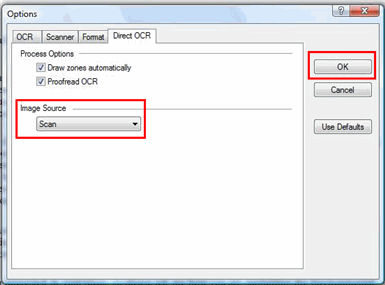
The Options window will open.

- On the Direct OCR tab, click the 'Image Source' drop-down to select 'Scan'.

- Confirm 'Scan' is shown in Image Source section and then click 'OK'.
The Options window will close and you'll return to Office Word 2007.
Note: If a scanner has not been previously setup, then the Scanner Setup Wizard may appear. The Scanner SetupWizard can also be started manually. Click Here for more information.
- Click 'OmniPage' and select 'Acquire Text (OmniPage SE)' to scan your document.

- After the document(s) is scanned, make corrections to the text items as appropriate.
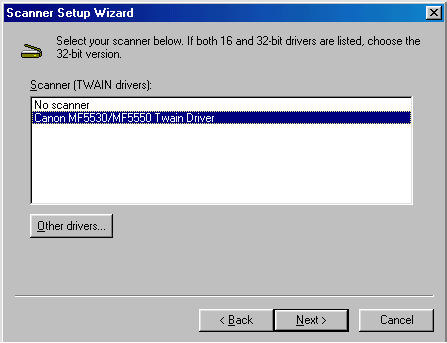
If you are unable to scan with the Automatic Document Feeder using the Twain driver in Omnipage, you need to run the OmniPage Scanner Wizard first.
- Click on [Start], [Programs], [ScanSoft OmniPage SE 2.0], then [Scanner Wizard].

- Click [Next].

- Choose [Twain}, then click [Next].

If the Twain driver is not listed, click on [Other drivers...] and add it.
- Click [Yes], then [Next] to test the scanner.

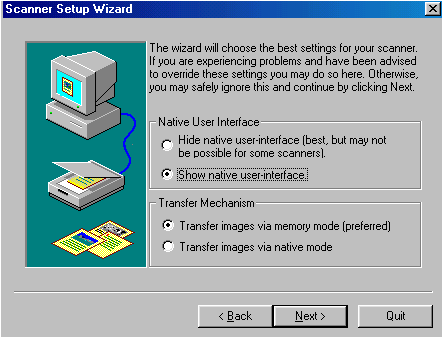
- Put the "check mark" in [Configure Advanced Settings], then click [Next].

- Choose "Show native user-interface" and then click [Next].
- Click [Next].

- Make sure there is a "checkmark" in the box marked "with automatic document feeder (ADF)".

- Click on [Next] for the next four windows and then click [Finish].
- Now you will be able to put a "checkmark" in the box "Use Automatic Document Feeder".

