Software Installation for the Network Connection Environment
Please choose an item below:
note:
- The following procedures are explained using sample screens from Windows XP Professional.
- The screen may differ according to the operating system, as well as the type and version of the printer driver.
- For Windows 2000/XP/Server 2003/Vista/Server 2008, log on as an Administrator to install the software.
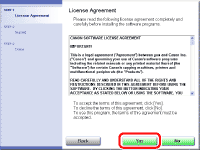
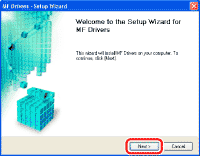
- Click on the circled button on each screen to proceed to the next step.
- Make sure the machine is turned ON.
- Make sure the network cable is connected to the machine.
- Make sure an IP address is assigned to the machine.
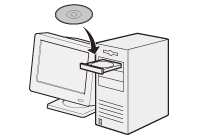
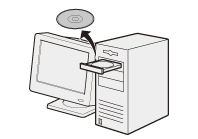
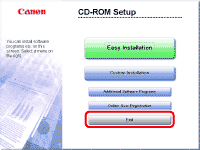
1. Insert the User Software CD-ROM.
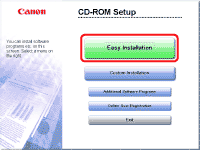
2.
note:
If the CD-ROM Setup screen is not displayed, click [start] on the Windows task bar -> [My Computer].
Windows Vista/Server 2008: click [Start] on the Windows task bar -> [Computer].
Windows 2000: double-click [My Computer] on the Windows desktop.
Right-click on the CD-ROM icon and select [Open], then double-click [MInst] ([MInst.exe]).
3.
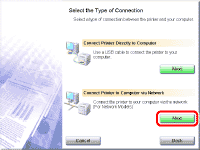
While installing the software on a computer running Windows Server 2003/2008, the display in this step does not appear.
4.
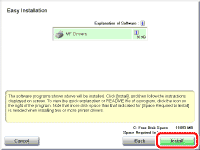
5.
6.
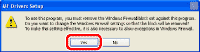
note:
If the firewall is applied to the operating system, the dialog box below appears.
Click [Yes] and continue the installation.
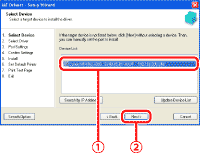
7. Select your machine on the list. Make sure that the machine name is highlighted and click [Next>].
 Select your machine on the list. Make sure that the machine name is highlighted.
  Click [Next>].
note:
The machine name displayed on this screen varies depending on the model of your machine.
8. Select the driver you want to install.
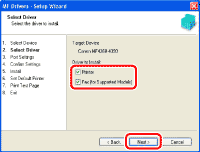
Select [Printer and [Fax (for Supported Models)]
note:
The machine name displayed on this screen varies depending on the model of your machine.
9.
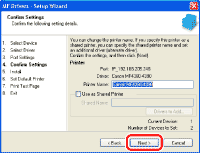
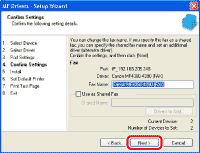
note:
- When you share the printer with Windows 2000/XP/Server 2003/Vista/Sever 2008, select [Use as Sheared Printer]. If necessary, you can change the name of Shared printer. If you want to set the operating system on which driver will run, click [Driver to add] to install an alternate driver so that the driver can be installed on a client pc via a network.
- The machine name displayed on this screen vary depending on the model of your machine.
10.
note:
The machine name displayed on this screen varies depending on the model of your machine.
11.
note:
The machine name displayed on this screen varies depending on the model of your machine.
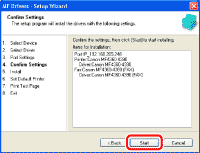
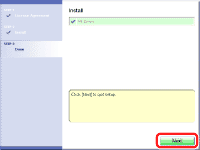
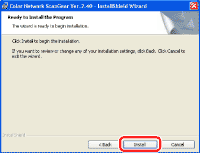
12.
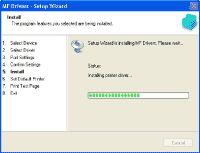
13.
note:
The machine name displayed on this screen varies depending on the model of your machine.
14.

A printer test page is printed out from the machine.
note: The machine name displayed on this screen varies depending on the model of your machine.
15.
16.
17.
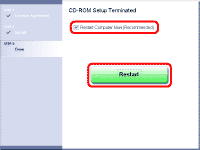
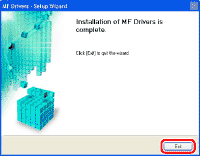
18. Remove the User Software CD-ROM. Installation is complete.
note:
If you have several computers that you want to connect to the machine through a network, repeat the procedure from step 1 for each computer.
Top
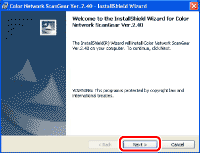
1. Insert the User Software CD-ROM.

2.
note:
- If the CD-ROM Setup screen is not displayed, click [start] on the Windows task bar -> [My Computer]. Windows Vista: click [Start] on the Windows task bar -> [Computer]. Windows 2000: double-click [My Computer] on the Windows desktop. Right-click on the CD-ROM icon and select [Open], then double-click [MInst] ([MInst.exe]).
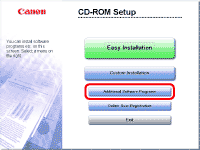
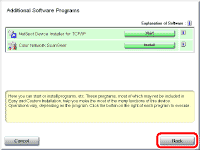
- To install the Color Network ScanGear on Windows Server 2008, click [Start] on the Windows task bar -> [Computer] -> right-click on the CD-ROM icon and select [Open], -> [Color_Network_ScanGear] -> [Driver] -> double-click [SetUp] ([Setup.exe]), then proceed to step 4.
- Note that [Additional Software Programs] may not appear on the screen depending on the language. Even in such a case, start the Color Network ScanGear by the above procedures and go to Step 4.
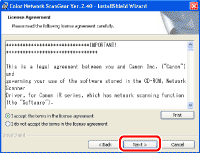
3.
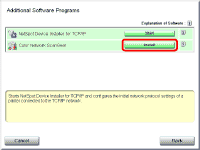
4.
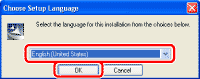
Select the same language as your operating system.
note: If you selected a language that is not same as your operating system, the characters may be garbled.
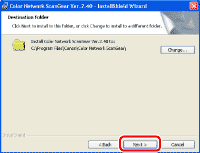
5.
6.
7.
8.
9.
The Readme file opens. After reading it, close the window.
10.
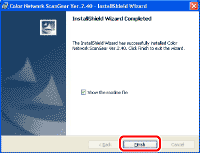
11.
12. Remove the User Software CD-ROM. Installation is complete.

Top
Verify that the driver has been installed successfully and that the machine has been set as the default printer.
note: If the machine name is selected on the [Printer] screen from an application, it is set as the default printer.
1. Open the [Printers and Faxes] folder (for Windows 2000: The [Printers] folder).
Windows XP/Server 2003: From the Windows task bar, click [start] -> select [Printers and Faxes].
Windows Server 2008: From the Windows task bar, click [Start] -> select [Control Panel] -> double-click [Printers].
Windows Vista: From the Windows task bar, click [Start] -> select [Control Panel] -> [Hardware and Sound] -> double-click [Printers].
Windows 2000: From the Windows task bar, click [Start] -> [Settings] -> [Control Panel] -> double-click [Printers].
Verify that the corresponding printer driver icon is displayed.
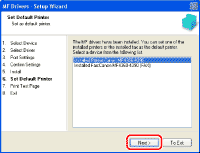
2. Set your machine as the default printer.
Select the printer icon for this machine, then select [Set as Default Printer] from the [file] menu.
3. Verify that [Color Network ScanGear] is displayed in the program list.
Windows XP/Server2003: From the Windows task bar, click [start] on the Windows task bar -> select [All Programs].
Windows Vista/Server2008: From the Windows task bar, click [Start] on the Windows task bar -> select [All Programs].
Windows 2000: From the Windows task bar, click [Start] -> [Programs].
Verify that the [Color Network ScanGear] is listed in [All Programs] (or [Programs]).
Top
