Front View (With the Feed Tray Open)
.jpg)
- Eject Support
Open this when scanning documents that are 150 mm (A5 horizontal) or longer.
- Eject Support Extension
Extend this when scanning documents that are longer than 279 mm (LTR, vertical).
- Feed Support
Extend this when loading documents that are longer than 216 mm (LTR horizontal).
- Document Guides
Align the document guides with both edges of the document to ensure that the document feeds straightly.
- Document Feed Tray
Place the document.
- OPEN Lever
Raise this to open the upper unit.
- Eject Stopper
Raise this to stop the leading edge of ejected documents and prevent them from falling off of the scanner.
- Document Eject Tray / Upper Unit
Scanned documents are output here.
Open this when cleaning the inside of the scanner or replacing rollers.
- Operating Panel
A range of scanning operations can be performed with this, such as starting and stopping scans, executing registered jobs, and canceling double feed detection.
- Power button
Press this to turn on the scanner. The button remains lit while the power is on.
Press and hold the button until the light goes out to turn off the scanner.
The power button lights or flashes as follows depending on the scanner status.
| Power Button Indication |
Description |
| Lit |
Power is on |
| Flashing |
Sleep mode |
- Feed Selection Lever
Use this to change the way documents are fed.
Set this lever to the lower position when scanning documents consecutively.
Set the lever to the upper position when scanning documents one page at a time or scanning multi-page documents that are fastened together.
- LED Indicator (Orange)
This lights during non separation feeding mode.
- Document Guides
Align the document guides with both sides of the document to ensure that the document feeds straight.
Back View
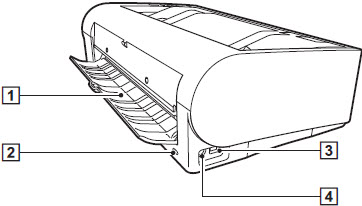
- Straight Path Tray
When using the straight path, scanned documents are output here.
- Kensington Slot
Connect an anti-theft key chain or the like.
- USB Connector
Connect the supplied USB cable to this connector..
- Power Connector
Connect the supplied AC adapter to this connector.
Operating Panel
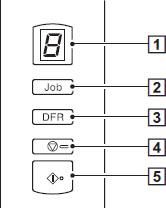
- Job No. Indicator
This displays the number of the job selected with the operating panel, errors, and other information.
- Job Select Button
This selects registered jobs. Every time the button is pressed, the Job No. displayed in the Job No. Indicator changes..
- DFR (Double Feed Release) Button
This is lit when a document double feed is detected. Pressing this button cancels the double feed detection function, allowing you to continue scanning.
- Stop Button
This stops active jobs.
- Start Button
This executes the job displayed in the Job No. indicator..
Displayed Error Codes
When a scanning error occurs, the following error codes are displayed in the Job No. indicator.

: displayed when the upper unit is open.

: displayed when a paper jab is detected.

: displayed when a double feed is detected while scanning.

: displayed when skewed documents, staples, or feed errors are detected.

: displayed for other errors.
Other Displays
When the straight path tray is opened or closed, the eject method is displayed in the Job No. Indicator.

: flashes during straight path mode.

: animates during U-turn path mode.
