
Transferring Recordings and Photos to an FTP Server Using a Wireless Connection (XF705)
| Article ID: ART172467 | | | Date published: 11/13/2018 | | | Date last updated: 12/11/2018 |
Description
Transferring Recordings and Photos to an FTP Server Using a Wireless Connection (XF705)
Solution
| Solution |
You can transfer clips from the camcorder to another device connected to the network, using the FTP protocol.
The following explanations assume that the FTP server is on, ready and correctly configured.
FTP Server and Transfer Settings Before you can transfer clips to a connected device, you need to configure the FTP server settings and other settings related to the handling of folders and files. If necessary, consult the network administrator in charge of the FTP server.
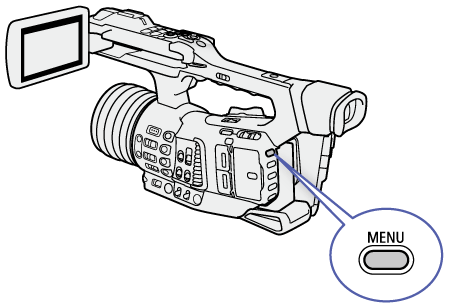
1. Press and hold the button on the POWER switch and set the switch to ON.

2. Press the MEDIA button.

3. Press the MENU button.
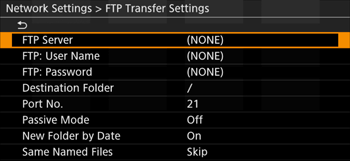
4. Select [FTP Transfer Settings].
[

 Network Settings] -> [FTP Transfer Settings] Network Settings] -> [FTP Transfer Settings]
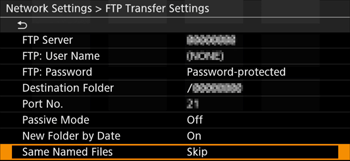
5. To enter the destination FTP server, select [FTP Server] and then press SET.
6. Enter the FTP serverâs IP address or host name using the keyboard screen.

* For more information on using the keyboard, please refer to ''Using the Virtual Keyboard Screen''.
7. Enter the [FTP: User Name], [FTP: Password], and [Destination Folder] in the same way.
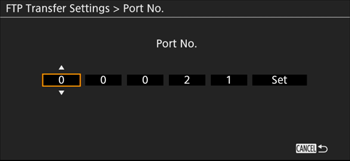
8. To change the port number, select [Port No.] and then press SET.
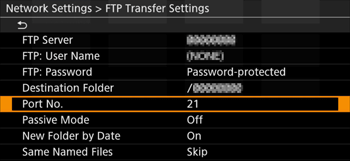
9. To activate the passive mode, select [Passive Mode].

10. Select the desired option and then press SET.

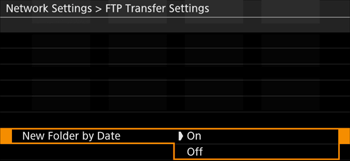
11. To select whether to create a new folder for every transfer date, select [New Folder by Date].

12. Select the desired option and then press SET.
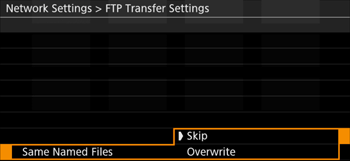
13. To select how to handle file transfers when a file with the same name already exists, selects [Same Named Files].
14. Select the desired option and then press SET.
15. Select [Connection Settings].
[
Network Settings] -> [Connection Settings]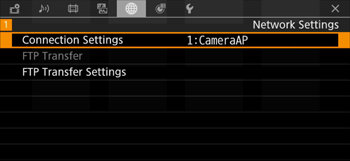
16. Select the desired network configuration profile and then select [Infrastructure].
Network configuration profile ([1:] to [4:]) -> [Edit] -> [Infrastructure]

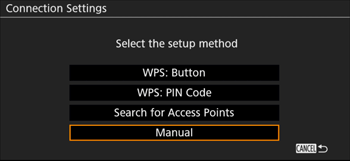
17. Continue the setup with the procedure corresponding to the method you wish to use.
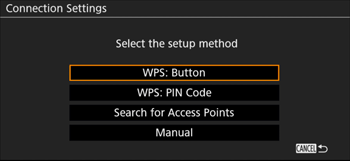
Wi-Fi Protected Setup (WPS) Wi-Fi Protected Setup (WPS) is the easiest way to set up a Wi-Fi access point. You can do simply by pushing a button (if the access point (wireless router) you want to connect to has a WPS button) or using a PIN code issued by the camcorder.
1. Select the desired option and then press SET.

2A. [WPS: Button]

2B. [WPS: PIN Code]
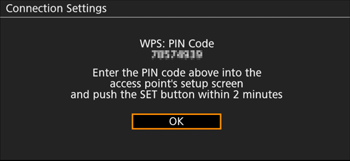
* For most wireless routers, you must use a Web browser to access the setup screen.
3. Within 2 minutes, press SET.
4. Select the method for assigning the IP address ([Automatic] or [Manual]) and then press SET.

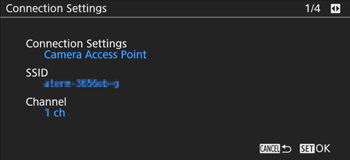
5. Push the joystick left/right to review all the information before pressing SET.

6. Enter a name for the new network configuration profile.
[Input] -> Enter the desired name using the keyboard screen -> [OK]

* For more information on using the keyboard, please refer to ''Using the Virtual Keyboard Screen''.
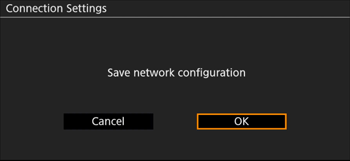
7. Select [OK] and then press SET to save the network configuration.

8. When the confirmation screen appears, press SET.
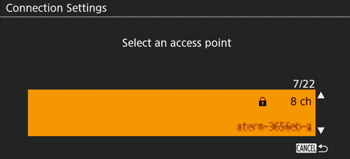
Searching for Access Points The camcorder will automatically detect access points in the vicinity. After you select the desired access point, you only need to enter the selected networkâs password to connect the camcorder. For details about the access pointâs network name (SSID) and password refer to the wireless routerâs instruction manual or consult the network administrator in charge of the access point.
1. After you select [Search for Access Points], the camcorder will search for active access points in the vicinity and display a list of available options on the screen.
2. Push the joystick up/down to select the desired access point and then press SET.
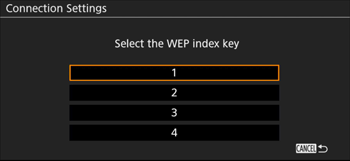
3. If necessary, select the WEP index key.
4. Enter the encryption key (password).
[Input] -> Enter the password using the keyboard screen -> [OK]
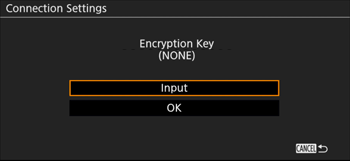
* For more information on using the keyboard, please refer to ''Using the Virtual Keyboard Screen''.

5. Select the method for assigning the IP address ([Automatic] or [Manual]) and then press SET.
6. Push the joystick left/right to review all the information before pressing SET.
7. Enter a name for the new network configuration profile.
[Input] -> Enter the desired name using the keyboard screen -> [OK]
* For more information on using the keyboard, please refer to ''Using the Virtual Keyboard Screen''.
8. Select [OK] and then press SET to save the network configuration.
9. When the confirmation screen appears, press SET.
Manual Setup If you prefer, you can enter manually the details of the Wi-Fi network you want to connect to. Follow the instructions on the screen to complete the procedure.
1. Enter the access point's SSID (network name).
[Input] -> Enter the network name using the keyboard screen -> [OK]
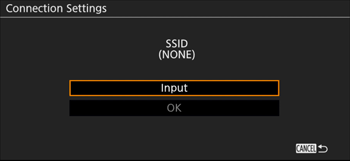
* For more information on using the keyboard, please refer to ''Using the Virtual Keyboard Screen''.
2. Select the authentication method and then press SET.
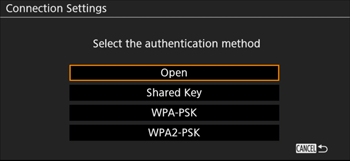

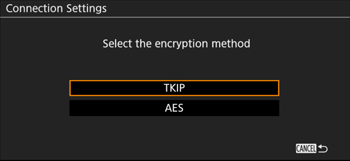
3. Select the WEP index or encryption method, depending on the selected authentication mode.
4. Enter the encryption key (password).
[Input] > Enter the password using the keyboard screen > [OK]

* For more information on using the keyboard, please refer to ''Using the Virtual Keyboard Screen''.
5. Select [OK] and then press SET.
6. Select the method for assigning the IP address ([Automatic] or [Manual]) and then press SET.
7. Push the joystick left/right to review all the information before pressing SET.
8. Enter a name for the new network configuration profile.
[Input] -> Enter the desired name using the keyboard screen -> [OK]
* For more information on using the keyboard, please refer to ''Using the Virtual Keyboard Screen''.
9. Select [OK] and then press SET to save the network configuration.
10. When the confirmation screen appears, press SET.
Transferring Clips (FTP Transfer)
1. Press the INDEX button.

2. Open the index screen with the clips you want to transfer.
3. Select the desired clip and then press SET to open the clip menu.
4. Select [FTP Transfer] and then press SET.
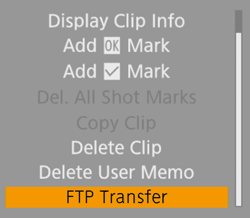
5. When the confirmation message appears, press SET.
7. When the confirmation message appears, press SET.
Using the Virtual Keyboard Screen The virtual keyboard will appear on the screen. The layout may differ slightly depending on the function.
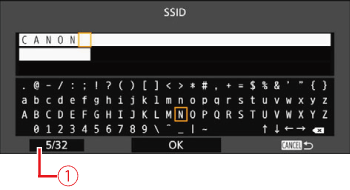
 : Current character / Character limit : Current character / Character limit
1. Use the joystick to select a character and then press SET to add it.
2. After entering the desired text, select [OK] and then press SET to close the keyboard screen.
|
|
ID: 8204262100_EN_1
|
|
 /
/  /
/  /
/  ) to change the position of the cursor and the backspace character (
  ) to delete the last character entered.
SIMS Doc Id
8204262100