|
You can connect your camera to a printer and print using Wi-Fi.
When establishing a wireless connection with a printer, you can either use the camera as an access point (Camera Access Point Mode) or use another access point.
IMPORTANT
- This camera requires a PrintBridge-compatible printer (supporting DPS over IP) for printing via Wi-Fi.
NOTE
- Connections require that a memory card with saved images be inthe camera.
- Follow these instructions when using the camera as an access point.
Connecting your camera and printer via Wi-Fi Register the printer you want to connect to using Wi-Fi.
1. Press the <Playback> (  ) button to turn the camera on.
2. Touch [Wi-Fi].

NOTE
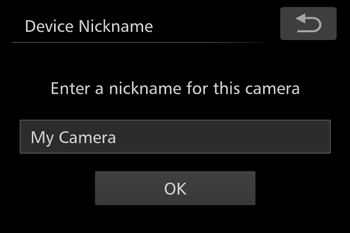
When making Wi-Fi settings for the first time, a screen will appear for you to register a nickname for the camera.
This nickname will be displayed on the screen of target devices when connecting to other devices via Wi-Fi.
Touch within the frame and then enter a nickname with the displayed keyboard.
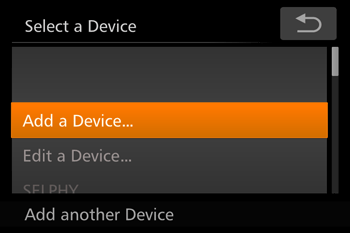
3. Touch [  ] or [  ] or drag left or right across the screen to choose [  ].

4. Drag up or down across the screen to choose [Add a Device].
NOTE
- Once a printer is added, the printer name will be displayed on the screen in step 4. To connect to a printer again, simply choose the printer name from the list.
- Once you have connected to devices via the Wi-Fi menu, recent destinations will be listed first when you access the Wi-Fi menu. You can easily connect again by choosing the device. You can register new devices by dragging left or right to access the device selection screen.
- If you prefer not to display recent target devices, touch [FUNC.], and then choose [MENU] > [
 ] tab > [Wi-Fi Settings] > [Target History] > [Off]. ] tab > [Wi-Fi Settings] > [Target History] > [Off].
- Once you have assigned a connection destination to Touch Actions, you can prepare the camera to reconnect to the destination simply by dragging across the screen with the assigned gesture.
5. Choose the displayed SSID (network name) from the printer's Wi-Fi setting menu.
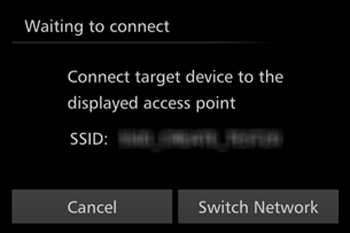
6. Once the printer is ready for the connection, touch the printer name when it is displayed on the camera.
- When the printer has been added successfully, the printing screen will be displayed.

Printing Images 7. Drag left or right across the screen to choose an image to print.
Touch [FUNC. ], and then touch [ Print] (  ).

8. The printing screen appears.
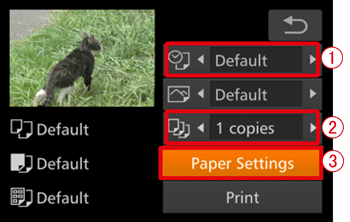
 To add the date, touch [ ] or [ ] to choose [Date], and configure the setting.
 Touch [ ] or [ ] to choose the number of copies to print.
 Touch [Paper Settings].
9. The paper size setting screen appears.

Touch an option to choose it, and then touch [Next].
[Default] has been selected in the example image above.
10. The paper type setting screen appears.
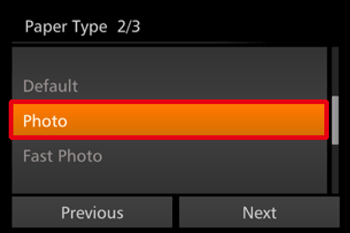
Touch an option to choose it, and then touch [Next].
[Photo] has been selected in the example image above.
11. The layout settings screen appears.
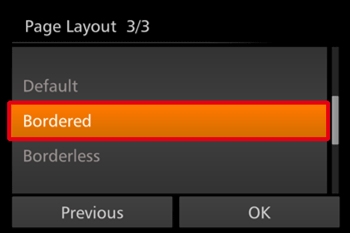
Drag up or down to choose an option, and then touch [OK].
[Bordered] has been selected in the example image above.
12. The print settings screen appears again.
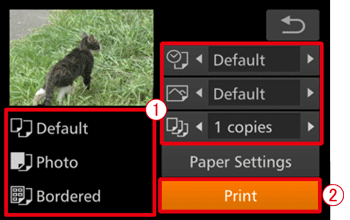
Make sure that the settings are correct.
Touch [Print] to begin printing.
To disconnect, touch [  ] in the upper right, and then touch [OK] on the confirmation screen.
IMPORTANT
For printers or items which cannot be set, the standard settings of the printer applies to printing. For the standard settings of the printer, confirm the instruction manual of the printer in use.
|