
Copying a two-sided (or two sides) document (MG6220)
| Article ID: ART111535 | | | Date published: 05/11/2015 | | | Date last updated: 08/17/2015 |
Description
Solution
Two-Sided Copying
To copy a two-sided document (or, to copy a single two-sided document) onto one sheet of paper, you will need to reload the document and the paper to copy the second document on the back of the first printed copy.
| Two-sided Original |
|
| Two Single-sided Documents |
|


- Make sure that the machine is turned on.
-
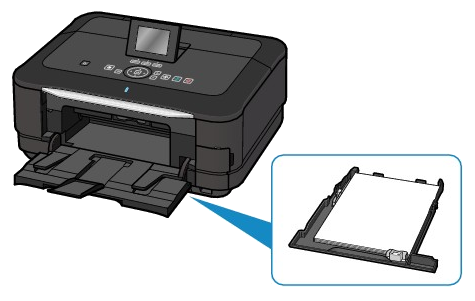
Load paper.
- You can load letter-size plain paper in the cassette
- Or, you can load letter-size plain paper in the rear tray.
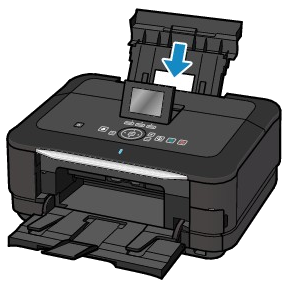
- If you do load plain paper in the rear tray, click here to change Plain paper feed settings to Rear tray.
- You can load letter-size plain paper in the cassette
- Select
 Copy on the HOME screen.
The Copy standby screen is displayed. - Load the original on the platen glass.
- Press the [+] or [-] to select the number of copies.

- Press the right Function button (2) (Print settings) to view the Standard copy menu options.
On the Print settings screen, you can change the settings of page size, media type, and print quality and so on.
-> Refer to [ Setting Items ] within this webpage. -
Select 2-sided copy options.
- Press the
 up or
up or  down button to highlight 2-sided option.
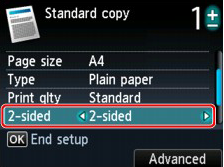
- Press the
 left or
  right arrow to select 2-sided and then press the right Function button (Advanced) to select the stapling side.
(A) Long-side stapling
(B) Short-side stapling - Press the left or right arrow to select the stapling side and then touch the OK button
- At the Check orientation screen, press the up or down arrow to select whether to use the preview screen or not and then touch the OK button.
If you select ON, the preview screen is displayed. This is recommended so you can confirm the orientation.
- Press the
- You will return to the main Standard copy screen.
Press the OK button to end setup. - Touch the Color button for color copying, or the Black button for black & white copying.
The machine starts copying. - When Check orientation is selected, a preview of the scan will appear.
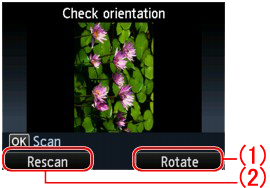
(1) Rotate
If you touch the right Function button, the original rotates by 180 degrees.
(2) Rescan
If you touch the left Function button, the original is rescanned. -
Touch the OK button to start scanning.
-
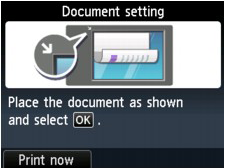
When scanning is finished, the Document setting screen appears on the LCD after scanning each sheet of original.

-
Scan the next document.
-
Remove the original document from the platen glass and load the next sheet on the platen glass, then touch the OK button to check the orientation of the next document.
-
If you are satisfied with the scan, touch OK to scan the next document.
-
If you do not need to check the orientation of the next document, touch the left Function button (Print now) to print the 2-sided copy.
The machine starts copying.
-
- Remove the document after copying is complete.
 Important:
- Do not open the document cover or remove the original from the platen glass until scanning is completed.
- To cancel copying, touch the Stop button.
 Note:
Note:
- If Device memory is full. Cannot continue process appears on the LCD when scanning, set the print quality to Standard, then try copying again. If the problem is not resolved, set the print quality to Fast and try copying again.
- Two-sided copy setting can be used in combination with 2-on-1 copy or 4-on-1 copy when Standard copy is selected.
-> Refer to [ Copying Two Pages to Fit onto a Single Page ] within this webpage.
-> Refer to [ Copying Four Pages to Fit onto a Single Page ] within this webpage. - If you are copying in black & white, print intensity of the Two-sided copy may differ from that of a single-sided copy.
Setting Items
When the Copy standby screen is displayed, touch the right Function button to change the copy settings such as page size, media type, and print quality.
Use the 
 button to change the setting item, and the
 button to change the setting, then use the OK button to confirm the selection.

- Depending on the copy menu, some setting items cannot be selected. This section describes the setting items in Standard copy. The setting item which cannot be selected is displayed grayed out.
- Depending on the setting item, some settings cannot be specified in combination with the setting of other setting item or the copy menu. If the setting cannot be specified in combination is selected, Error details is displayed on the LCD. In this case, touch the left Function button to confirm the message, then change the setting.
- The settings of the page size, media type, etc. are retained even if the machine is turned off.
- When copying starts in the copy menu that is not available with the specified setting, The specified function is not available with current settings. is displayed on the LCD. Change the setting, following the on-screen instructions.
(1) Magnif. (Magnification)
Specify the reduction/enlargement method.
(2) Intensity
Specify the intensity. When Auto is selected, the intensity is adjusted automatically according to the originals loaded on the platen glass. Auto is displayed on the Copy standby screen.

(3) Page size
Select the page size of the loaded paper.
(4) Type (Media type)
Select the media type of the loaded paper.
(5) Print qlty (Print quality)
Adjust print quality according to the original.
- If you use Fast with Type set to Plain paper and the quality is not as good as expected, select Standard or High for Print qlty and try copying again.
- Select High for Print qlty to copy in grayscale. Grayscale renders tones in a range of grays instead of black or white.
(6) 2-sided
Specify the setting of Two-sided copy.
Refer to step 6 in [ Copying onto Sides of the Paper ] within this webpage.
(7) Layout
Select the layout.
-> Refer to [ Copying Two Pages to Fit onto a Single Page ] within this webpage.
-> Refer to [ Copying Four Pages to Fit onto a Single Page ] within this webpage.
(8) Orientation
Select the orientation of the original document.
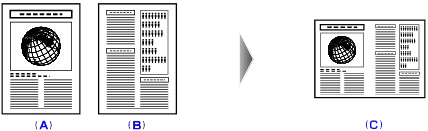
Copying Two Pages to Fit onto a Single Page
When you select 2-on-1 copy for Layout in Standard copy, you can copy two original pages (A) (B) onto a single sheet of paper (C) by reducing each image.
Touch the right Function button on the Copy standby screen to display the print settings screen, then select 2-on-1 copy for Layout.

Touch the right Function button to specify the advanced layout. You can also use this function with Orientation setting.
- When Portrait is selected for Orientation
2-on-1 copy layout: Left to right

2-on-1 copy layout: Right to left

- When Landscp. is selected for Orientation
2-on-1 copy layout: Top to bottom

2-on-1 copy layout: Bottom to top

After selecting the layout and touch the OK button, you can select whether you use the preview screen. If you select ON, the preview screen is displayed so that you can check the orientation.
- If Device memory is full. Cannot continue process. appears on the LCD when scanning, set the print quality to Standard, then try copying again. If the problem is not resolved, set the print quality to Fast and try copying again.
- This function can be used in combination with Two-sided copy. If you use this function in combination, you can copy four original pages on one sheet of paper. In this case, two original pages are copied on each side of paper. If you use this function in combination, select the two-sided copy setting for 2-sided and the stapling side of print paper on the Print settings screen.
For details on two-sided copy function:
-> Refer to [ Copying onto Sides of the Paper ] within this webpage.
- When checking the orientation:
When you are using the preview screen, the screen below is displayed so that you can check the orientation.

(1) Rotate
If you touch the right Function button, the original rotates by 180 degrees.
(2) Rescan
If you touch the left Function button, the original is rescanned.
Touch the OK button to start scanning.
- When scanning is finished:
Document setting screen appears on the LCD after scanning the first sheet of original.

Remove the first sheet of original from the platen glass and load the second sheet on the platen glass, then touch the OK button.
The machine starts scanning the second sheet of original and copying.
- If you do not need more scanning, touch the left Function button. The machine starts copying.
- You can add the copying job while printing.
Copying Four Pages to Fit onto a Single Page
When you select 4-on-1 copy for Layout in Standard copy, you can copy four original pages onto a single sheet of paper by reducing each image. Four different layouts are available.
Touch the right Function button on the Copy standby screen to display the print settings screen, then select 4-on-1 copy for Layout.

Touch the right Function button to specify the advanced layout.
- When Upper-left to right is selected

- When Upper-right to left is selected

- When Upper-left to bottom is selected

- When Upper-right to bottom is selected

After selecting the layout, touch the OK button, you can select whether you use the preview screen. If you select ON, the preview screen is displayed so that you can check the orientation.
- If Device memory is full. Cannot continue process. appears on the LCD when scanning, set the print quality to Standard, then try copying again. If the problem is not resolved, set the print quality to Fast and try copying again.
- This function can be used in combination with Two-sided copy. If you use this function in combination, you can copy eight original pages on one sheet of paper. In this case, four original pages are copied on each side of paper. If you use this function in combination, select the two-sided copy setting for 2-sided and the stapling side of print paper on the Print settings screen.
For details on two-sided copy function:
-> Refer to [ Copying onto Sides of the Paper ] within this webpage.
- When checking the orientation:
When you are using the preview screen, the screen below is displayed so that you can check the orientation.

(1) Rotate
If you touch the right Function button, the original rotates by 180 degrees.
(2) Rescan
If you touch the left Function button, the original is rescanned.
Touch the OK button to start scanning.
- When scanning is finished:
Document setting screen appears on the LCD after scanning each sheet of original.
Remove the sheet of original from the platen glass after scanning and load the next sheet on the platen glass, then touch the OK button.
After scanning the fourth sheet of original, the machine starts copying.
- If you do not need more scanning, touch the left Function button. The machine starts copying.
- You can add the copying job while printing.
If you use this function in combination with Two-sided copy, the Document setting screen is displayed after scanning the fourth sheet of original is complete. Follow the on-screen instructions to scan the rest of originals.