Untitled Document
Installing / Replacing the BJ Cartridge and ink tanks
The procedure explained here is the same for replacing an old BJ cartridge with a new one, or simply exchanging the BJ cartridge for one of the optional BJ cartridges (BC-34e or BC-30). Click here to skip to installation of ink tanks.
1. Make sure the MultiPASS is plugged in.
2. Open the document tray.
3. Lift the handle to open the printer cover.
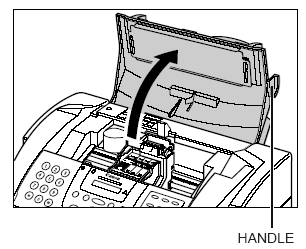
The cartridge holder automatically moves to the center of the unit.
Caution: Do not try to manually move or stop the cartridge holder since this may damage the unit. Do not touch the components shown or any metal parts since this may adversely affect operation of the unit and/or affect print quality.

4. Raise the blue cartridge lock lever on the cartridge holder and remove the BJ cartridge.

Caution: Spilled ink can stain any surface; protect yourself and your work area.
Note: If removing a BJ cartridge to use one of the optional BJ cartridges, be sure to store the BJ cartridge in the container provided with your MultiPASS. Otherwise the ink will dry and affect print quality.

5. Remove the new BJ cartridge from its package, then remove the orange protective cap (1) and the protective tape (2).

Discard the cap and tape. Never attempt to reattach them to the BJ cartridge print head.
Install the BJ cartridge immediately after removing the cap and tape.
6. Insert the BJ cartridge into the cartridge holder, then lower the blue cartridge lock lever until it locks into position.

7. Press on the two orange tabs and remove the two orange pieces from the BJ cartridge.

8. Install the BJ tanks into the BJ cartridge. Be sure to install them in their correct slot. The illustration here shows the correct color array of BJ tanks in a BJ cartridge.

Start with the far right BJ tank. If you are installing a new BJ tank, remove the packing film by pulling on the orange tape (1). Then grip the bottom of the BJ tank and twist off the orange protective cap in the direction shown (2).

If you are simply replacing the BJ cartridge and not the BJ tanks, reinsert the partially used BJ tanks into the new BJ cartridge. Be sure to insert them in their correct slot and from right to left.
For a new BJ tank, carefully remove the packing film taking care not to remove the label from the BJ tank.
For a new BJ tank, carefully remove the packing film taking care not to remove the label from the BJ tank.
Do not touch the ink port on the BJ tank.
9. Insert the BJ tank into the far right slot on the BJ cartridge, then press it down from the top until it clicks into position.

10. For the Color and Photo BJ cartridges, repeat steps 8 and 9 to install the other BJ tanks. Be sure to install them in the correct order and to insert them in the slots from right to left.
Do not use the BJ cartridge with any of its BJ tanks missing as this can cause the BJ cartridge to clog.
11. Close the printer cover.
The LCD displays CART. RETURN while the cartridge holder moves to its home position on the right side of the unit. The MultiPASS then cleans the print head which takes about 20 seconds.
12. Close the document tray.
