Print Head Cleaning / Head Refreshing
If the printed nozzle check pattern is broken, missing, or a specific color is not printed, clean the print head (Cleaning) or print head deep cleaning (Deep Cleaning).
Note:
-
Cleaning the print head consumes a small amount of ink. Cleaning too often reduces the amount of ink in the ink tanks.
-
Print head cleaning is performed when you connect the power cord. Your machine may perform print head cleaning periodically to avoid clogging.
Overview:
|
Step1:
|
|
Print the Nozzle Check Pattern.
|
| |
|
To check whether the print head nozzles are clogged, print the Nozzle Check Pattern.
|
| |

|
If the print quality is poor, perform print head cleaning.
|
|
Step 2:
|
|
Perform print head cleaning.
|
| |
|
This unclogs the print head nozzles
|
| |
|
Print the Nozzle Check Pattern again.
|
| |
|
To check whether the print head nozzles are clogged, print the Nozzle Check Pattern.
|
| |
|
If the print quality is still poor, perform two print head cleanings.
|
| |
|
Print the Nozzle Check Pattern again.
|
|
Step 3:
|
|
Perform deep print head cleaning.
|
| |
|
This is a more powerful cleaning.
|
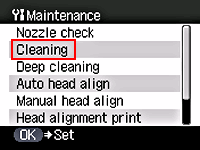
Displaying the Maintenance screen
-
Ensure that the printer is powered on.
-
Press the <Menu> button.
-
Press the left or right cursor to select [Maintenance/settings], then press <OK>.
-
Press the left or right cursor to select [Maintenance], then press <OK>.
Return to Nozzle Check Pattern procedure
Return to Print Head Cleaning procedure
Return to Deep Cleaning procedure
Print Nozzle Check Pattern
-
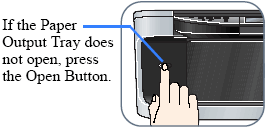
Press the Open button to open the output tray.
-
Load letter-sized plain paper in the auto sheet feeder (ASF) or the cassette.
-
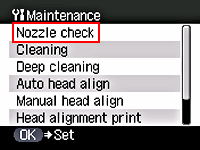
Display the Maintenance screen on the printer.
-
Press the up or down cursor to select [Nozzle check], then press the <OK>.
-
Press the up or down cursor to select [Yes], then press <OK>. (The nozzle check pattern is printed.)
-
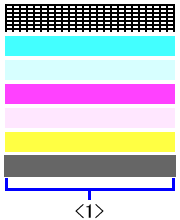
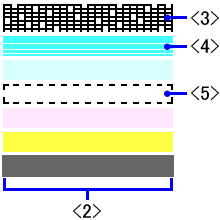
Confirm the nozzle check pattern.
|
|
|
|
< 1 > The normal nozzle check pattern
|
< 2 > The abnormal nozzle check pattern
|
| |
< 3 > Some black ink lines are broken.
|
| |
< 4 > White lines are present in the color ink pattern.
|
| |
< 5 > black and color inks are not present.
|
Note:
-
When all patterns are printed normally, press the up / down cursor button to select "All A" and press the OK button.
-
When any patterns are printed abnormally, press the up / down cursor button to select "Also B" and press the OK button.
Print Head Cleaning:
-
Display the Maintenance screen on the printer.
-
Press the up or down cursor to select [Cleaning], then press <OK>.
-
Press the up or down cursor to select [Yes], then press <OK> to start print head cleaning.
Note:
Do not do any other operations until print head cleaning is completed.
-
Print the nozzle check pattern and check the print head status.
Deep (Print Head) cleaning:
-
Display the Maintenance screen.
-
Press the up or down cursor to select [Deep cleaning], then press <OK>.

-
Press the up or down cursor to select [Yes], then press <OK> to start print head deep cleaning.
Note:
Do not do any other operations until print head deep cleaning is completed.
-
Print the nozzle check pattern and check the print head status.
Note:
If the printed result does not improve even after doing print head deep cleaning, turn off the printer. Then, after 24 hours or later, do print head deep cleaning again. (After a given time interval, ink could dissolve itself, resulting in ink unclogging.)
