
Sharing the Printer on a Network (Windows) - MP490
| Article ID: ART131387 | | | Date published: 05/12/2015 | | | Date last updated: 08/17/2015 |
Description
Solution
When multiple computers are being used in the network environment, you can share the printer connected to one computer with the other computers.
The Windows versions of the computers connected to the network do not necessarily have to be the same.
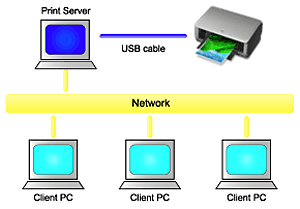
- Settings on Print Server
The procedure for setting up a computer directly connected to a printer with a USB cable is as follows:
- Settings on Client PC
The procedure for setting up those computers that will use this printer through the network is as follows:
When you execute print, the data is sent through the print server system to the printer.
In case an error occurred when a document is printed by the client system to a shared printer, the error message of Canon IJ Status Monitor will be displayed on the client system and the print server system. For regular printing, Canon IJ Status Monitor will be displayed only on the client system.
- Install the printer driver from the Setup CD-ROM that accompanies the machine on the print server system and each of the client systems according to the OS of each system.
- You cannot share this printer with Macintosh computers.
Settings on Print Server
When you use the printer on a network, set up the printer driver for sharing on the server system.
The procedure for setting up the print server systems is as follows:
1. Install the printer driver on the print server system
2. Select items from the Start menu as shown below:
- In Windows Vista, select the Start menu -> Control Panel -> Hardware and Sound -> Printers.
- In Windows XP, select the Start menu -> Control Panel -> Printers and Other Hardware -> Printers and Faxes.
- In Windows 2000, select the Start menu -> Settings -> Printers.
The Printers window (Windows Vista, Windows 2000) or Printers and Faxes window (Windows XP) is displayed.
3. Click the icon for the model name of printer to be shared
- In Windows Vista, press the Alt key on your keyboard and then select Run as administrator -> Sharing... from the displayed File menu.
- In Windows XP or Windows 2000, select Sharing... from the File menu.
In Windows Vista, a confirmation/warning dialog box may appear when installing, uninstalling, or starting software.
This dialog box appears when administrative rights are required to perform a task.
When you are logged on to an administrator account, click Continue or Allow to continue.
Some applications require an administrator account to continue. When you are logged on to a standard account, switch to an administrator account, and restart the operation from the beginning.
Windows XP may display a message recommending the user to use the Network Setup Wizard to set up sharing.
When this message appears, choose not to use the wizard and then set up sharing.
4. Set sharing
Select Share this printer (Windows Vista, Windows XP) or Shared as (Windows 2000) on the Sharing tab to set a shared name if necessary, and click OK.
The setup on the print server system is complete. Next, set up the client systems.
Settings on Client PC (Windows Vista)After setting up the print server system, set up the client system.
The procedure for setting up the client systems is as follows:
1. Install the printer driver on the client systems
To install the driver, load the Setup CD-ROM that comes with the machine, and select Custom Install.
During the installation, a screen prompting you to turn the printer on appears. Click Manual Selection and then select an appropriate port to complete your installation.
2. Start the wizard
Select the Start menu -> Network -> Add a printer.
The Add Printer window appears.
3. Add a printer
Select Add a network, wireless or Bluetooth printer, and click the icon for the printer that you have configured on the print server system to be shared, and then click Next.
- If the icon for the printer is not displayed, check that the printer is actually connected to the print server.
- It may take some time for the icon for the printer to appear.
4. Complete the setup
Take the appropriate action as described on the screen and then click Finish.
The icon for the shared printer will be created in the Printers window.
The setup on the client systems is complete. You can now share the printer in the network.
Settings on Client PC (Windows XP/Windows 2000)After setting up the print server system, set up the client systems.
The procedure for setting up the client systems is as follows:
1. Install the printer driver on the client systems
To install the driver, load the Setup CD-ROM that comes with the machine, and select Custom Install.
During the installation, a screen prompting you to turn the printer on appears. Click Manual Selection and then select an appropriate port to complete your installation.
2. Start the wizard
- In Windows XP, select the Start menu -> Control Panel -> Printers and Other Hardware -> Printers and Faxes -> Add a printer.
- In Windows 2000, select the Start menu -> Settings -> Printers -> Add a printer.
When Welcome to the Add Printer Wizard screen appears, click Next.
3. Add a printer
Select A network printer, or a printer attached to another computer (Windows XP) or Network printer (Windows 2000), then click Next.
On the Specify a Printer window (Windows XP) or Locate Your Printer window (Windows 2000), click Next and then search for the print server system.
Click the icon for the printer that you have configured on the print server system to be shared, and then click Next.
If the icon for the printer is not displayed, check that the printer is actually connected to the print server.
4. Complete the setup
Take the appropriate action as described on the screen and then click Finish.
The icon for the shared printer will be created in the Printers and Faxes window (Windows XP) or Printers window (Windows 2000).
The setup on the client systems is complete. You can now share the printer in the network.
Restrictions on Printer SharingThese are restrictions that apply when you are using a printer in a network environment. Check the restrictions for the environment you are using.
When You Are Sharing a Printer in a Network:
- A print completion message may be displayed. To disable the message display, follow the procedure below.
- In Windows Vista: Press the Alt key from the Printers window on the client system. Open Run as administrator -> Server Properties... from the displayed File menu. Uncheck Show informational notifications for network printers on the Advanced tab, and then restart the computer.
- In Windows XP or Windows 2000: Open Server Properties from the File menu of the Printer and Faxes window (Windows XP) or the Printers window (Windows 2000) on the print server system. Uncheck Notify when remote documents are printed on the Advanced tab, and then restart the computer.
- The bi-directional communication function is disabled and the correct printer status may not be recognized. When a client user opens the printer driver properties and then clicks OK with the Enable bidirectional support check box on the Ports tab unchecked, the bi-directional function of the printer server system may also be disabled.In this case, check Enable bidirectional support check box on the print server system and the client system.
- When you print from a client system, you cannot use Canon IJ Preview.
- When the functions on the Maintenance tab cannot be set properly from a client system, they may be grayed out. In this case, change the settings from the print server. When you change the settings of the print server, you should delete the icon of the shared printer from the client system, and then specify the shared settings again in the client system.
When the Same Printer Driver is Installed in the Print Server System and the Client System as the Local Printer :
- The net crawl function may automatically create a network printer icon on the client system.