
MP530 firmware v.1.08 upgrade procedure on Mac OS X
| Article ID: ART103213 | | | Date published: 05/11/2015 | | | Date last updated: 11/04/2015 |
Description
Solution
Firmware Upgrade Procedure
If the machine's serial number is within the range that is listed below and the machine's firmware version is less than 1.08, please upgrade the firmware using the below procedure. If the firmware version is 1.08 or higher, this upgrade is not necessary. To confirm which version is installed, follow the instructions to step 6.
Serial Number Ranges:
|
From: |
To: |
| AAGA00001 | AAGA91839 |
The serial number consists of four alphabet characters and five numeric characters. Please open scanner unit to check the machine's serial number. The serial number is attached to the back wall inside the printer.
The following items are required for the upgrade:
The following files are contained in the same folder as the RomVUp file:
|
Upgrade Procedure:
- Connect the MP530 to the computer <3>, using the USB cable.
- Disconnect the telephone cord from the external device jack <1> and the telephone line jack <2> (marked "L"). (It will be helpful if you mark each line so that you can distinguish them when reconnecting them after the upgrade.)
- If applicable, remove the USB cable from the direct print port (PictBridge) and a card from the card slot.
Caution:
* Connect a single MP530 printer unit to the computer via the USB cable, and disconnect all other printer units, if any.
* Before starting the firmware upgrade, print all received fax messages. All the data received in memory will be cleared by the firmware upgrade. The registered user's data such as the one-touch and coded speed dial numbers are retained and you don't need to register them again. - Exit all application software, and double-click RomVUp
 to launch the Printer Upgrade Utility.
 - Review the bulleted items in the Printer Upgrade Utility window (in Step 1) then turn on the printer, and click 'Next'.
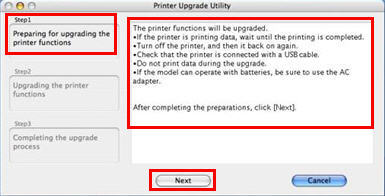
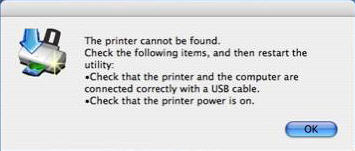
If the following dialog box is displayed, the following causes are suspected:
Cause 1: The USB cable is not connected.
Solution: Connect the USB cable, and perform the procedures from the beginning again.
Cause 2: The printer is not turned on.
Solution: Turn on the printer power, and perform the procedures from the beginning again.
Cause 3: The downloaded upgrade firmware is not for your printer.
Solution: Download the applicable upgrade firmware files, and perform the procedures from the beginning again.
-
In addition to confirming your machine's model appears in the Printer Name field (in Step 2 of the Printer Upgrade Utility window), it is important that you verify the version numbers in the Current software version and Upgrade software version boxes. If your machine requires the firmware update, click 'Start'.
- If the version number in the Current software version box is lower than the Upgrade software version box, click 'Start'.
- If the version number in the Current software version box is the same or higher than the Upgrade software version box, click 'Cancel'.
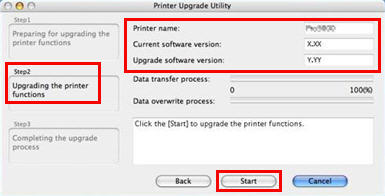
CAUTION: Until the upgrade is completed, DO NOT turn off the printer, or disconnect the USB cable. If the printer is turned off or the USB cable is disconnected during the operation, the printer will be damaged.
Back to top of page.
- If the version number in the Current software version box is lower than the Upgrade software version box, click 'Start'.
- The printer firmware upgrade starts. Wait until the upgrade is completed.
The progress will be indicated in the dialog box as follows:
Preparing for transferring. Please wait... -> Transferring data to the printer... -> Upgrading printer functions...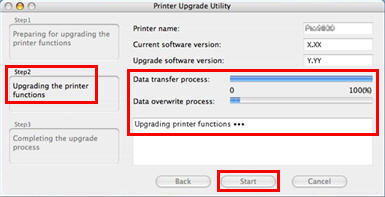
- The upgrade will take about 5 to 7 minutes, depending on the computer.
- During the upgrade process, the printer LED blinks in orange.
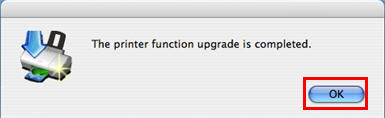
- Until the upgrade is completed, DO NOT turn off the printer, or disconnect the USB cable. If the printer is turned off or the USB cable is disconnected during the operation, the printer will be damaged. - When the upgrade is complete, the following dialog box is displayed. Click OK.
- After confirming the message in the dialog box, click End to exit the Printer Upgrade Utility window.
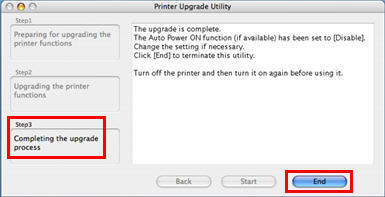
- Press the <ON/OFF> button to turn off the printer.
Note: For correct operation of the printer, turning the printer off and on again is necessary. - The firmware is correctly upgraded.
Note: If power is cut off during the MP530 upgrade process, the upgrade will not complete properly.
If the printer does not operate normally even after powering the printer OFF then ON again, the upgrade may not have been successfully completed.
In that case, perform the upgrade once again, from the beginning. - Re-connect all the telephone lines and cables including the USB cable, and set the Date/time setting.
Note:
* Be sure to connect the telephone line from an external device (such as a telephone) to the jack marked telephone illustration, and the other line from the wall to the jack marked "L". If the lines are connected the other way around, they do not operate properly.
* The Date/time setting may be reset to default. Set it properly.
If an error message is displayed during the upgrade process:
If an error occurs during the printer firmware upgrade process, the applicable error message is displayed. Follow the error message instruction to clear the error. Major error messages, causes, and their solutions are given in the table below.
| Error message | Cause | Solution |
|---|---|---|
| This program does not support the operating system you are using. | The upgrade was attempted under a non-supported OS. | Perform the upgrade under the supported OS. |
| Classic is running. Stop Classic and restart the utility. |
The upgrade was attempted when Classic is active under Macintosh OS X. | Stop Classic, then perform the upgrade under Macintosh OS X. |
| The printer driver may not be installed. Install the printer driver, and then restart the utility. |
The printer driver is not installed. | Install the printer driver before starting the upgrade. |
The printer cannot be found. Check the following items, and then restart the utility.
|
|
|
| More than one printer is connected. Make sure only one printer is connected with a USB cable, and then restart the utility. | A printer other than the printer to be upgraded is connected to the computer. | Connect only the applicable printer to the computer, and disconnect all other printers. |
|
The printer status is abnormal. |
|
|
|
An error occurred during the printer function upgrade. Since the upgrade failed, the printer cannot be used in its current condition. Turn on the the printer power again, and then be sure to restart the utility. |
|
|