Print Nozzle Check Pattern / Self Test from unit iP6000D
Article ID: ART160067
|
Date published: 06/09/2015
|
Date last updated: 08/18/2015
Description
Print a Self Test iP6000D
Solution
Print a Nozzle Check Pattern
Print the nozzle check pattern in order to confirm that ink is ejected properly from the print head's nozzle.
Confirm that the printer is powered on.
Set a sheet of A4 or letter-sized plain paper in the sheet feeder or cassette and open the paper output tray.
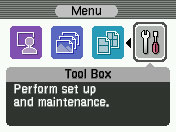
Press the 'Menu' button and use the left and right cursor buttons to select Tool Box on the right and then press the 'OK' button.
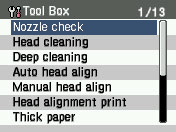
Use the up and down cursor buttons to select 'Nozzle check' and then press the 'OK' button.
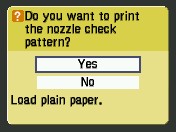
Use the up and down cursor buttons to select 'Yes' and then press the 'OK' button. (The Power lamp will blink and the nozzle check pattern print will start.)
The Power lamp blinks and the nozzle check pattern is printed. (It takes about 10 seconds until printing is completed.)
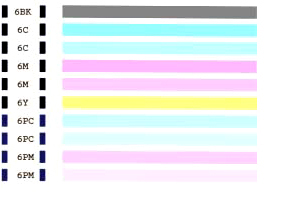
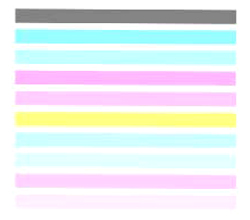
Examine the nozzle check pattern output.
Normal:
Lines are completely drawn in the pattern.
No white streaks.
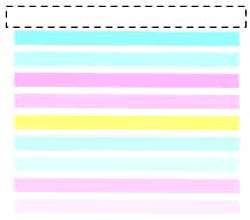
Error A: No colors are printed. (Nothing appears on the output.)
Error B: Some colors of ink are not ejected completely.
(A sample in which no black ink is ejected onto the paper.)
Error C: There are some white streaks.
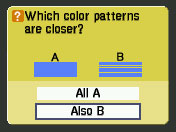
If the output is normal, use the up and down cursor buttons to select 'All A', and press the 'OK' button.The print head is normal.
If the output is not normal, use the up and down cursor buttons to select 'Also B' and select the 'OK' button.
Procedures for printing the nozzle check pattern is completed.
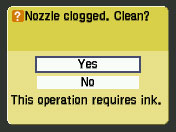
The following describes the handling when print results are not normal.
Use the up and down cursor buttons to select 'Yes' and then press the 'OK'button.
The Power lamp blinks, and print head cleaning starts. Cleaning completes when the Power lamp stops blinking and lights. (It takes approximately 30 to 60 seconds for the Power lamp to stop blinking and light.)
Confirm whether print results are normal by printing the nozzle check pattern again. Use the up and down cursor buttons to select 'Yes' and then press the 'OK' button.