|
The camcorder will automatically record a pre-defined number of frames at a pre-defined interval. This mode is suitable for recording subjects with little movement, such as natural surroundings or plants. Sound is not recorded in this mode.
Configuring Interval Recording Mode
1. Hold down the button on the <POWER> switch and slide the switch to <CAMERA>. The power indicator will illuminate in green.

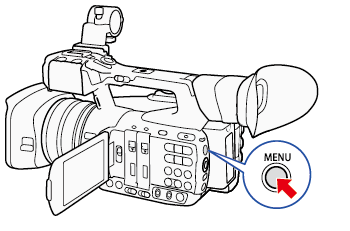
2. Press the <MENU> button to display the menu screen.
3. Open the [Interval] submenu.
3-1. Select [  Other Functions] -> [Interval Recording] -> [Interval].

3-2. Select the desired interval and then press <SET>.
| 1-10 sec, 15 sec, 20 sec, 30 sec, 40 sec, 50 sec, 1-10 min |

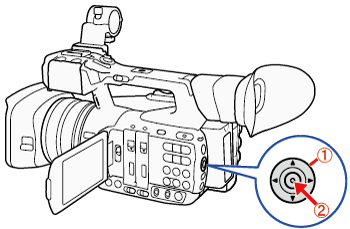
 : Joystick  : In the following procedures, 'Press <SET>' refers to the action of pressing the joystick straight down to select the desired setting.
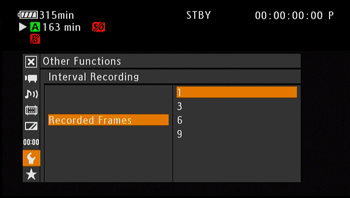
4. Open the [Recorded Frames] submenu.
4-1. Select [ Other Functions] -> [Interval Recording] -> [Recorded Frames].

4-2. Select the desired number of frames and then press <SET>.
| [Frame Rate] |
[Recorded Frames] |
| 59.94i, 29.97P, 23.98P |
1, 3, 6, 9 |
| 59.94P |
2, 6, 12 |
5. Activate interval recording.
5-1. Select [ Other Functions] -> [Special Recording].
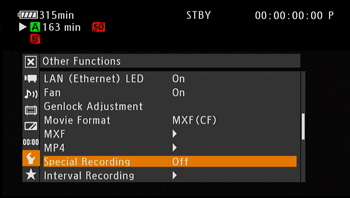
5-2. Select [Interval Recording] and then press <SET>.
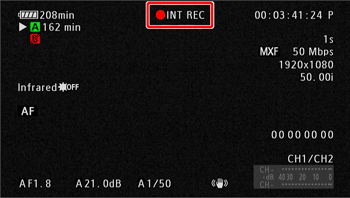
- [INT STBY] appears at the top of the screen (with [INT] flashing).

Shooting in Interval Rec mode
1. Press the <START/STOP> button.
- The camcorder automatically records the set number of frames at the set interval.
- The front and rear tally lamps illuminate. [INT STBY] changes to [
 INT REC] while recording frames and [ INT STBY] while between intervals. INT REC] while recording frames and [ INT STBY] while between intervals.
2. Press the START/STOP button again to stop recording.
- All of the recorded frames are joined together into one clip.
- The front and rear tally lamps go out and [INT STBY] appears at the top of the screen (with [INT] flashing).
- To deactivate interval recording:
Select [ Other Functions] -> [Special Recording] and then select another special recording mode, or [Off].
REFERENCE
Time Code
- During this special recording mode, the time codes running mode can be set to [Rec Run] or [Regen.] and the time code advances by the number of frames recorded. If the time codes running mode is set to [Free Run] or the time code is input from an external source, the running mode will switch to [Rec Run] during special recording mode. When the special recording mode is deactivated, the running mode will return to its previous setting.
- During special recording mode, the time code signal will not be output from the TIME CODE terminal, 3G/HD-SDI terminal or MON. terminal.
NOTE
- You can use only one special recording mode at a time.
- The interval and the number of frames recorded cannot be changed while recording.
- Some frames at the point the recording was stopped may be recorded and added to the end of the clip.
- Interval recording mode will be deactivated if the special recording mode is changed or turned off. It will be deactivated also if you change the video format or video configuration.
|
