|
|
Manually adjust color from the driver (Windows) Pro9000 Mark II / Pro9500 Mark II
| Article ID: ART128771 |
| |
Date published: 05/12/2015 |
| |
Date last updated: 08/17/2015 |
Solution
Manual Color Adjustment
Follow the steps below to make fine adjustments to the color hue for the printed output. These settings will only make minor color adjustments. If more drastic color adjustment is necessary, use an image editing application.
-
Open the printer's Preferences / Properties.
For Windows 7
- Click the 'Start' button from the bottom left of the Windows screen, and then click on 'Devices and Printers'.
- Click your right mouse button on the listing for your printer, and then select 'Printing Preferences' from the menu that appears.
For Windows Vista
- Click / Select the 'Start' from the bottom left of the Windows screen, 'Control Panel', 'Hardware and Sound', and then click on 'Printers'. Note: If you are in 'Classic' view, click 'Printers' directly from the 'Control Panel'.
- Click your right mouse button on the listing for your printer, and then select 'Preferences' from the menu that appears.
For Windows XP Home Edition
- Click / Select the 'Start' button from the bottom left of the Windows screen, 'Control Panel,' 'Printers and Other Hardware,' and 'Printers and Faxes.'
- Click your right mouse button on the listing for your printer, and then select 'Preferences' from the menu that appears.
For Windows XP Professional Edition
- Click 'Start' from the bottom left of the Windows screen, and 'Printers and Faxes.'
- Click your right mouse button on the listing for your printer, and then select 'Preferences' from the menu that appears.
For Windows 2000
- Click / Select 'Start' from the bottom left of the Windows screen, and 'Settings,' then 'Printers.'
- Click your right mouse button on the listing for your printer, and then select 'Properties' from the menu that appears.
- On the Main tab, select 'Manual' for 'Color Adjustment,' and then click the 'Set' button.

- Select the Color Adjustment tab.

On the Color Adjustment screen, you can adjust each color individually to achieve the desired effect. These are only slight adjustments. If major color adjustments are required, edit the image in a photo editing application.
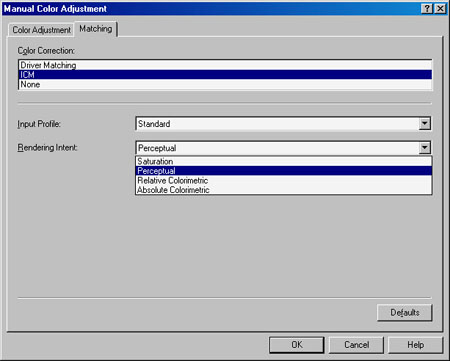
- Click the Matching tab.
- Select the best 'Color Correction' setting for type of image you are printing.
None
Do not correct colors. Use this when managing color from an application.
(Default setting: Driver Matching )
Driver Matching
Correct colors inside the printer driver.
Use the 'Linear Tone' option for Color Mode to get the most accurate match for sRGB without using custom profiles.
ICM (Windows Image Color Management)
Correct colors using the Windows color management. Select 'Standard' for the Input Profile if your image was created in the sRGB color space. Select 'Adobe RGB 1998' if your images were created in the color space.
For the ICM setting, select a rendering intent.
Saturation - This method reproduces images even more vividly than the Perceptual method.
Perceptual - This method reproduces images by focusing on colors that most people find desirable. Select this method to print photos.
Relative Colorimetric - When image data is converted to the color space of the printer, this method converts the image data so the color reproduction approximates the shared color regions. Select this method to print image data with colors that are close to the original colors.
Absolute Colorimetric - When Relative Colorimetric is selected, white spots are reproduced as white spots of the paper (background color). However, when Abosolute Colorimetric is selected, how the white spots are reproduced depends on the image data.
|
