When the message shown below is displayed, cleaning the Transport Roller (Sheet cleaning) should be performed as soon as possible.
You need to prepare: a cleaning sheet (supplied with the printer)
important:
- You do not need to clean the transport roller until this message is displayed.

note:
- You can continue to print even after the message informing you that cleaning is necessary is displayed. However, if the transport roller is not cleaned, printed surfaces may be smudged or print quality reduced. We recommend that you clean the transport roller as soon as possible.
- Cleaning sheets can be stored under the Cassette.
Using the Sheet Cleaning
important:
- Sheet cleaning requires a specified cleaning sheet fed from the Rear Tray.
- Do not perform any other operation while the Sheet cleaning is being performed.
Click here for Mac OS X Instructions.

1. Make sure that the power is turned on, and then remove any paper from the Rear Tray.
2. Prepare a cleaning sheet.
Take out a cleaning sheet from the Cleaning Sheet Holder. For details on taking out cleaning sheets, see [ Storing and Taking out the Cleaning Sheets ].
3. Open the Front Tray gently, and then pull out the Front Tray Extension.
note:
- Remove any paper in the Front Tray.
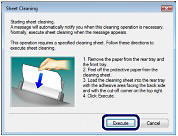
4. Peel off the protective tape (B) at top of cleaning sheet and load the cleaning sheet FACING DOWNWARD WITH THE ADHESIVE AREA AT THE TOP into the Rear Tray and the notched corner (A) in the top right..

(B) Peel off the protective tape.
(A) Load the cleaning sheet with the notch at the top right.
5. Open the printer driver setup window.
6. Perform sheet cleaning.
For Windows 10
- Select the Start menu and click Settings. Click Devices, then click Devices and Printers.
- Click your right mouse button on the listing for your printer, and then select 'Preferences' from the menu that appears.
For Windows 8 / 8.1
- Press and hold the Windows key, then tap the "X" key. Click Control Panel, then under Hardware and Sound, click Devices and Printers.
- Click your right mouse button on the listing for your printer, and then select 'Preferences' from the menu that appears.
For Windows 7
- Click / Select the Start menu, then click on Devices and Printers.
- Click your right mouse button on the listing for your printer, and then select 'Preferences' from the menu that appears.
For Windows Vista
- Click / Select 'Start' from the bottom left of the Windows screen, 'Control Panel', 'Hardware and Sound', and then click on 'Printers'. Note: If you are in 'Classic' view, Click 'Printers' directly from the 'Control Panel'.
- Click your right mouse button on the listing for your printer, and then select 'Preferences' from the menu that appears.
For Windows XP Home Edition
- Click / Select 'Start' from the bottom left of the Windows screen, 'Control Panel,' 'Printers and Other Hardware,' and 'Printers and Faxes.'
- Click your right mouse button on the listing for your printer, and then select 'Preferences' from the menu that appears.
For Windows XP Professional Edition
- Click 'Start' from the bottom left of the Windows screen, and 'Printers and Faxes.'
- Click your right mouse button on the listing for your printer, and then select 'Preferences' from the menu that appears.
For Windows 2000/Me/98
- Click / Select 'Start' from the bottom left of the Windows screen, and 'Settings,' then 'Printers.'
- Click your right mouse button on the listing for your printer, and then select 'Properties' from the menu that appears.
(1) Click the Maintenance tab.
(2) Click Sheet Cleaning.
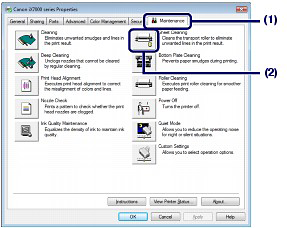
(3) Click Execute.
important:
- Discard used cleaning sheets as soon as sheet cleaning is done. Handle the sheets carefully to avoid staining clothing or the surrounding area since the ejected sheet is stained.

1. Make sure that the power is turned on, and then remove any paper from the Rear Tray.
2. Prepare a cleaning sheet.
Take out a cleaning sheet from the Cleaning Sheet Holder. For details on taking out cleaning sheets, see [ Storing and Taking out the Cleaning Sheets ].
3. Open the Front Tray gently, and then pull out the Front Tray Extension.
note:
- Remove any paper in the Front Tray.
4. Peel off the protective tape at top of cleaning sheet and load the cleaning sheet FACING DOWNWARD WITH THE ADHESIVE AREA AT THE TOP into the Rear Tray.
(A) Load the cleaning sheet with the notch at the top right.
(B) Peel off the protective tape.
5. Open the Canon IJ Printer Utility.
6. Perform sheet cleaning.
- Launch IJ Printer Utility.
Note: In versions of Mac OS X older than 10.4, open the IJ / BJ Printer Utility from the Library>Printers>Canon>BJPrinter>Utilities folder.
- In the Apple menu select System Preferences
- Open Print & Fax / Print & Scan / Printers & Scanners.
- Make sure the correct printer is selected and, depending on OS version, click 'Open Print Queue...' or 'Print Queue...'.
- Click the Utility / Printer Setup icon.
Note: In Mac OS X 10.6, select 'Utility' at the top of the screen, and then click the 'Open Printer Utility" button.
- Select the printer from the list, then click 'Maintenance'.
(1) Make sure that Cleaning is displayed in the pop-up menu.
(2) Click Sheet Cleaning.

(3) Click OK.

important:
- Discard used cleaning sheets as soon as sheet cleaning is done. Handle the sheets carefully to avoid staining clothing or the surrounding area since the ejected sheet is stained.
Storing and Taking out the Cleaning Sheets
Five cleaning sheets are supplied with the printer.
The whole package of these cleaning sheets can be stored in the Cleaning Sheet Holder under the Cassette.
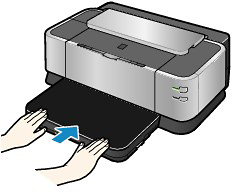
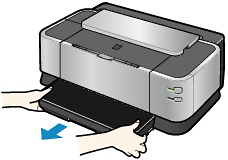
1. Pull out the Cassette.
Pull the Cassette out slowly with hands until it stops, and pull it out from the printer with lifting the near side of the Cassette slightly.
2. Store or take out cleaning sheets.
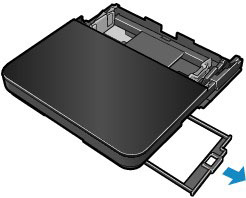
(1) Pull out the Cleaning Sheet Holder from the Cassette.
(2) Store or take out cleaning sheets.

note:
- Return unused cleaning sheets into the original package and seal the package.
(3) Insert the Cleaning Sheet Holder.
3. Insert the Cassette into the printer.
Push the Cassette all the way into the printer.
note:
- If the Cassette is not inserted correctly, the error may occur and the printer cannot print. Make sure that the Cassette is pushed all the way into the printer.