Snap in ink tanks properly MP500 / MP800
| Article ID: ART153372 |
| |
Date published: 06/02/2015 |
| |
Date last updated: 08/17/2015 |
Description
If an ink tank is not seated properly, colors in the print out may be missing or distorted.
Solution
Ink Tank Seated Properly
Refer to the following steps to verify the ink tanks are seated correctly:
- Confirm that the printer is powered on and press the Open button. (The paper output tray will open.)
- Lift the scanning unit (printer cover) completely. (The print head will move to the replacement position.)
- Open the inner cover.
CAUTION:
a. Do not try to manually move or stop the Print Head Holder.
b. Do not touch any metal parts.
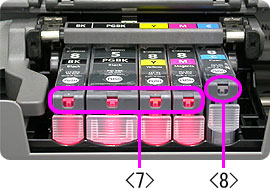
- Press down on the ink tank until a click is heard, thereby making sure the ink tank is seated properly.
Note:
Make sure that the ink tank is inserted in the slot that corresponds to the ink tank's color.
- Ensure that all the ink tanks are installed properly and the ink tank lamps light red.
Note:
Ink Tank Lamp
You can check the status of each ink tank according to the way its lamp flashes.
-
- - On: The printer is ready to print.
- - Slow flashing (at about three second interval): Ink is low. Prepare a new ink tank.
- - Fast flashing (at about one second interval): Ink tank is empty, or the printer is not ready due to an error.
- - Off: An error has occurred and the printer is not ready to print.
- Close the inner cover and the scanning unit (printer cover).
Note:
-
- When closing the scanning unit (printer cover), be careful not to jam your finger.
- When starting printing next time, the print head cleaning launches automatically.
