Untitled Document
How to perform the Print Head Alignment (Mac OS X)
1. Launch the BJ Printer Utility.
Note: In versions of Mac OS X older than 10.4, open the IJ / BJ Printer Utility from the Library>Printers>Canon>BJPrinter>Utilities folder.
- In the Apple menu select System Preferences
- Open Print & Fax.
- Make sure the correct printer is selected and, depending on OS version, click 'Open Print Queue...' or 'Print Queue...'.
- Click the Utility icon.
- Select the printer, then click 'Maintenance'.
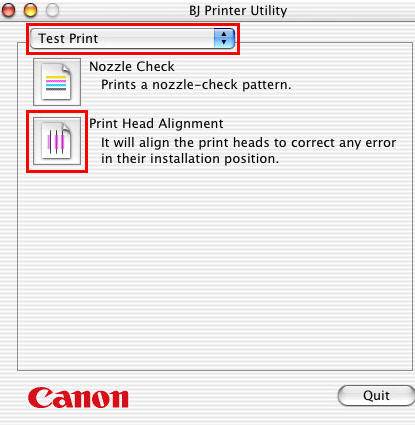
2. Select 'Test Print' in the pop-up menu and click 'Print Head Alignment'.
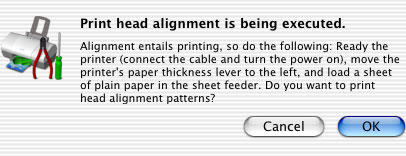
3. The message is displayed. After confirming the three points below, click 'OK'.
- Is the cable connected properly? Is the printer powered on?
- Is the printer's paper thickness lever set to the left?
- Is a sheet of plain paper set in the sheet feeder?
4. The power lamp will flash and print head cleaning will start. After cleaning has finished, the head alignment pattern will be printed. Until printing completes, do not perform other operations.
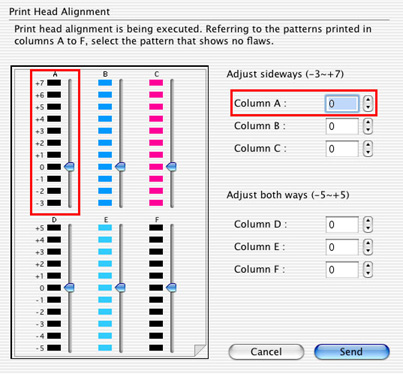
5. Refer to the printed sheet, and enter the numbers on the next screen.
a. Select the pattern with the fewest visible vertical stripes in column A.
b. Enter the selected pattern's number in the column A box, or drag the slide bar to specify directly.
c. Similarly, enter the selected numbers in the boxes for column B to F.
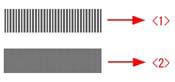
<1> Pattern with the greatest number of visible vertical stripes.
<2> Pattern with the least number of visible vertical stripes.
6. The Print Head Alignment operation is now complete.
