By connecting the camera to a personal computer, you can transfer images from the camera's CF card by operating the camera. This is called direct image transfer.
Before connecting the camera to the personal computer, be sure to install the bundled software (EOS Digital Solution Disk/ CD-ROM) in the personal computer.
For instructions on how to install the software, see "Software Guide."
 |
1 Connect the camera to the personal computer.
- Turn off the camera's power switch before connecting it.
- Use the USB cable provided with the camera to connect it to the personal computer.
2 Set the camera's power switch to <ON>.
- When the program selection screen appears on the personal computer, select [EOS Utility]. When the camera model selection screen appears, select your camera's model.
- The [EOS Utility] screen will appear on the computer, and the [Direct Transfer] screen will appear on the camera's LCD monitor.
|
- While the direct transfer screen is displayed, pressing the shutter button halfway will not return the camera to shooting-ready.
- Before disconnecting the cable, turn off the camera first and pull out the cable by grasping the plug (instead of the cord).
Transferring images to a personal computer
The images sent to the personal computer will be saved in the [My Pictures] folder (Windows) or [Pictures] folder (Macintosh) in subfolders organized according to shooting date.
 |
Transfer all the images in the CF card to the personal computer.
- Select [All images], then press the <
 > button. > button.
- The <> button's blue lamp will blink and the image transfer will start.
- When the image transfer is completed, the lamp will stay on.
|
Options other than [All images] are explained below. To start the image transfer, press the <> button.
Images which have not yet been transferred to the personal computer will be selected by the camera automatically for the transfer.
You select the images to be transferred to the personal computer in a batch. To select the images, follow the instructions below
Press the < > key to select images one by one to be transferred to the personal computer. To exit, press the <MENU> button.
Press the < > key to select the image and transfer it. The image will then appear as wallpaper on the computer desktop screen. To exit, press the <MENU> button
Selecting the images to be transferred
You select the image to be transferred to the personal computer one by one
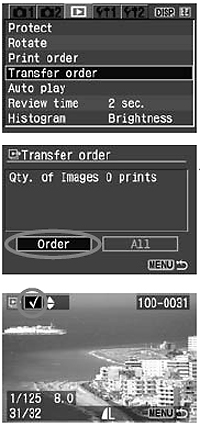 |
1 Select [Transfer order].
- Under the [Playback] tab, select [Transfer order], then press <SET>.
- The Transfer order screen will appear.
2 Select [Order].
- Select [Order], then press <SET>.
- An image will appear.
3 Select the image to be transferred.
- Press the < > key to select an image, then press the <UP / DOWN> key to place a checkmark <v> on the upper left.
- Repeat this step for all the images you want to transfer. You can select up to 998 images to be transferred.
- Press the <MENU> button twice to save the image selections to the CF card. The menu screen will then reappear.
To Mark All
In step 2, when you select [All], the screen on the left will appear. If you then select [Mark all] and press <SET>, up to 998 images will be transferred in one batch.
If you select [Clear all] and press <SET>, all your image selections for transfer will be canceled.
|
