Setting up the Printer (CP790)
attention:
- Always use the paper specific to SELPHY CP series printers included in the genuine Canon brand Color Ink Cassette / Paper Sets. Use only dedicated paper. Regular printing paper, regular postcards, or paper specified for use in SELPHY ES series printers cannot be used.
Confirming the Size Indication.
- Confirm that the [Paper cassette] and the [Ink cassette] have the same size indication.
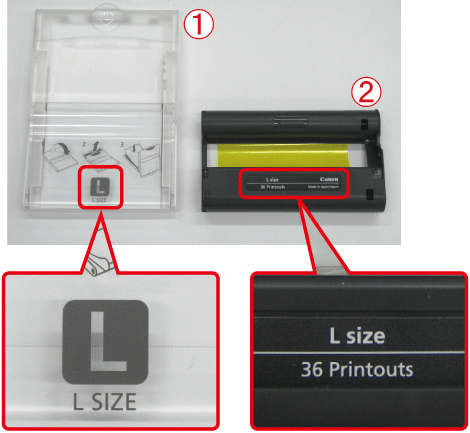
 [Paper cassette]
 [Ink cassette]
Preparing the [Ink Cassette].
- Confirm that the [Ink sheet] is taut with no slack.
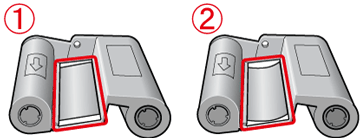
shows the normal condition. shows that the [Ink sheet] is slack.
- If the [Ink sheet] is slack, take up the slack with the following procedures.

Push the spot indicated by inward, rotate it in the clockwise direction to roll up the [Ink sheet]. Roll up the [Ink sheet] until the slack is taken up. Rolling it up too much may reduce the number of prints that can be made.
attention:
Do not pull or touch the [Ink sheet] with bare hands. Also, do not hold the [Ink Cassette] with wet hands. This may cause the printing errors.
Preparing the [Paper Cassette].
- Open the <Outer lid>.
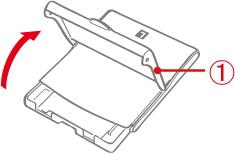
<Outer lid>
- Open the <Inner lid>.
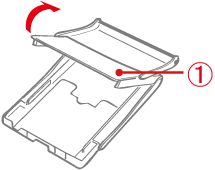
<Inner lid>
For [Wide size paper cassette] (sold separately), open the outer lid first, and then slide the <inner lid> in the direction of the ( ) arrow to open it.
- Hold the paper stack as shown in the illustration, with the shiny side facing up. Do not touch the print side (shiny side) of the paper with your fingers. Doing so may prevent you from making clean prints.
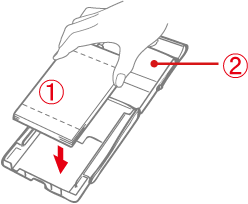
Paper (When a protective sheet is present, remove it and only set the paper stack into the cassette.)
<Inner lid>
-
Close the <Inner lid>.
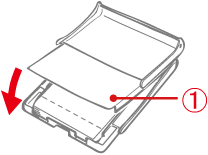
When closing the <Inner lid>, there will be a clicking sound.
For Wide size paper cassette (sold separately), close the inner lid first, and then slide the inner lid until it clicks to the opposite direction of the () arrow.
attention:
- You can place up to 18 sheets in the paper cassette (up to 12 for Wide size). Inserting 19 or more sheets (13 or more for Wide size) may damage the printer or cause malfunction.
- Mistakenly reversing the paper in the cassette may damage the printer.
- Do not bend the paper at the perforations or separate it before printing.
- Do not use label sheets that have begun to peel or label sheets with portions peeled back.
- Do not write on a sheet before printing with the printer. It may lead to a malfunction.
- Do not print on printed paper.
- Never reuse a spent [Ink cassette].
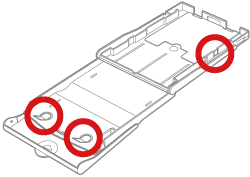
- Do not touch the springs of the paper cassette. If the springs are bent or deformed, paper will not feed correctly into SELPHY.
- Do not touch the print surface (shiny side), scratch it or touch the paper with wet hands. Prints will not be desirable if the print surface becomes dirty or wet.
Installing the [Ink Cassette] and the [Paper Cassette].
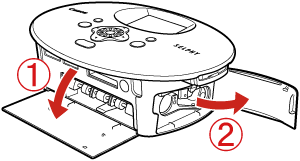
- Open the <Paper cassette compartment cover> and the <Ink cassette compartment cover> of the printer.
<Paper cassette compartment cover>
<Ink cassette compartment cover>
- Insert the [Paper cassette] and the [Ink cassette].
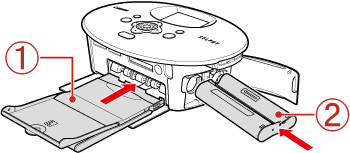
[Paper cassette] (Set the cassette so the side on which the paper is visible is facing up and insert it all the way into the slot.)
[Ink cassette] (Insert until it clicks and locks.)
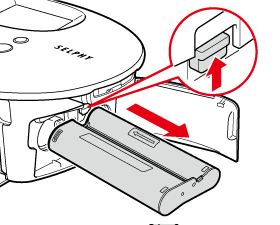
To remove the [Ink cassette], slide up the <Ink Cassette Lever>.
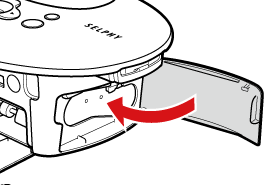
- After inserting the [Paper cassette] and the [Ink cassette], close the <Ink cassette compartment cover>.
Setting Up and Connecting the Printer.
-
Set up and connect your SELPHY printer in the following manner for safe use.
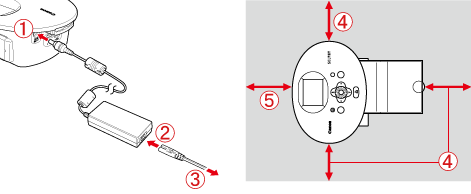
Connect the [Compact power adapter] to the printer.
Insert the [Power cord] to the [Compact power adapter].
 Plug the other end into a [Power outlet].
 Make sure there is at least 10 cm (4 in.) of free space around printer.
 Make sure there is free space of at least the length of the paper behind printer. (During printing the paper will pass in and out.)
attention:
- Place SELPHY on a stable and even surface, such as a table. Never place it on an unstable or tilted surface.
-
Do not place SELPHY in the following locations. This may damage or cause the printer to malfunction.
- Close to a motor or other devices that generate strong magnetic fields
- Near a television or radio set Keep SELPHY at least 1 m (3 ft.) from devices emitting electromagnetic waves or strong magnetic fields. Do not handle the power cords with wet hands.
note:
- You can also use the Battery Pack [NB-CP2L] sold separately with the SELPHY CP790.
