Press the Menu button. This is located next to the left side of the LCD.
Using the Scroll Wheel, scroll through the items on the LCD menu until Print Settings is highlighted.
Press SET button which is located in the center of the Scroll Wheel.
Again using the Scroll Wheel, scroll through the items on the LCD menu until Page Layout is highlighted.
You can change the Page Layout settings by pressing on the left or right side of the Scroll Wheel repeatedly until the desired option is displayed.
Explanation of the available options.
1-up (Default Setting)
Prints a single image per sheet.
2-up
Prints 2 images per sheet.
4-up
Prints 4 images per sheet.
8-up
Prints 8 images per sheet.
Fixed Size
Prints the image with a white border on the right side. [Fixed Size] can be set only when using the L size* and Postcard size.
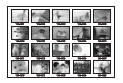
Index
Prints a thumbnail index.
Note:
You can set bordered/borderless when the setting is 1-up, 2-up, 4-up or 8-up.
When the page layout is set to [Index] and the print mode is [Print All Images], all images on the memory card (or added to the printer can be printed out as a thumbnail index.
You cannot specify the layout of images.
Once you have the desired option selected, press the yellow BACK button, which is located below the Scroll Wheel.
Press BACK again to exit the MENU.
Press the PRINT button to start printing or select your images and then print.