Setting the Paper Size and Type If you have to change the paper size and type loaded in the paper cassette, follow the procedure in this section to adjust the paper size and type settings. IMPORTANT If the setting is different from the size of the loaded paper: - An error message appears or the machine may not perform as expected.
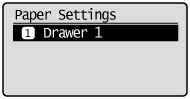
1. Press [  ] (Paper Settings). 2. Press [  ] or [  ] to highlight <Drawer 1>, and then press [OK].
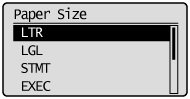
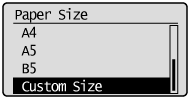
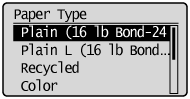
 3. Press [ ] or [ ] to highlight a paper size, and then press [OK]. 4. Press [ ] or [ ] to highlight the desired paper type, and then press [OK].
 5. Press [  ] (Paper Settings) to close the <Paper Size> screen. Setting a Custom Paper Size You can register the paper sizes and types of paper that you frequently use. 1.Press [ ] (Paper Settings). 2. Press [ ] or [ ] to highlight <Drawer 1>, and then press [OK].
 3. Press [ ] or [ ] to highlight <Custom Size>, and then press [OK].
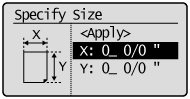
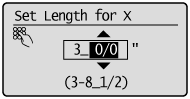
 4. Specifies the size of <X> direction and <Y> direction. For paper size, specify within the possible range of length and width (<Y>  <X>). (1) Press [ ] or [ ] to highlight the X direction, and then press [OK]. (2) Press [ ] or [ ] to specify the size, and then press [OK]. You can also enter values using the numeric keys. (3) Refer to steps (1)-(2) to specify the size of the Y direction. (4) Press [ ] or [ ] to highlight <Apply>, and then press [OK]. 5. Press [ ] or [ ] to highlight the desired paper type, and then press [OK].
 6. Press [ ] (Paper Settings) to close the <Paper Size> screen.
|