The following can be set here.
• All Videos
Specify the set of video sizes used by the camera.
• JPEG
Set the video quality, size, maximum frame rate and upload size in JPEG.
• H.264
Set the bit rate, video size and capture frame rate in H.264.
• On-screen display
Set time, character string, etc. displayed over video.

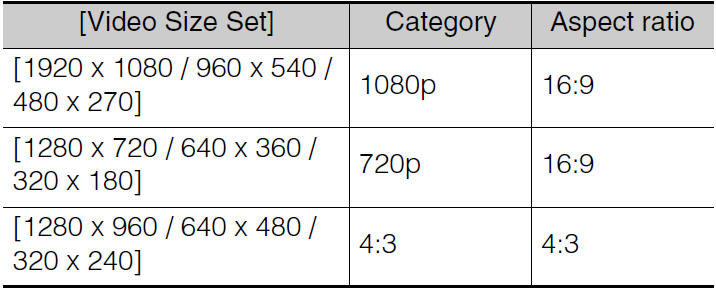
(1) [Video Size Set]
Select the set of video sizes used by the camera from [1920 x 1080 / 960 x 540 / 480 x 270], [1280 x 720 / 640 x 360 / 320 x 180], or [1280 x 960 / 640 x 480 / 320 x 240].
Select from [1280 x 720 / 640 x 360 / 320 x 180] or [1280 x 960 / 640 x 480 / 320 x 240] for the VB-S805D and VB-S905F.
All options in the [Video] menu and the size set that can be selected in [Video Size] are determined by the set selected here.
Important
• Changing the [Video Size Set] setting will disconnect all connections and then change all the video sizes.
Consequently, users connected to the camera must reconnect.
• If the [Video Size Set] selection is changed and you click [Apply and Reboot], review the following settings and check the operation.
- Privacy mask settings
- View restriction settings
- Preset settings
- Intelligent function settings
• [1920 x 1080 / 960 x 540 / 480 x 270] cannot be selected for the VB-S805D and VB-S905F.
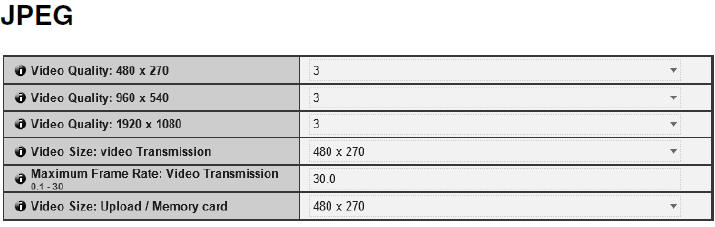
(1) [Video Quality]
Select a desired video quality from 1 to 5 (5 levels) for videos transmitted at each video size in JPEG.
Greater values have higher quality.
(2) [Video Size: video Transmission]
Select the size of the transmitted video. The video sizes that can be selected depend on the [Video Size Set] setting. This becomes the start-up video size used by each viewer if no video size has been set.
(3) [Maximum Frame Rate: Video Transmission]
Limit the maximum transmission frame rate per second to reduce the viewer load. The maximum is 30 frames/sec. Enter a value of between 0.1 and 30.0.
(4) [Video Size: Upload / Memory card]
Select the size of video when using the upload function (p. 51) or when recording to a memory card. The video sizes that can be selected depend on the [Video Size Set] setting. Use [Event] > [Video Record Action] to specify the destination of a video recording (upload or memory card recording).
Configure settings using H.264(1) when using H.264 video for upload or memory card recording. H.264(2) video cannot be used for upload, memory card recording, and RM-Lite.
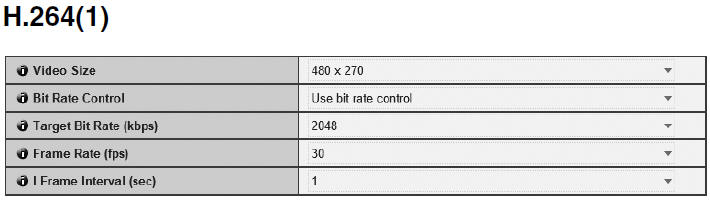
(1) [Video Size]
Select the size of the transmitted video. The video sizes that can be selected depend on the [Video Size Set] setting.

(2) [Bit Rate Control]
Select [Do not use bit rate control] or [Use bit rate control].
Select [Use bit rate control] when [Video Format] under [Upload] is set to [H.264(1)] or when [Video Format] under [Memory Card] is set to [H.264(1)].
(3) [Target Bit Rate (kbps)]
If [Use bit rate control] is selected in (2), select a desired target bit rate from the 17 levels from [64] to [16384].
(4) [Video Quality]
If [Do not use bit rate control] is selected in (2), select a desired quality from 1 to 5 (total 5 levels) for H.264 video transmission.
Greater values have higher quality.
(5) [Frame Rate (fps)]
Select [30], [15], [10], [6], [5], [3], [2] or [1] (fps) for the frame rate of video transmitted.
Important
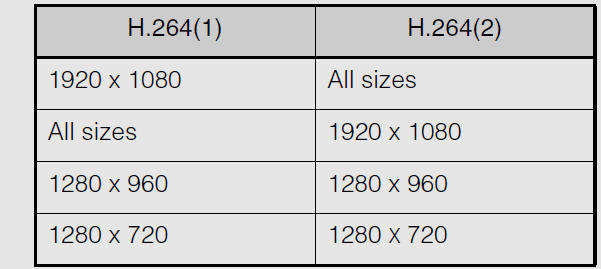
When streaming two H.264 videos, setting the video size settings for H.264(1) and H.264(2) to the following combinations restricts the frame rate to a maximum of 15 fps.
For all other combinations, a frame rate of up to 30 fps can be selected.
(6) [I Frame Interval (sec)]
Select [0.5], [1], [1.5], [2], [3], [4] or [5] for the I frame interval (sec) for H.264 video.

(1) [H.264(2)]
Select [Enable] to distribute H.264 video using two streams.
Note that H.264(2) video cannot be used for upload, memory card recording, or RM-Lite.
Refer to the settings for “H.264(1)” for details about [Video Size], [Bit Rate Control], [Target Bit Rate (kbps)], [Video Quality], [Frame Rate (fps)], and [I Frame Interval (sec)] settings.
Important
• When [H.264(1)] is selected for the memory card recording and upload settings, the following restrictions apply to the [H.264(1)] setting.
- Only [Use bit rate control] can be selected for [Bit Rate Control].
- Only [3072] or less can be selected for [Target Bit Rate (kbps)].
- Only one of [0.5], [1], and [1.5] can be selected for [I Frame Interval (sec)].
• Network load will increase if a larger video size is set or higher video quality and target bit rate are set, as this increases data size per frame. As a result, the following could occur:
JPEG: The frame rate may drop H.264: Video may be temporarily disrupted
• Block noise may become noticeable if a large video size and low target bit rate are set.
• The data size may increase depending on the type or movement of the subject. If the frame rate remains low or other undesirable conditions continue for a prolonged period, lower the video size or quality setting.
• Note that if you are using included RM-Lite, the hard disk usage will also be affected during recording.
• H.264 video can be displayed using Admin Viewer and RMLite.
However, only H.264(1) video can be displayed in RMLite.
H.264 video cannot be displayed using VB Viewer.

(1) [Date display]
Select whether to enable date display over video. If [Enable] is selected, date information will be displayed over video.
(2) [Position of date display]
Select [Upper left], [Upper right], [Lower left] or [Lower right] for the position of date display information.
(3) [Format of date display]
Select [YYYY/MM/DD], [DD/MM/YYYY] or [MM/DD/YYYY] for the format of the date display.
(4) [Time display]
Select whether to enable time display over video. If [Enable] is selected, display time information will be displayed over video.
(5) [Position of time display]
Select [Upper left], [Upper right], [Lower left] or [Lower right] for the position of time display information.
(6) [Text display]
Select [Display nothing], [Display designated string] or [Display camera name] for the text string to display over video.
If [Display designated string] is selected, the [Text string display] set in (8) will be displayed.
If [Display camera name] is selected, the text string set in [Camera Name (alphanumeric characters)] under [Camera] will be shown.
(7) [Position of text display]
Select the position of text display from [Upper left], [Upper right], [Lower left] or [Lower right].
(8) [Text string display]
If [Display designated string] is selected in (6) [Text display], you can enter a text string of up to 15 ASCII characters (spaces and printable characters) for superimposed display on the video.
(9) [Color of text]
Select [Black], [Blue], [Cyan], [Green], [Yellow], [Red], [Magenta] or [White] for the color of text to be displayed over the video.
(10)[Color of text outline]
Select [Black], [Blue], [Cyan], [Green], [Yellow], [Red], [Magenta] or [White] for the color of text outline.
(11)[Color depth of text and outline]
Select [Fill text and outline], [Make text only transparent], [Make text only translucent] or [Make text and outline translucent] for the color depth of text and outline to be displayed over the video.
Note
• The on-screen time display may not correspond with camera time by several seconds.
• Depending on video quality settings, on-screen display may become difficult to decipher. Set after confirming appearance on actual video.
Important
The on-screen time display is not suitable for usage where high reliability is required. Use as reference information only where utmost and constant reliability is required for surveillance.
