
Change the machine settings (MX330)
| Article ID: ART128547 | | | Date published: 05/12/2015 | | | Date last updated: 08/17/2015 |
Description
Solution
Changing the Machine Settings on the LCD
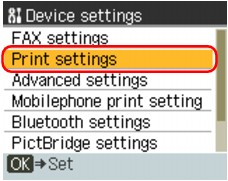
This section describes the procedure to change the settings in the Device settings screen, taking the steps to specify Extended copy amount as an example.
-
Make sure that the machine is turned on, then press the Menu button.
- Use the

 button to select
  Settings, then press the OK button.
 -
Use the

 button to select
  Device settings, then press the OK button.
The Device settings screen is displayed.
-
Use the

 button to select a menu, then press the OK button.
-
Use the

 button to select a menu, then press the OK button.

The setting screen for the selected item is displayed.
-
Use the

 button to select a setting item, then press the OK button.
Print settings
-
Prevent paper abrasion
Use this setting only if the print surface becomes smudged.
 Important
- Be sure to set this back to OFF after printing since it may result in lower printing speed or lower print quality.
- Be sure to set this back to OFF after printing since it may result in lower printing speed or lower print quality.
-
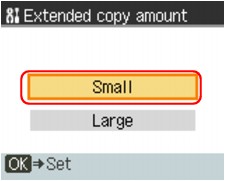
Extended copy amount
Selects the amount of image that extends off the paper when printing in Borderless (full).
 Note
Note
Advanced settings
-
Volume control
Selects the volume.
-
Country select
Selects the country where you are using the machine.
-
Quiet mode
Enables this function on the machine if you want to reduce the operating noise, such as when printing at night.
Enabling this function reduces the noises generated in the following cases:
ImportantNote
-
Key repeat
Enables/Disables continuous input by pressing and holding down the
 ,
,  ,
,  , or
, or  button when setting the number of copies, the zoom ratio, etc.
Mobilephone print setting
When printing from a mobile phone through Bluetooth communication, select the print settings such as page size, media type, layout, and so on.
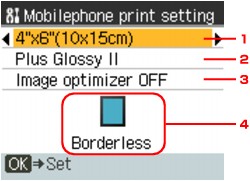
- Select the page size for printing photos saved on a mobile phone.
- Select the media type for printing photos saved on a mobile phone.
- Select Image optimizer ON to correct and smooth out the jagged contours when printing.
-
Select the layout of the photos according to the paper for printing.
Bordered x 1, x 2, x 4, x 8
Borderless x 1, x 2, x 4, x 8
Mixed 1, 2, 3Note
Bluetooth settings
You can change the device name of the machine, passkey, and so on in the Bluetooth settings.
-
Device name
Specifies the name of this machine that is displayed on a Bluetooth-compatible device.
For example, if you set it to XXX-2, the machine will be displayed as "Canon XXX-2" on the Bluetooth device. The default value is XXX-1 (where "XXX" is your machine's name).
-
Access refusal
Selecting ON will disable searching of this machine by a Bluetooth-compatible device.
-
Security
When you select Enable, the passkey set on the Passkey screen becomes effective. Setting the passkey prevents unwanted access from other Bluetooth devices. You can choose either of the security modes below.
-
Mode 3 (recommended)
This mode is activated on link level enforced security.
The passkey will be required when a Bluetooth device communicates with the machine.
Normally select this mode.
-
Mode 2
This mode is activated on service level enforced security.
The passkey will be required when printing through Bluetooth communication.
After setting the security mode, we recommend making a trial print through Bluetooth communication.
If printing does not start, change the security mode and try again.
-
Mode 3 (recommended)
-
Passkey
Changes the passkey. The passkey is a four-digit number used to prevent unwanted access from other Bluetooth devices.
The initial value is "0000".
After you change the passkey, you may be required to input the new passkey on a Bluetooth device, even though it had previous access to the machine. In this case, input the new passkey on the device.
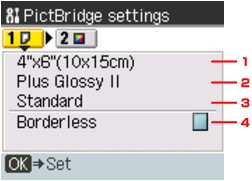
PictBridge settings
You can change the print settings when printing from a PictBridge compliant device.
Set the print settings to Default on the PictBridge compliant device when you want to print according to the settings on the machine.
See Settings on a PictBridge Compliant Device to change print settings from the PictBridge compliant device.
Tab 1
-
Select the paper size when printing directly from a PictBridge compliant device.
When you perform PictBridge settings from the machine, set Paper size to Default on the PictBridge compliant device.
-
Select the media type when printing directly from a PictBridge compliant device.
When you perform PictBridge settings from the machine, set Paper type to Default on the PictBridge compliant device.
- Select the print quality when printing directly from a PictBridge compliant device.
-
Select bordered or borderless print.
When you perform PictBridge settings from the machine, set Layout to Default on the PictBridge compliant device.
Tab 2
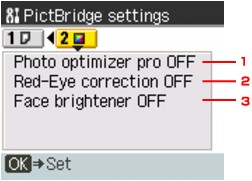
Language selection
Reset setting
Reverts all settings you made to the machine back to default. However, some data may not be changed, depending on the current usage state of your machine.
Settings on a PictBridge Compliant Device
This section describes the PictBridge function of the machine. For the print settings on a PictBridge compliant device, refer to the instructions given in the device's instruction manual.
- In the following description, names of setting items are given according to those used in Canon-brand PictBridge compliant devices. Setting item names may be different depending on the brand or model of your device.
- Some setting items explained below may not be available on some devices. In this case, the settings made on the machine are applied. Also, when some items are set to Default on a PictBridge compliant device, the machine settings for these items are applied.
 Settings on the Machine
The following settings can be used when printing from a PictBridge compliant device.
Settings on the Machine
You can change the PictBridge print settings from the PictBridge settings screen. Set the print settings to Default on the PictBridge compliant device when you want to print according to the settings on the machine.
This section describes the procedure to display the PictBridge settings screen. For setting items, see PictBridge settings.
- Make sure that the machine is turned on.
- Press the Menu button.
- Use the

 button to select
  Settings, then press the OK button.
 - Use the
 button to select
  Device settings, then press the OK button.
 -
Use the

 button to select PictBridge settings, then press the OK button.
The PictBridge settings screen is displayed.