Set Color Mode to Linear Tone
If printed colors appear too saturated or dark, try changing the Color Mode setting to Linear Tone on the Manual Color Adjustment page of the driver.
- On the Windows desktop, click 'Start', point to 'Settings', then click 'Printers' (Windows XP: On the Start menu, click 'Printers and Faxes', Windows Vista Click / Select Start from the bottom left of the Windows screen, 'Control Panel', 'Hardware and Sound', and then click on 'Printers'.).
Note: If you are in 'Classic' view, Click 'Printers' directly from the 'Control Panel'.
- Windows 2000/XP/Vista: Right-click the printer icon, then click 'Printing Preferences'. Windows 98/Me: Right-click the printer icon, then click 'Properties'.
- On the Main tab, select 'Manual' for 'Color Adjustment.'

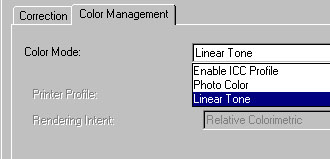
- On the Manual Color Adjustment screen, select 'linear Tone' from the Color Mode drop-down menu.

Note: 'Linear Tone' can only be selected when 'Driver Matching' is set for Color Correction.
'Linear tone' can also be set from the Color Adjustment section of Easy-PhotoPrint Pro.