 Stitch Assist Mode Stitch Assist Mode
Use this mode when taking shots that you want to combine into a panorama. To create the panorama itself, you must stitch the images together at your computer.

- To create the panorama at your computer, use the PhotoStitch software that came with your camera.
Shooting
Framing a Subject
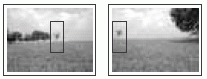
The PhotoStitch program detects the overlapping portions of adjoining images and merges them. When shooting, try to include a distinctive item (landmark) in the overlapping portions.

-
Compose each frame so that it overlaps 30 to 50 % of the adjoining image.
-
Do not include moving items in the overlap.
-
Do not try to stitch images that include distant and close items. Objects may appear warped or doubled up.
-
Make the brightness in each image consistent. The final image will appear unnatural if the difference in brightness is too great.
-
For good results, pan (swivel) the camera to take successive shots. A tripod helps greatly.
-
To shoot close-ups, slide the camera over the subject, keeping it parallel as you move.
|
|
Return to top
Shooting
1. Turn on the camera, and set the mode switch to  .
.
2. Turn the shooting mode dial to .

The LCD monitor will turn on.
3. Select the shooting direction using the  or
or  button.
|

|
Left > Right
|
Left to right horizontally
|
|

|
Left < Right
|
Right to left horizontally
|

3. Shoot the first image.
- The exposure and white balance settings are set and locked with the first image.
4. Compose and shoot the second image so that it overlaps the first.

- Minor discrepancies in the overlap can be corrected with the software.
- An image can be retaken. Press the or button to return to that frame.
5. Use the same procedures to shoot the remaining frames.
- A sequence may contain up to 26 images.
6. Press the <FUNC./SET> button after the last shot.

- A custom white balance setting cannot be set in mode. To use a custom white balance setting, first set it in another Shooting mode.
- When the
 button is pressed, you can switch between the items (Exposure compensation/Shooting direction selection) which you can set. button is pressed, you can switch between the items (Exposure compensation/Shooting direction selection) which you can set.
- The settings in place for the first image are locked in and cannot be changed for subsequent shots.
- A TV cannot be used as the monitor for shooting in this mode.
|
Return to top
