
Information on printing options PowerShot S400
| Article ID: ART157640 | | | Date published: 06/09/2015 | | | Date last updated: 08/17/2015 |
Description
Solution
Printing
About Printing
This camera supports direct printing. By connecting the camera to an optional direct print compatible printer (CP Series)*1 or a Bubble Jet printer (sold separately) that supports the direct print function, you can send the images from the CF card directly to the printer using the camera buttons. Or, you can specify the images on your CF card you want to print and how many copies you want (DPOF*2 Print Settings), and then take the CF card to a participating photo lab to have them printed out later.
*1 The direct print ![]() icon appears on direct print compatible CP Series printers.
icon appears on direct print compatible CP Series printers.
*2 Digital Print Order Format

Connecting the Camera to a Printer
You can make clear prints swiftly and easily when you connect the camera to an optional direct print function compatible printer (CP Series) or a direct print function compatible Bubble Jet printer (sold separately). It can also be used with DPOF print settings.
![]()
- You are recommended to use the optional AC Adapter Kit ACK500 to power the camera when it is connected to the printer. If you do use a battery pack, ensure that it is fully charged and monitor the battery charge while printing.
![]()
- Please refer to the System Map supplied with your camera for direct print function compatible printer (CP Series) information.
- Please see your printer's user guide for instructions on loading paper and installing ink cartridges.
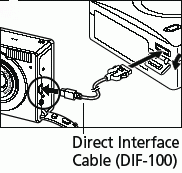
Connecting to a Direct Print Function Compatible Printer (CP Series)
Two direct interface cables are supplied with the printer. Use the cable (DIF-100) that has a ![]() symbol on the connector to connect to this camera.
symbol on the connector to connect to this camera.
1. Turn off the camera.
2. Attach the power cable to the printer and plug the other end into power supply, or install the printer's rechargeable battery.
Depending on the type of printer you have, it may or may not use rechargeable batteries. Refer to your printer's user guide.
3. Connect the camera and printer using the direct interface cable. When you insert the cable, make sure the "Canon" mark of the cable faces up.
4. Press the printer's <ON/OFF> button to turn on the power.
With the Card Photo Printer CP-10, the power turns on when the power cord is connected to the printer as shown in step 3.
5. Set the mode switch to ![]() and turn the camera on.
and turn the camera on.
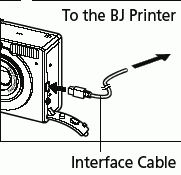
Connecting Bubble Jet Printer to the Camera
![]()
- Please read the user guide supplied with your BJ printer to see if it is compatible with the direct print function, and for instructions on connection cables and general operations.
1. Turn off the camera.
2. Turn the BJ printer's power on after you have connected the power cord to the BJ printer and inserted the other end in a power outlet.
3. Connect the camera and printer using the cable.
4. Set the mode switch to ![]() and turn the camera on.
and turn the camera on.
![]()
- On Bubble Jet printers with operation panels, images cannot be printed through the operation panel while the camera is connected.
- The following operations cannot be performed while the printer is connected.
- Replaying movies
- Setting the language using the <SET> and the <MENU> button combination.
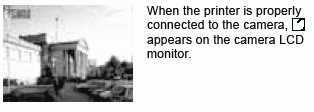
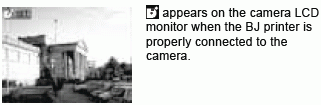
- When the printer is disconnected, the
 or
or  symbol will disappear from the LCD monitor and the camera will revert to standard replay mode.
Please use the following procedures when you detach the cable from the printer and the camera.
1. Detach the cable from the printer.
2. Turn off the camera power.
3. Detach the cable from the camera.
When you detach the cable from the camera, hold the plug and do not pull by the cable.
Printing (Direct Print Function)
NOTE: The following illustrations show examples from a direct print function compatible printer (CP Series). Options for the Style category will differ slightly for BJ printers.
An image can be printed when displayed in single replay or selected in index replay.
1. Choose an image using the  or
or  button and press the <SET> button.
2. Set the number of prints, the print style and cropping settings (printing area) as required.
3. Choose [Print].
The image will start to print and, when it is completely finished, the display will revert to standard replay mode.
![]()
- You cannot print movies.
![]()
Cancel Printing
- To cancel printing between images printed, press the <SET> button. A confirmation dialog appears. Select [OK] using the and buttons and press the <SET> button.
- Direct Print Function Compatible Printers (CP Series):
- BJ Printers:
A print in progress cannot be stopped. The printer will stop after the current print is complete and the camera will display its replay screen at that point.
The printer will stop printing the current image and eject the paper.
Printing Errors
- An error message appears if an error occurs for some reason during the printing process. Use the or button to select [Stop] or [Resume] and press the <SET> button (with a BJ printer, the print will automatically restart if the error is resolved).
- Direct Print Function Compatible Printers (CP Series):
- BJ Printers with the Direct Print Function:
- On BJ printers equipped with an operation panel, an error number displays on the panel. Please refer to the Bubble Jet Printer Quick Start Guide for the remedies corresponding to the error numbers.
The [Resume] option may not appear with some types or error. In that case, select [Stop].
The [Continue] and [Stop] options may appear with some error messages.
Setting the Print Settings (Direct Print Function)
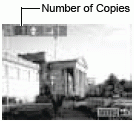
Selecting the Number of Copies
1. In Replaying mode, press the <SET> button and select the [Copies] option using the  or
or  button.
2. Specify the desired number of copies using the or button. You can specify from 1 to 99 prints.
Return to Printing Instructions
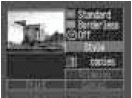
Setting the Print Style
You can select from among the following print styles.
Direct Print Function Compatible Printer (CP Series)
| Prints one image per page. | ||
|
- |
Prints eight copies of the same image on one page. | |
| Prints right to the edges of the page. | ||
|
- |
Prints with a border. | |
|
- |
Prints the image's creation date. |
* Only selectable when printing with credit-card size paper.
Direct Print Function Compatible BJ Printer
|
- |
Select the paper size from the following.
[Card #1], [Card #2], [Card #3], [LTR] or [A4] For the usable paper type, please refer to the Bubble Jet Printer User Guide. |
|
| Prints right to the edges of the page. | ||
|
- |
Prints with a border. | |
|
- |
Prints the image?s creation date. |
1. In the print setting menu, choose [Style] using the ![]() or
or ![]() button and press the <SET> button again.
button and press the <SET> button again.
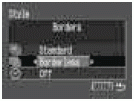
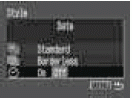
2. Choose [Image] (or [Paper]), [Borders] or [Date] using the or button.
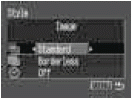
3. Select settings using the or button.
|
(Direct print compatible CP series printer) |
(Direct print compatible BJ printer) |
|
|
|
| Select [Standard] or [Multiple]. | Select [Card #1], [Card #2], [Card #3], [LTR] or [A4]. |
|
|
|
|
|
|
|
Choose [Borderless] or [Bordered]. |
Choose [On] or [Off]. |


4. Press the <MENU> button.
NOTE: If [Borderless] or [Multiple] is selected as the print style, the center portion of the recorded image (the image displayed on the LCD monitor) is printed at an enlarged size. As a result, the image's top, bottom and sides may be cropped slightly. The area of the image that will be printed will appear lighter than the rest of the image allowing you to check the portion that will be cropped.
![]()
- When printing multiple prints, the borders and the date cannot be set. (Images are printed without any date or borders)
- With the [Bordered] option, the border is printed in practically the same space as the recorded image.
Return to Printing Instructions
Trimming
You can specify which portion for an image gets printed.
![]()
- Prior to Trimming: Please set the Print Style (Image Settings, Paper, Borders and Date) first before setting the trimming settings.
1. In Replaying mode, press the <SET> button, choose [Trimming] using the or button and press the <SET> button again.
The trimming frame will appear at the center of the image. If a trimming setting has already been selected for the image, the frame will appear around the previously selected portion.
2. Trim the image.
-
Changing the Size of the Trimming Frame
- Turn the zoom lever toward
 or
or  .
. - The trimming frame can be changed to a minimum selection of approximately half the displayed image or a maximum selection that is virtually the same size as the image.
- You can cancel the trimming setting by turning the zoom lever toward again when the trimming frame is already set to the maximum size.
- When printing an image that has been magnified using the trimming option, the image quality may become coarser and grainier depending on the magnifying rate. With direct print function compatible printers, the trimming frame displays in red.
- Turn the zoom lever toward
-
Setting the Portion of the Trimming Frame
Move the trimming frame using the
, , or button. -
Rotating the Trimming Frame
You can rotate the trimming frame by pressing the <DISP.> button.
3. Press the <SET> button to close the setting menu.

![]()
- The trimming setting only applies to one image.
The trimming setting is cancelled with the following operations.
- When you set the trimming settings for another image.
- When you close the Print mode (when you turn the camera power off, change the camera mode, or detach the direct interface cable).
- When you press the button while in the trimming setting screen.
- When you try to expand the trimming frame beyond its maximum size.
![]()
- The selected Image Settings, Paper and Border setting determine the shape of the trimming frame.
- Please use the LCD monitor to set the trimming settings. The trimming frame may not display correctly on a TV monitor.
Return to Printing Instructions
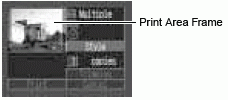
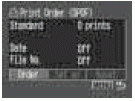
Print Settings (DPOF Print Settings)
You can select images on a CF card for printing and specify the number of print copies in advance using the camera. This is extremely convenient for sending the images to a photo developing service or for printing on a direct print function compatible printer (CP Series) or a direct print function compatible BJ printer.
![]()
- The
 mark appears on images that have had print marks set by another DPOF-compliant camera. These settings will be overwritten by any print marks set by your camera.
 - The output of some digital printers or photo lab services may not reflect the specified print settings.
- Print settings cannot be set for movie images.
Selecting Images for Printing
1. In the [ ![]() (Replay)] menu, select [
(Replay)] menu, select [![]() (Print Order)] and press the <SET> button.
(Print Order)] and press the <SET> button.
2. Select [Order] using the or button and press the <SET> button.
Single Images
|
|
|
|
All the Images on a CF Card
|
|

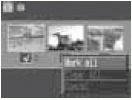
3. Press the <MENU> button.
![]()
- Images are printed in order from oldest to newest by the shooting date.
- A maximum of 998 images can be marked per CF card.
- Press the zoom lever in step 3 to switch between single and 3-image index replay for selecting an image.
- When [Print Type] is set to , the number of copies can be set. When it is set to [Index], the number of copies cannot be set (only one copy will be printed).
- Print settings can also be assigned to images with the supplied software programs on a computer.
Setting the Print Style
The following print settings can be selected.
|
- |
|
Prints one image per page |
|
|
|
Prints index prints (multiple reduced-size images per page) |
|
- |
|
Prints the images in the standard and index formats |
|
|
- |
Adds the date to the print |
|
|
- |
Adds the file number to the print |
1. In the [ ![]() (Replay)] menu, select [
(Replay)] menu, select [![]() (Print Order)] and press the <SET> button.
(Print Order)] and press the <SET> button.
2. Select [Set up] using the or button and press the <SET> button.

3. Select [![]() (Print Type)], [
(Print Type)], [![]() (Date)] or [
(Date)] or [![]() (File No.)] using the or button.
(File No.)] using the or button.
4. Select a setting using the or button.
|
|
|
|
|
Select [Standard], [Index], or . |
Select [On] or [Off]. |
Select [On] or [Off]. |

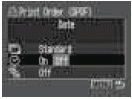
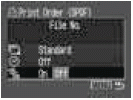
5. Press the <MENU> button.
The set up menu will close and the Print Order menu will reappear.
![]()
- When [Print Type] is set to [Index], the [Date] and [File No.] cannot be set to [On].
- If [Print Type] is set to , [Date] and [File No.] can be set to [On], however, only the file number is printed for the index print.
![]()
- The date prints as the date and time in the format specified in the Set Date/Time menu.
Resetting the Print Settings
The print settings can all be removed at once. The print type is reset to [Standard] and the date and file number options are set to [Off].
1. In the [![]() (Replay)] menu, select [
(Replay)] menu, select [![]() (Print Order)] and press the <SET> button.
(Print Order)] and press the <SET> button.
2. Select [Reset] using the or button and press the <SET> button.

3. Select [OK] using the or button and press the <SET> button.
If you decide you don't want to reset the settings, select [Cancel] and press the <SET> button.
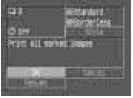
Printing with DPOF Print Settings
You can use the DPOF print settings to print with an optional direct print function compatible printer (CP Series) or with a direct print function compatible BJ printer.
1. In the [![]() (Replay)] menu, select [
(Replay)] menu, select [![]() (Print Order)] and press the <SET> button.
(Print Order)] and press the <SET> button.
2. Select [Print] using the , , or button and press the <SET> button.
3. Set the print style settings as required.
NOTE: A print style cannot be set if the print type is set to [Index] in the DPOF print setting. (You can also select the type of paper when printing with a BJ printer.)
4. Select [OK] using the , , or button and press the <SET> button.
![]()
- To print the date, set the [Date] setting in the print order menu in Step 2 above to [On]. You cannot set the date to print with the [Style] menu in Step 3 above. If the print type is set to [Index], the date will not print even if the [Date] setting is set to [On] in Step 2.
- When the print type is set to , it is possible to have the [Date] and [File No.] options set to [On], but only the file number will print on the Index print. (With a BJ printer, the file number and the date cannot be printed in the [Index] option)
- When the print type is set to [Standard], file numbers will not be printed even if they are set to [On].
![]()
The maximum number of images printed on one page in the Index print type depends upon the selected paper size.
| - Card Size: | 20 images |
| - L Size: | 42 images |
| - Postcard Size: | 63 images |
(Please refer to your Bubble Jet's user guide for an explanation of the number of images printed with a Bubble Jet printer.)
Restarting Printing
In the Print Order menu, select [Resume] using the and buttons and press the <SET> button. The remaining images can be printed.
Printing cannot be restarted under the following circumstances:
- If the print settings have been changed before restarting.
- If the image for which the print settings were set has been deleted before restarting.
- If there was very little free space on the CF card when the printing was cancelled. If these circumstances apply, you can select [OK] in the Print Order menu and reprint starting from the first image. If printing was cancelled because the camera battery became discharged, you are recommended to power the camera with the AC Adapter Kit ACK500 or switch to a fully charged battery pack. After replacing the spent battery, turn the camera power on again.