
Get Ink Status / Replace ink tank(s) MX7600
| Article ID: ART102102 | | | Date published: 05/11/2015 | | | Date last updated: 05/06/2019 |
Description
Solution
Routine Maintenance
Replacing an Ink Tank |
 |
This section explains the way to confirm the ink status and the procedure to replace ink tanks.
When ink runs out or other errors occur, an error message is displayed on the LCD to inform you of the error. See An Error Message Is Displayed on the LCD and confirm how to handle it.
When printing from your computer, error messages appear on your computer screen as well.
|
|
 Getting the Color or Black Ink Status Information
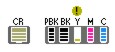
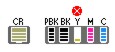
You can confirm the status of color or black ink tanks (PGI-9PBK/Y/M/C or PGI-7BK) in the following two ways:
 With the LCD of this Machine
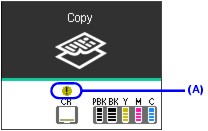
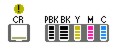
Make sure that the machine is turned on, then press the COPY, FAX, SCAN, or MEMORY CARD button. The current ink level will be displayed on the LCD for a few seconds.

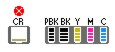
(A) Confirm whether any symbols are displayed here.
|
|
Color or black ink is low. You can continue printing for a while, but we recommend you to have a new ink tank available. |
|
|
Color or black ink may have run out. See "The ink may have run out. You are recommended to stop printing, then replace the ink tank." (when printing is in progress) / "The ink may have run out. Replacing the ink tank is recommended." (when printing is not in progress) U044 and take appropriate action. |
Note
The ink status information is also displayed on the screen that appears during printing.
An error message may be displayed on the LCD during printing.
|
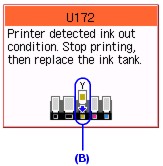
(B) Empty ink tank. |
Machine detected ink out condition. See "Printer detected ink out condition. Stop printing, then replace the ink tank." (when printing is in progress) / "Printer detected ink out condition of the following ink. Replace the ink tank." (when printing is not in progress) U172 and take appropriate action. |
With the Ink Lamps
You can confirm the status of each ink tank by the ink lamps. Open the Scanning Unit (Printer Cover) of the machine to confirm how the ink lamps light or flash.
 Ink lamp is on
The ink tank is correctly set and there is enough ink remaining to print.
Ink lamp is flashing
Flashing slowly (at around 3-second intervals)
 ......Repeats
Ink is low. You can continue printing for a while, but we recommend you to have a new ink tank available.
Flashing quickly (at around 1-second intervals)
 ......Repeats
The ink tank is inserted in the wrong position or it is empty. Ensure that the ink tank is in the correct position as directed by the label on the Print Head Holder. If the position is correct and its lamp flashes, it is empty. Replace it with a new one.
Ink lamp is off
The ink tank is not set properly or the function for detecting the remaining ink level is disabled.
If the ink tank is not set properly, press the  mark on the ink tank until the tank clicks into place. If it does not click into place, make sure that the orange protective cap has been removed from the bottom of the ink tank. See Prepare the replacement tank..
If the function for detecting the remaining ink level is disabled, replace the ink tank with a new one. See Replacing Ink Tanks.
If the lamps are still off after reinserting the ink tanks, there has been an error and the machine cannot print. Check the error message displayed on the LCD. See An Error Message Is Displayed on the LCD.
Getting the Clear Ink Status Information
Clear ink is used only when printing on plain paper.
When Plain paper (Cassette) is selected for Media type and printing begins when clear ink (PGI-9Clear) is low, a message will be displayed in the LCD.
(A) Confirm whether a symbol is displayed here.
|
|
The clear ink is low. You can continue printing for a while, but we recommend you to have a new ink tank available. |
|
|
The clear ink tank is empty. See "The clear ink tank is empty. Replacing the ink tank is recommended." U045 and take appropriate action. |
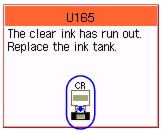
The following error message will be displayed on the LCD when the clear ink has run out during printing on plain paper.
|
|
Refer to When Replacing the Clear Ink Tank and replace the clear ink tank. If you continue printing under the clear ink out condition, see "The clear Ink has run out. Replace the ink tank." U165/U166 and take appropriate action. When the clear ink has run out, printing on plain paper from the Cassette is not possible. The fax, which is received under the clear ink out condition, will be stored in memory.
It is possible to print on photo paper, or any media type other than plain paper, loaded in the Rear Tray, even if clear ink has run out. |
Checking the Ink Status with the Computer Screen
This section describes how to check the color, black, or clear ink status with the computer.
You can confirm the status of each ink tank with the printer status monitor (Windows) or the Canon IJ Printer Utility (Macintosh).
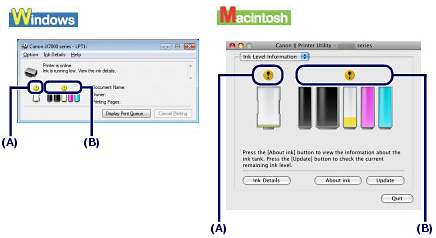
Clear ink (A): If  (Ink low) appears, the clear ink is running low. You can continue printing for a while, but we recommend you to have a new ink tank available.
Color or black ink (B): The ink with (Ink low) is running low. You can continue printing for a while, but we recommend you to have a new ink tank available.
- If the clear ink has completely run out, you cannot print on plain paper.
- An error message may appear while printing. Confirm the message and take an appropriate action.
- It is possible to print on photo paper, or any type of paper other than plain paper, loaded in the Rear Tray, even if clear ink has run out.
Follow the procedure below to open each of the confirmation screens.

1. Open the printer driver setup window.
For Windows Vista
- Click / Select 'Start' from the bottom left of the Windows screen, 'Control Panel', 'Hardware and Sound', and then click on 'Printers'.
Note: If you are in 'Classic' view, Click 'Printers' directly from the 'Control Panel'.
- Click your right mouse button on the listing for your printer, and then select 'Preferences' from the menu that appears.
For Windows XP Home Edition
- Click / Select 'Start' from the bottom left of the Windows screen, 'Control Panel,' 'Printers and Other Hardware,' and 'Printers and Faxes.'
- Click your right mouse button on the listing for your printer, and then select 'Preferences' from the menu that appears.
For Windows XP Professional Edition
- Click 'Start' from the bottom left of the Windows screen, and 'Printers and Faxes.'
- Click your right mouse button on the listing for your printer, and then select 'Preferences' from the menu that appears.
For Windows 2000
- Click / Select 'Start' from the bottom left of the Windows screen, and 'Settings,' then 'Printers.'
- Click your right mouse button on the listing for your printer, and then select 'Properties' from the menu that appears.
2. Click View Printer Status on the Maintenance sheet.
To confirm the ink tank information, click the Ink Details menu.
- You can also display the printer status monitor by clicking Canon XXX (where "XXX" is your printer's name) which appears on the taskbar while printing.

1. Open the Canon IJ Printer Utility.
- Launch IJ Printer Utility.
Note: In versions of Mac OS X older than 10.4, open the IJ / BJ Printer Utility from the Library>Printers>Canon>BJPrinter>Utilities folder.
- In the Apple menu select System Preferences
- Open Print & Fax.
- Make sure the correct printer is selected and, depending on OS version, click 'Open Print Queue...' or 'Print Queue...'.
- Click the Utility / Printer Setup icon.
Note: In Mac OS X 10.6, select 'Utility' at the top of the screen, and then click the 'Open Printer Utility' button.
- Select the printer from the list, then click 'Maintenance'.
2. Select Ink Level Information in the pop-up menu.
To confirm the ink tank information, click Ink Details.
Replacing Ink Tanks
When Replacing Color or Black Ink Tanks
When color or black ink tanks (PGI-9PBK/Y/M/C or PGI-7BK) run out of ink, replace them using the following steps.
Important
Handling Ink
Refilling ink is not recommended.
Color ink is also consumed in Print Head Cleaning and Print Head Deep Cleaning, which may be necessary to maintain the machine's performance. When an ink tank is out of ink, replace it immediately with a new one.
1 Open the Scanning Unit (Printer Cover) and the Paper Output Tray.
(1) Make sure the machine is turned on.
(2) Lift the Scanning Unit (Printer Cover) until it stops.
The Paper Output Tray will open automatically and the Print Head Holder moves to the center.
(A) Press the Open button to open the Paper Output Tray if it does not open automatically.

Caution
If the Scanning Unit (Printer Cover) is left open for more than 10 minutes, the Print Head Holder moves to the right side. Close and reopen the Scanning Unit (Printer Cover) to return the holder to the center.
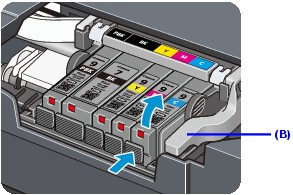
2 Remove the ink tank whose lamp is flashing fast.
(1) Push the tab and remove the ink tank.
(B) Do NOT touch the Print Head Lock Lever; remove only the ink tank.
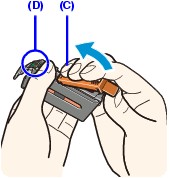
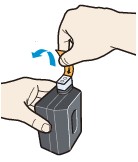
3 Prepare the replacement tank.
(1) Remove the orange protective cap from the ink tank.
Discard the cap once it is removed.
(C) Carefully hold the protective cap when removing it to prevent the ink from staining your fingers.
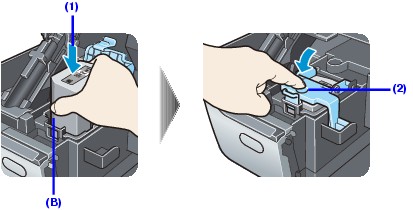
4 Install the ink tank.
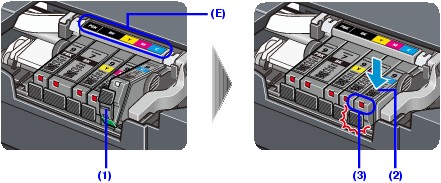
(1) Insert the front end of the ink tank into the Print Head.
(E) Make sure the position of the tank matches the label.
(2) Press on the
mark on the ink tank until the ink tank snaps firmly into place.
(3) Make sure that the ink lamp lights up red.
Install all the ink tanks to print. The machine cannot be used unless all the ink tanks are installed.
5 Gently close the Scanning Unit (Printer Cover).
The machine automatically stirs the inks.
Wait until the machine has stopped making operational sounds (up to 2 minutes). Do not open the Scanning Unit (Printer Cover) while the machine is operating.
When Replacing the Clear Ink Tank
When the clear ink tank (PGI-9Clear) runs out of ink, replace it using the following steps.
Handling Ink
Refilling ink is not recommended.
1 Open the Scanning Unit (Printer Cover) and the Paper Output Tray.
(1) Make sure the machine is turned on.
When replacing the clear ink tank, make sure that the machine is turned on. If the ink tank is replaced when the machine is turned off, the detected ink level may not match the actual ink level.
(2) Lift the Scanning Unit (Printer Cover) until it stops.
The Paper Output Tray will open automatically and the Print Head Holder moves to the center.
(A) Press the Open button to open the Paper Output Tray if it does not open automatically.

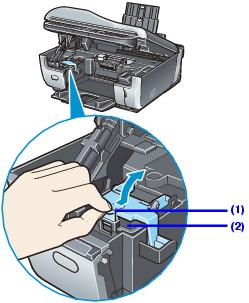
2 Remove the clear ink tank.
(1) Push the tab and open the Clear Ink Tank Locking Cover.
(2) Remove the clear ink tank.
3 Prepare the replacement tank.
Remove the orange tape in the direction of the arrow to peel off the protective film from the clear ink tank.
4 Install the clear ink tank.
(1) Be sure that the clear ink tank is properly aligned when inserting.
(B) Be sure that the sharp corner of the ink tank is closest to you and on your left.
(2) Close and press the round, indented portion on the Clear Ink Tank Locking Cover until it snaps firmly into place, locking the ink tank.
5 Gently close the Scanning Unit (Printer Cover).
Printing cannot be done until the machine is ready. This takes about 2 minutes.
If the error message is still displayed after the Scanning Unit (Printer Cover) is closed, see An Error Message Is Displayed on the LCD.
An Error Message Is Displayed on the LCD |
|
If an error message is displayed on the LCD, take the corresponding action described below.
Message
Action
"The ink may have run out. You are recommended to stop printing, then replace the ink tank." (when printing is in progress) / "The ink may have run out. Replacing the ink tank is recommended." (when printing is not in progress)
U044Ink may have run out (The lamp on the ink tank flashes).
If printing is in progress, you are recommended to press the machine's Stop/Reset button to stop printing, replace the ink tank, and then print again.
If printing is in progress and you want to continue printing, press the machine's OK button. Then printing can continue. Replacing the ink tank is recommended after the printing. The machine may be damaged if printing is continued under the ink out condition.
"The clear ink tank is empty. Replacing the ink tank is recommended."
U045The clear ink tank is empty.
You are recommended to replace the clear ink tank with a new one.
If printing is in progress and you want to continue printing, press the machine's OK button. Then printing can continue. Replacing the clear ink tank is recommended after the printing.
If the clear ink runs out, you will not be able to print on plain paper.
"Print head is not installed. Install the print head."
U051"The type of print head is incorrect. Install the correct print head."
U052Follow the directions given in your setup sheet to install the Print Head.
If the Print Head is already installed, remove the Print Head once and then reinstall it.
If the error is not resolved, the Print Head may be damaged. Service is required
For support and service options, sign into (or create) your Canon Account from the link below.
My Canon Account."Some ink tanks are not installed in place."
U072"More than one ink tank of the following color is installed."
U071Possible causes are as follows:
Confirm that the ink tanks are installed in the appropriate positions.
"The following ink tank cannot be recognized."
U043
U140
U150
Install the ink tank.
Install an appropriate ink tank.
Replace the ink tank.
"The clear Ink has run out. Replace the ink tank."
U165/U166The clear ink has run out.
Replace the clear ink tank with a new one.
If you do not replace the clear ink tank, press the machine's Stop/Reset button to clear the error. Print job will be canceled.
Print quality will deteriorate considerably and the feeder behind the cassette may be damaged if printing on plain paper is continued under the clear ink out condition. For this reason, you cannot print on plain paper until the clear ink tank is replaced with a new one.
Until the clear ink tank is replaced, the machine will not be able to print the received fax and will store it in its memory. The fax stored in memory needs to be printed manually.
If you accidentally unplug the power cord and the power is turned off when the clear ink has run out, the error may not be cleared even after pressing the Stop/Reset button. Replace the ink tank with a new one.
"The ink has run out. Stop printing, then replace the ink tank." (when printing is in progress) / "The ink has run out. Replace the ink tank." (when printing is not in progress)
U171Ink has run out. (The lamp on the ink tank flashes.)
If printing is in progress, press the machine's Stop/Reset button to stop printing, replace the ink tank, and then print again. Printing under the current condition may damage the machine.
To continue printing, you need to release the function for detecting the remaining ink level. Press and hold the machine's Stop/Reset button for at least 5 seconds, and then release it.
This operation releases the function for detecting the remaining level of the above ink, and releasing the function is memorized.
Please be advised that Canon shall not be liable for any malfunction or trouble caused by continuation of printing under the ink out condition.
See Getting the Color or Black Ink Status Information.
"Printer detected ink out condition. Stop printing, then replace the ink tank." (when printing is in progress) / "Printer detected ink out condition of the following ink. Replace the ink tank." (when printing is not in progress)
U172Machine detected ink out condition (The lamp on the ink tank flashes).
If printing is in progress, press the machine's Stop/Reset button to stop printing, replace the ink tank, and then print again.
To avoid printing troubles such as the mixing of inks, this machine is designed to display an error message and stop printing when the remaining ink level in an ink tank goes under the amount of ink required to maintain machine and print quality.
"Printer detected ink out condition. Stop printing, then replace the ink tank." (when printing is in progress) / "Printer detected ink out condition of the following ink. Replace the ink tank." (when printing is not in progress)
U181Machine detected ink out condition (The lamp on the ink tank flashes).
Stop printing, replace the ink tank, and then print again.
An ink tank that was once empty is installed.
Printing under the ink out condition may damage the machine.If you want to continue printing, you need to release the function for detecting the remaining ink level. To release this function, press and hold the machine's Stop/Reset button for at least 5 seconds, and then release it.*
* With this operation, releasing the function for detecting the remaining ink level is memorized. Please be advised that Canon shall not be liable for any malfunction or trouble which may be caused by continuation of printing or refilling of ink.
See Getting the Color or Black Ink Status Information.
"Printer detected ink out condition. Stop printing, then replace the ink tank." (when printing is in progress) / "Printer detected ink out condition of the following ink. Replace the ink tank." (when printing is not in progress)
U182Machine detected ink out condition (The lamp on the ink tank flashes).
Stop printing, replace the ink tank, and then print again. Be sure to replace the empty ink tank before resuming printing.
An ink tank that was once empty is installed.
Printing under the ink out condition may cause the printing trouble such as the mixing of inks, or a printer malfunction.If you want to continue printing, you need to release the function for detecting the remaining ink level. To release this function, press and hold the machine's Stop/Reset button for at least 5 seconds, and then release it.*
* With this operation, releasing the function for detecting the remaining ink level is memorized. Please be advised that Canon shall not be liable for any malfunction or trouble which may be caused by continuation of printing or refilling of ink.
See Getting the Color or Black Ink Status Information.
"There is no photo data."
"The card is currently write-enabled. Remove card and set to read-only mode before performing operation."
The Card Slot is set to write-enabled (USB enabled or LAN enabled).
You cannot print when the Card Slot is set to USB enabled or LAN enabled. After writing on the memory card, set to Read-only mode again.
"The ink absorber is almost full. Press OK to continue printing. Contact the service center."
The machine has a built-in ink absorber to hold the ink used during Print Head Cleaning, for example.
This error message indicates that the ink absorber is nearly full.
Press the OK button to cancel the error so you can continue printing.
However, because printing is disabled once the ink absorber becomes completely full and until the ink absorber is replaced, you are recommended to contact your Canon service representative as early as possible. For support and service options, sign into (or create) your Canon Account from the link below.
My Canon Account
(You will need to replace a particular part of the machine.)"Auto head align has failed. Press OK and repeat operation. <See manual>"
Possible causes are as follows:
Press the OK button to dismiss the error message, and print the nozzle check pattern to check the status of the Print Head.
Press the OK button on the machine to dismiss the error message, then load four sheets of A4/Letter-sized plain paper in the Cassette.
Automatic Print Head Alignment can only be performed using paper from the Cassette. For Automatic Print Head Alignment, always load paper in the Cassette.
Press the OK button to dismiss the error message, and then adjust your operating environment and/or the position of the machine so that the Paper Output Slot is not exposed directly to strong light.
After carrying out the above measures, if the problem continues after aligning the Print Head again, press the OK button to dismiss the error message, and then perform Manual Print Head Alignment.
"The transport unit may not be clean. Perform sheet cleaning. <See manual>"
When a sheet cleaning operation is necessary, the message is displayed before printing. Press the OK button on the machine to start printing.
We recommend that you perform sheet cleaning after printing finishes, as failure to perform sheet cleaning may affect the print quality.
"****
Error code."
"****" is an alphanumeric code that varies according to the error status.
(1) Turn off the machine, and lift the Scanning Unit (Printer Cover) to check if there are any foreign objects inside the machine.
(2) Move the Print Head Holder (the part that holds the ink tanks) to the right side gently by hand if you can move it manually. Make sure that the ink tanks are securely set in the Print Head Holder.
(3) Turn on the machine.
If the same error occurs, follow the instruction in "When other codes are displayed" described below.
Turn off the machine, and unplug the power cord of the machine from the power supply. After 5 minutes or more, plug the power cord of the machine back in, and then turn on the machine. If the same error occurs, service is required
For support and service options, sign into (or create) your Canon Account from the link below.
My Canon Account."Scanner is not operating correctly."
Turn off the machine, and unplug the power cord of the machine from the power supply. After 5 minutes or more, plug the power cord of the machine back in, and then turn on the machine. If the same error occurs, service is required
For support and service options, sign into (or create) your Canon Account from the link below.
My Canon Account."Incompatible device detected. Remove the device."
When printing from a PictBridge compliant device, depending on the model or brand of your device, you may have to select a PictBridge compliant print mode on the device before connecting it to the machine. You may also have to turn on your device or select Play mode manually after connecting the device to the machine. Perform necessary operations before connecting your device referring to its instruction manual.
If the error is still not resolved, check if you can print another photograph.
"An unsupported USB hub is connected. Remove the hub."
If a PictBridge compliant device is connected via a USB hub, remove the hub and connect it directly to the machine.
"Document in ADF. Redo operation after checking document in ADF and pressing OK."
The document is jammed in the ADF. Remove the document page jammed in the ADF, then press the OK button. When the error is cleared, redo the operation.
"Document size is too long. Redo operation after checking document on ADF and pressing OK."
The document is too long or is jammed in the ADF. Remove the document page jammed in the ADF, then press the OK button. When the error is cleared, make sure that the document you are loading meets the machine's requirements before redoing the operation.
"Document size not suitable for two-sided scanning. Press OK to cancel operation and discharge document."
Two-sided scanning can be used only for A4 or Letter-sized documents. Press the OK button to discharge the document, and rescan the document one side at a time.
"This paper is not compatible with duplex printing. Remove the paper and press OK."
The Page size or Paper size setting in the printer driver is not compatible with automatic duplex printing. Make sure that the paper size suitable for automatic duplex printing is specified.
Load A4, B5, A5, or Letter-sized paper, then press the OK button on the machine.
"Auto redial"
The machine is waiting to redial the recipient's number because the line was busy or the recipient did not answer when you tried to send a document. Wait for the machine to automatically redial the number. If you want to cancel automatic redialing, wait until the machine starts dialing the number, then press the Stop/Reset button. You can also delete the document from memory.
"This group dial cannot be used.
Coded dial ##"You selected a coded speed dial code in which a group is registered with the Hook button pressed.
In this way, a coded speed dial code in which a group is registered cannot be used.
* "##" represents a two-digit number.
"This group dial cannot be used.
One-touch ##"You pressed a One-touch Speed Dial button in which a group is registered with the Hook button pressed.
In this way, a One-touch Speed Dial button in which a group is registered cannot be used.
* "##" represents a two-digit number.
"Hang up the phone."
The handset is not placed in the handset cradle correctly. Replace the handset correctly.
"Try again in black & white."
The recipient's fax machine is not color-compatible. Press the Black button to resend the faxes. Alternatively, you can set Color TX to Send in black & white.
"Failed to connect."
The telephone line cable with a modular plug is not plugged in properly, or Dial tone detect is set to ON. Make sure that the cable is plugged in properly, and resend the fax after a while. If you still cannot send the fax, set Dial tone detect to OFF.
"Received in memory."
If the machine receives a fax under one of the following conditions, the machine will not be able to print the received fax and will store it in its memory. When the problem is resolved as described, the fax stored in memory is printed automatically.
You can set to print the received fax forcibly even if an ink other than the clear ink has run out.
However, a part of contents or all contents of the fax may not be printed since the ink has run out. And also the contents of fax will not be stored in memory.
In addition, if ink has already run out, it is recommended that OFF be selected for Auto print received in RX settings to store the received fax in memory once and print the fax manually after replacing the ink tank.
If the clear ink has run out, until the clear ink tank is replaced, the machine will not be able to print the received fax and will store it in its memory. The fax stored in memory needs to be printed manually.
When you did not print the fax stored in memory (e.g., when you did not resolve the problem by pressing the Stop/Reset button), you can delete or print the fax stored in memory later.
"Busy/no signal"
Try dialing again after waiting for a moment.
Check the fax number and dial again.
Contact the recipient and have him/her check the fax machine. For an overseas call, add pauses to the registered number.
The machine cannot send or receive documents to/from the fax machine incompatible with G3 standard. Contact the recipient and ask him/her to check that the fax machine is G3 compatible.
Confirm the telephone line type, then set your machine to the setting that matches your telephone line.
"Memory is full."
The machine's memory is full because it has sent/received too many documents, or a detailed document.
"Check the page size and press OK."
Paper of size other than A4, Letter, or Legal is loaded.
Load A4, Letter, or Legal-sized plain paper in the Cassette. However, plain paper cannot be fed from the Rear Tray.
Top of Page