
Change the copy settings - MX870
| Article ID: ART106036 | | | Date published: 05/11/2015 | | | Date last updated: 08/15/2015 |
Description
Solution
Making Copies
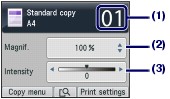
When the Copy standby screen is displayed, press the right Function button to change the copy settings such as page size, media type, and print quality. Use the 
 button to change the setting item, and the
 button to change the setting.

-
Prepare for copying.
(1) Make sure that the power is turned on.
(2) Press the COPY button.
The copy standby screen will appear.
(3) Load paper.
Here we make sure that A4 plain paper is loaded in the Cassette.
|
(4) Open the Paper Output Tray gently, and open the Output Tray Extension.
(5) Load an original on the Platen Glass or in the ADF.
To load the original on the Platen Glass, align it with the alignment mark
WITH THE SIDE TO COPY FACING DOWN as shown below.
Then close the Document Cover gently.

|
- Start copying.
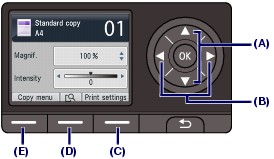
(1) Use the Numeric buttons to specify the number of copies.
(2) Use the
or
button (A) to specify the magnification.
Here we select 100%.
(3) Use the
or
button (B) to specify the copy intensity.
Press the
(4) Press the right Function button (C) to select Print settings, and confirm the page size, media type, etc.
Here we confirm that A4 is selected for Page size and Plain paper for Type.
To change the settings, use the

(5) Press the Color button for color copying, or the Black button for black & white copying.
The machine starts copying.
Remove the original on the Platen Glass or the Document Output Slot after copying is completed.
|
|
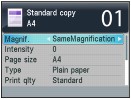
 Changing the Settings
Press the right Function button to select Print settings on the copy standby screen. You can select the item, such as page size, media type, or print quality, and change the setting.
|
|
|
Note:
- The settings of the page size, media type, etc. are retained even if the machine is turned off.
- Depending on the functions, some setting items cannot be specified in combination. If the setting items cannot be specified in combination, Error details is displayed on the LCD. In this case, press the left Function button to confirm the message, then perform settings again.
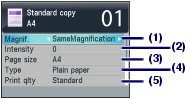
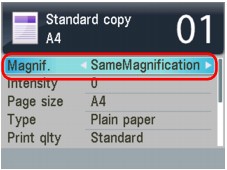
(1) Magnif. (Magnification)
Specify the enlargement/reduction manner. You can specify the copy scale by selecting the page size: A4 to A5, A4 to B5, etc. If you do not want to enlarge/reduce the page size, select SameMagnification.
(2) Intensity
Specify the intensity. When Auto is selected, the intensity is adjusted automatically when copying originals loaded on the Platen Glass. Auto is displayed under the slide bar for the intensity on the Copy standby screen.
Important: When Auto is selected, pressing the
Note: When Auto is selected, you cannot copy originals from the ADF. Load the original on the Platen Glass.
(3) Page size
Select the page size of the paper to print: A4, 8.5"x11" (LTR), etc.
(4) Type (Media type)
Select the media type of the paper to print: Plain paper, Plus Glossy II, etc.

|
(5) Print qlty (Print quality)
Select the print quality according to the original to copy: Standard, High, etc. The available print quality settings depend on the paper selected for Type.
Important:
- If you use Fast with Type set to Plain paper and the quality is not as good as expected, select Standard or High for Print qlty and try copying again.
- Select High for Print qlty to copy in grayscale. Grayscale renders tones in a range of grays instead of black or white.
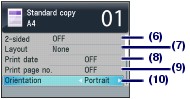
(6) 2-sided
Select the scanning side of original and the printing side of paper: 1
2sided print, 2
1sided print, or 2
2sided print.
If you want to make a one-sided copy of a one-sided original, select OFF.
(7) Layout
Select the layout: 2-on-1 copy or 4-on-1 copy.
(8) Print date
Print the current date in the upper right margin of paper, according to the orientation of the original.
Note:
- The date registered in the machine is printed.
- The date is printed in black at the upper right of the sheet.
- If you copy onto sides of the sheet with the following settings, the date is printed at the upper right on the front of the sheet and at the upper left on the back of the sheet.
- Portrait is selected for Orientation, and Long-side stapling is selected.
- Landscp. is selected for Orientation, and Short-side stapling is selected.
(9) Print page no.
Print a sequential page number in the lower center margin of paper, according to the orientation of the original.
Note:
- The page number is printed in black at the lower center of the sheet.
- The machine can print the page number from 1 to 999.
(10) Orientation
Select the orientation of the original to copy: Portrait or Landscp..
|
Reducing or Enlarging a Copy
The LCD below is displayed when you press the right Function button in the Copy standby screen. Select the reduction/enlargement method from Magnif..
-
Some of reduction/enlargement methods are not available depending on the copy method.
- Fit to page
-
The machine automatically reduces or enlarges the image to fit the page size.
-

- Preset ratio
-
You can select one of the preset ratios to reduce or enlarge copies.
-

-
Select the appropriate ratio from Magnif.. The following ratios are available.
-
94% A4->8.5x11/156% 5x7->8.5x11/94% 4x6->8.5x11
-
 Note
Note-
When you select Fit to page, load the original on the Platen Glass.
-
When you select Fit to page, the document size may not be detected correctly depending on the original. In this case, select the setting other than Fit to page.
-
When you want to copy at the same size as the original, select SameMagnification.
-
- Ratio specified copy
-
You can specify the copy ratio as a percentage to reduce or enlarge copies. Use the
button to change the copy ratio when the Copy standby screen is displayed.
