Loading the ink and paper integrated cartridges (SELPHY ES40)
Article ID: ART152500
|
Date published: 05/22/2015
|
Date last updated: 08/17/2015
Description
Loading the ink and paper integrated cartridges (SELPHY ES40)
Solution
SELPHY ES40 Integrated Ink and Paper Cartridge
attention:
Please use only genuine Canon Easy Photo Pack cartridges for SELPHY ES series printers. Cartridges for the CP series cannot be used.
Do not remove the colored protective paper that is installed in the cartridge.
Do not touch or pull on the ink sheet. Do not touch the cartridge with wet or sweaty hands. You may not be able to print if the ink sheet is damaged, dirty or wet.
Setting the [cartridge]
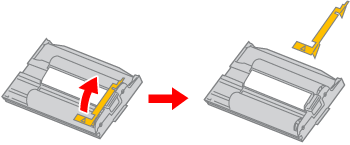
Prepare the cartridge. If there is an orange stopper attached to the cartridge, remove it as shown in the illustration.
Check that the ink sheet is taut with no slack. If the ink sheet is slack, insert the cleaner unit as shown in the illustration and turn it slowly to take up the slack. [Ink sheet] Insert the [Cleaner Unit]. Gently rotate in the counterclockwise direction to take up the slack.*
* It will not be possible to use all the paper for printing if you overwind the ink sheet.
Check that the [protective paper] is correctly loaded in the [cartridge]. [clips] [protective paper] (If the [protective sheet] has come out from under the [clips], use your finger to push it back under the [clips].)
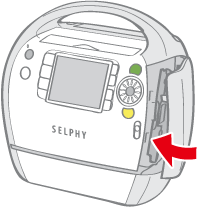
Slide the < cartridge cover lever > up to open the < cartridge cover >. Push up the < cartridge cover lever >. Open the < cartridge cover >.
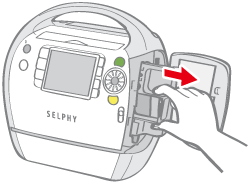
If there is a [cleaner unit] inside the printer, grasp it and remove it. If you are replacing a cartridge, you will need to eject the old cartridge. This is done by pressing down on the EJECT button located at the top right of the cartridge compartment. Once the button is pressed down, the cartridge will eject and you can pull it the rest of the way out.
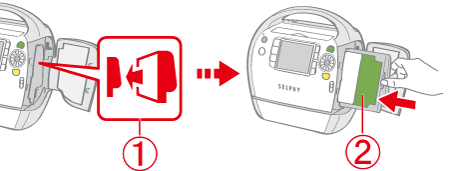
Make sure that the [cartridge] is oriented as shown by the direction indicator on the inside of the printer, and insert the [cartridge] until it clicks into place. Direction indicator [cartridge] (Insert the [cartridge] so that the side with the [protective paper] is facing the front.)
Press the area on the < cartridge cover > marked [PUSH] to close.
Placing / Connecting the Printer
Set up and connect your SELPHY printer in the following manner for safe use. Connect the supplied [power cord] to the printer. Insert the plug into a power outlet. Leave more than 15 cm (6 in.) of clearance at the front and back of the equipment and 10 cm (4 in.) of clearance on sides.
attention:
Place the printer on a stable and even surface, such as a table. Never place it on an unstable or tilted surface.
Keep the printer at least 1 m (3 ft.) from devices emitting electromagnetic waves or strong magnetic fields.
Do not block the < air vents > on the back of the printer.
Never place the printer close to motors or other devices that generate strong electromagnetic fields. This may damage or cause the printer to malfunction.
Do not place near television or radio. This may cause the printer to malfunction.


 [Ink sheet]
 Insert the [Cleaner Unit].
 Gently rotate in the counterclockwise direction to take up the slack.*
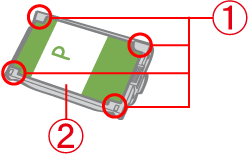

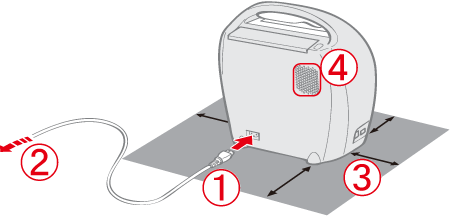
 < air vents > on the back of the printer.