Follow the procedure below to register fax/telephone numbers.
 Note
Note
Before you register fax/telephone numbers using Speed Dial Utility2, make sure that no fax operations are in progress.
-
Start up Speed Dial Utility2. Click here for instructions on starting this program in Windows. Click here for instructions on starting this program on a Mac OS X computer.
-
Select a printer from the Printer Name: list box, and then click Display Printer Settings.
-
Click TEL Number Registration from Setting Item List:.
The list of registered fax/telephone numbers is displayed.
-
Select an unoccupied code from list, and then click Edit....
The Individual or Group Selection dialog box is displayed.
-
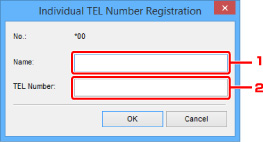
Click Register individual TEL number or Register group dial, and then click Next....
-
Click OK.
To continue registering fax/telephone numbers or a group dial, repeat steps 4 to 6.
Starting Up Speed Dial Utility2 in Windows
 Important
- Before starting up Speed Dial Utility2, make sure that the printer is connected to the computer correctly.
- Do not plug in or unplug any cables while the printer is in operation, or when the computer is in sleep or standby mode.
- If your printer is compatible with LAN connection, make sure that the printer is connected to the computer with LAN connection to use Speed Dial Utility2 via LAN connection.
- The password entry screen may appear during startup or operation. If it appears, enter the administrator password, and then click OK. If you do not know the administrator password, contact the administrator of the printer.
-
Make sure that the printer is turned on.
-
Start up Speed Dial Utility2.
- For Windows 10, click Start button and select All apps, Canon Utilities, and then Speed Dial Utility2.
- For Windows 8.1 or Windows 8, select Speed Dial Utility2 on the Start screen to start Speed Dial Utility2. If Speed Dial Utility2 is not displayed on the Start screen, select the Search charm, and then search for "Speed Dial Utility2".
- For Windows 7 or Windows Vista, click Start and select All programs, Canon Utilities, Speed Dial Utility2, and then Speed Dial Utility2.
Speed Dial Utility2 starts up.
Note
- You can also start up Speed Dial Utility2 from the Quick Utility Toolbox.
Back to top
Starting Up Speed Dial Utility2 on a Mac OS X computer
Important
- Before starting up Speed Dial Utility2, make sure that the printer is connected to the computer correctly.
- Do not plug in or unplug any cables while the printer is in operation, or when the computer is in sleep or standby mode.
- If your printer is compatible with LAN connection, make sure that the printer is connected to the computer with LAN connection to use Speed Dial Utility2 via LAN connection.
- The password entry screen may appear during startup or operation. If it appears, enter the administrator password, and then click OK. If you do not know the administrator password, contact the administrator of the printer.
-
Select Applications from the Go menu of Finder.
-
Double-click Canon Utilities folder.
-
Double-click Speed Dial Utility2 folder.
-
Double-click Speed Dial Utility2.
Speed Dial Utility2 starts up.
Note
- You can also start up Speed Dial Utility2 from the Quick Utility Toolbox.
Back to top