| Solution |
In a case where you install the printer driver via network connection with a temporary port (a port not used actually), you need to specify the port settings using the following procedure.
In the following cases, you need to specify the port settings manually.
| Configure port settings on your computer when: | Action |
| Installing the printer driver using [Add Printer]. | If the installed printer driver uses a different port than the one assigned to the machine, you must configure the port to match the machine's IP address. |
| When obtaining the IP address automatically (DHCP: ON), the data transfer stops suddenly. | When the IP address is obtained automatically, there may be a case where the IP address assigned to the machine is changed if you restart the server (router). In this case, confirm the IP address configured by the machine, and change the port settings according to the IP address reconfigured by the machine. |
| Changing the IP address of the machine. | When the machine's IP address is changed, you must reconfigure the port to match the IP address of the machine. |
NOTE
Checking the IP address by printing a user data list
- You can also check the IP address by printing a user data list. For details on the procedures for printing a user data list, see the "e-Manual" (HTML manual) in the CD-ROM supplied with the machine.
The dialog box that appears on your computer:
- The dialog box may vary slightly, depending on the version of your operating system.
1. Open the printer folder.
From the [Start] menu, select [Printers and Faxes].
From the [Start] menu, select [Control Panel], click [Printers and Other Hardware] and [Printers and Faxes].
From the [Start] menu, select [Control Panel] and click [Printer].
From the [Start] menu, select [Devices and Printers].
From the [Start] menu, select [Control Panel], and then double-click [Printers].
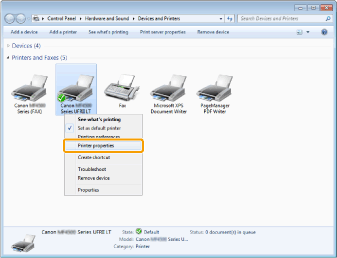
2. Right-click the icon for the machine and select [Printer properties] (or [Properties]).
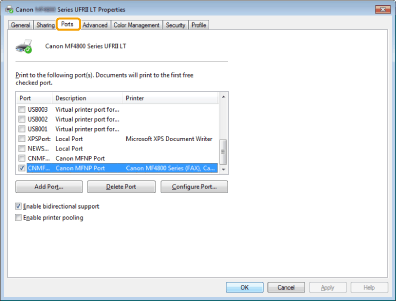
3. Click the [Ports] tab.
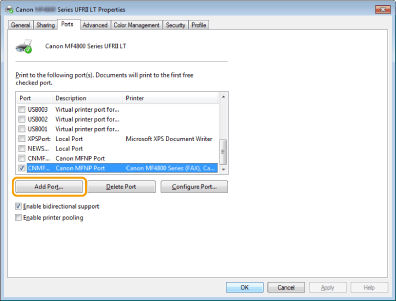
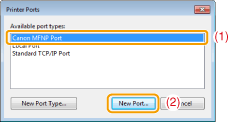
4. Click [Add Port].
5. Select [Canon MFNP Port] for [Available port types] and click [New Port].
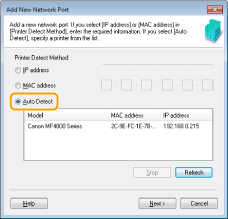
6. Click [Auto Detect].
NOTE
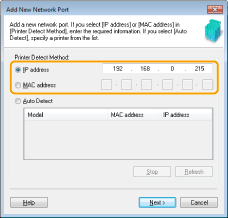
When you cannot perform Auto Detect:
- Enter the IP address or MAC address of the machine manually.
- For details on the procedures for checking the IP address of the machine, see the "e-Manual" (HTML manual) in the CD-ROM supplied with the machine.
- For details on the procedures for checking the MAC address of the machine, see the "e-Manual" (HTML manual) in the CD-ROM supplied with the machine.
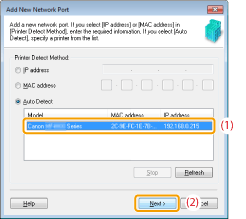
7. Select the detected printer and click [Next].
8. Click [Add].

9. Click [Finish].

10. Click [Close].
11. Click [Apply].
|