Restoring Network Settings to Factory Default
For troubleshooting purposes, it may be necessary to restore the printer's network settings back to factory default (initialize). To initialize the printer using the operation panel, click here. To initialize the printer with Canon IJ Network Tool, click here.
Operation Panel:
- Press <ON/OFF> to power on the machine.
- Press <Menu> button.
- Press the left or right arrow button to select [Maintenance/settings], then press <OK>.
- Press the left or right arrow to select [Device settings], then press <OK>.
- Press the left or right arrow to select [LAN settings], then press <OK>.
- Press the left or right arrow to select [Reset LAN settings], then press <OK>.
Canon IJ Network Tool
- Start Canon IJ Network Tool. (Click on the attachment for instructions to open Canon IJ Network Tool.)
- Select your printer in Printers.
- In Canon IJ Network Tool window, select 'Maintenance' from the Settings menu.
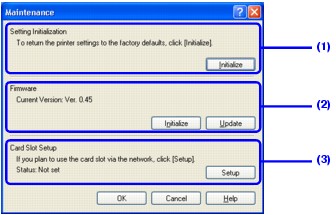
- Click 'Initialize' under Setting Initialization (1) in the Maintenance dialog box.
Caution: Initialization erases all connection settings with computers, disabling printing.
- All settings that were previously set will be lost after initialization. Set up the machine again to use it.
(1) Setting Initialization
Initialize:
Reverts all the network settings of the machine to factory default. Click 'Initialize' to display the Initialize Settings dialog box and click 'Yes' to initialize the network settings of the machine. Do not turn off the machine during initialization. Click 'OK' when initialization is complete.
Performing initialization when connected over wireless LAN will break the connection, so connect the computer and the machine with a USB cable and perform setup again, or restart the Canon IJ Network Tool.
Caution: Initialization erases all connection settings with computers, disabling printing.
(2) Firmware
Displays the firmware version.
Note: You must connect the machine to the computer over a network in order to initialize or update the firmware. If you are using the machine with a USB connection, these functions are not available.
Initialize:
Reverts the firmware to default. Click 'Initialize' to display the Initialize Firmware dialog box and click 'Yes' to revert the firmware. Do not turn off the machine during initialization. Click 'OK' when initialization is complete.
Performing initialization when connected over wireless LAN will break the connection, so connect the computer and the machine with a USB cable and perform setup again, or restart the Canon IJ Network Tool.
Update:
Updates the firmware. Select the firmware to update to from the Open dialog box and click 'Open'.
Performing initialization when connected over wireless LAN will break the connection, so connect the computer and the machine with a USB cable and perform setup again, or restart the Canon IJ Network Tool.
Caution:
- Do not turn off the machine during the firmware update. Otherwise the machine may not start up.
- Update is possible even when an out-of-date version of firmware is selected. However, doing so may cause the machine's network functionality to stop working.
(3) Card Slot Setup
Displays the status of the Card Slot. For details on how to mount the Card Slot as a network drive, see Using the Card Slot over a Network.
Caution:
- If you use the Card Slot over the network frequently, make sure the firewall setting on the computer is configured to allow communication with the Card Slot.
- Depending on your network environment, a computer might not be able to communicate with the Card Slot over the network, or it might take time to establish the connection.
Note: If "Communication with the Card Slot failed." is displayed, see "Communication with the Card Slot failed" is displayed during the network setup of the Card Slot.
Setup:
Click to display the Network Setup of the Card Slot dialog box. In the dialog box, select the drive letter, then click 'Next'.
Note: If the Card Slot setup is already complete, the button is grayed out and cannot be selected.
