Send a fax with non-default image resolution or contrast settings - MX922
Article ID: ART168671
|
Date published: 10/18/2017
|
Date last updated: 03/06/2019
Description
Learn how to adjust the image quality settings - image resolution and contrast - when sending a fax with PIXMA MX922 printer.
Solution
Steps to change the TX image quality settings
Press the FAX button to show the fax standby screen.
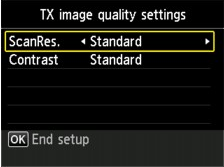
Press the right Function button. You should see the TX image quality settings screen.
Use the up/down arrow buttons to choose the setting you want change, and the left/right arrows to change the values.
The scan resolution (ScanRes.) options are:
Standard - Suitable for text-only documents.
Fine - Suitable for fine-print documents.
Extra fine - Suitable for detailed illustration or fine-print quality documents.
Note: If the recipient's fax machine is not compatible with Extra fine (300 x 300 dpi), the fax will be sent in the Standard or Fine resolution.
Photo - Suitable for photographs.
Note: When sending a color fax, documents are always scanned in the same resolution (200 x 200 dpi). The image quality (compression rate) is determined by which scan resolution is selected, except that Extra fine and Photo provide the same image quality.