Wireless Setup for the imageCLASS LBP215dw (Contains Video) (Windows)
Article ID: ART169769
|
Date published: 03/27/2018
|
Date last updated: 06/25/2018
Description
This article provides instructions on how to setup your imageCLASS LBP215dw printers to do wireless printing. It is broken down into two parts. Part 1 provides instructions on how to configure the settings on your printer. Part 2 provides instructions on how to download and setup the software on your computer.
Solution
Part 1: Canon imageCLASS Wireless Help Video for a Windows Computer. If you can't see the video please click HERE.
1. Select <Menu> in the Home screen.
2. Select <Preferences> <Network>. If the login screen appears, please enter the default [7654321] for both the ID and PIN.
3. Select <Wireless LAN Settings>. If the <Do you want to enable the wireless LAN?> message is displayed, select <Yes>.
4. Read the message that is displayed, and select <OK>.
5. Select <SSID Settings>.
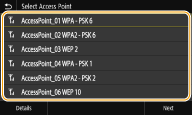
6. Select <Select Access Point>. The machine starts searching for available wireless routers.
7. Select a wireless LAN router. Select the router whose SSID matches the one that you have written down, and press <Next> (OK).
Note: To view details of security settings on the Touch panel model
Select the wireless LAN router, and select <Details>. To return to the original screen, select .
8. Enter the network key that you have written down.
Enter the network key, and select <Apply>.
9. Select <Yes>.
10. Wait until message <Connected.> is displayed.
11. Select <Close>. Wait several minutes until the IP address and other items are set automatically.
Part 2: Downloading and Installing the Computer Software
Once your printer hardware has been setup follow the instructions below to download and install your printer driver and software. In the illustrations we used the imageCLASS LBP215dw and Windows 7 64 bit. The screens may vary somewhat based on your selections and the browser you use.
2. Type you model name into the search box and select it from the list that appears.
3. Click the [GO] button to get to the Drivers & Downloads page for your model.
4. From the Drivers & Downloads Tab, Select your Operating System and Version from the provided drop-down menu. The most common driver to use will be listed in the Recommended Section. Click [SELECT] next to the driver you need as shown in the illustration above and then click [DOWNLOAD].
5. Click [Save] to begin downloading the printer driver software.
Downloaded files are saved in the specified folder, normally the Download Folder, in a self-extracting format (.exe format).
6. Click [Open Folder].
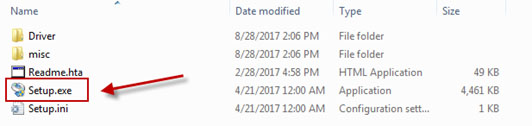
7. Double-click the files to decompress them. A new folder will be created in the same folder. The new folder will have the same name as the compressed file.
8. Open the folder and click the Setup.exe file to start installation.
9. Click [Yes] to allow the program to make changes to your computer.
10. Select the down arrow next to Language and select [English]. Select [Next] to continue.
11. Click [Yes] to accept the Canon Software License Agreement.
12. Select Standard and then click [Next] on the Printer Setup screen.
13. Click [Next] on the Select Process screen.
14. Select your printer and then click [Next].
15. Click [Start] to begin the installation.
16. Click [Restart] to complete the installation.
17. Congratulations your drivers are installed and you should be able to print, fax, and scan wirelessly depending on your model.