|
PIXMA iP6600D
|
PIXMA MP980
|
PIXMA mini320
|
PIXMA MG7120
|
|
MultiPASS MP700
|
MultiPASS C635
|
PIXMA MG8120
|
PIXMA MP180
|
|
PIXMA MP970
|
PIXMA MG5420
|
PIXMA MG5320
|
PIXMA iX6520
|
|
imageCLASS MF6550
|
S500
|
S820D
|
MultiPASS C3500
|
|
PIXMA MP250
|
PIXMA MP750
|
PIXMA MX472
|
PIXMA MP510
|
|
PIXMA MX330
|
PIXMA MP960
|
PIXMA iP4600
|
PIXMA MP450
|
|
PIXMA MP130
|
PIXMA MG4120
|
PIXMA iP1800
|
PIXMA MX320
|
|
PIXMA iP4200
|
i470D
|
MultiPASS F60
|
MultiPASS MP730
|
|
i320
|
PIXMA iP5200R
|
i250
|
S330
|
|
PIXMA MG5120
|
imageCLASS MF6580CX
|
i960 Series
|
PIXMA MP800
|
|
PIXMA MP600
|
MultiPASS F20
|
PIXMA MP620B
|
MultiPASS F30
|
|
PIXMA Pro9500
|
PIXMA MX420
|
PIXMA MX392
|
PIXMA iP3000
|
|
S800
|
PIXMA MG5620
|
PIXMA MX459
|
PIXMA MG3122
|
|
S450
|
PIXMA MG6120
|
PIXMA iP5000
|
i450
|
|
MultiPASS MP370
|
PIXMA iP6220D
|
PIXMA MX7600
|
PIXMA MX439
|
|
PIXMA MP530
|
PIXMA MX532
|
PIXMA MG3620
|
PIXMA MG7520
|
|
PIXMA MX860
|
PIXMA MX300
|
PIXMA MX340
|
PIXMA MG3222
|
|
PIXMA MX350
|
i9100
|
PIXMA MG6320
|
PIXMA iP1700
|
|
S400
|
MultiPASS C555
|
PIXMA iP2700
|
PIXMA MG4220
|
|
PIXMA MG6420
|
i950 Series
|
MultiPASS C650
|
PIXMA iP1500
|
|
MultiPASS C2500
|
PIXMA MP800R
|
PIXMA MX522
|
PIXMA MP810
|
|
PIXMA MP520
|
PIXMA iP6210D
|
PIXMA MG2420
|
S750
|
|
PIXMA MP620
|
PIXMA iP4820
|
|
Disable third-party software to avoid installation or printing conflicts
| Article ID: ART153464 |
| |
Date published: 06/02/2015 |
| |
Date last updated: 10/21/2019 |
Description
Learn how to disable software applications that can cause installation and printing conflicts.
Solution
Troubleshoot software installation issues
Some software applications and active firewalls can cause errors, installation difficulties, or prevent services from starting.
To address this issue, you can prevent the application services from starting by accessing Windows' System Configuration Utility (also referred to as 'Msconfig.exe').
- Read your application documentation for instructions on how to disable its services.
If you cannot find information about how to do this, proceed to the next step.
- Disable the startup items in the Startup tab of Msconfig - Windows System Configuration Utility (see below for instructions).
If this doesn't fix the problem, proceed to the next step.
- Disable all non-Microsoft related services in the Services tab of Msconfig. Then restart Windows and try to complete your task.
Using Msconfig - System Configuration Utility
The Windows System Configuration Utility (Msconfig.exe) allows you to temporarily change the way Windows starts by disabling startup programs and services individually or several at a time.
Note: Making changes using the System Configuration may cause some applications not function properly.
Always note any changes made, so that you can reconfigure the utility if problems were to occur.
Making changes in the System Configuration Utility
- Launch Msconfig.exe
- In Windows 10, Windows 7 & Vista, select the Start icon and type msconfig in the Search text box and double-click the msconfig.exe file that is found. For Windows 10 specific instructions, please click here.
- In Windows 8, from the metro-style desktop type msconfig, then select the msconfig icon in the search results for Apps. Then, click here for further instructions.
- In Windows XP, select Start, and then Run. Type msconfig, then click OK.
- In the General tab of System Configuration Utility dialog box, click Selective Startup radio button.
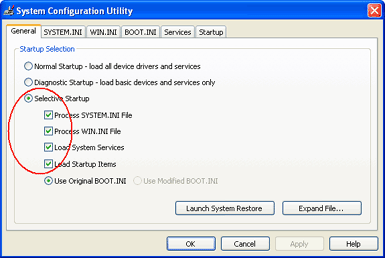
Note: If Selective Startup is already selected, write down the items that are still checked here and on the Startup tab so that they can be re-enabled after troubleshooting.
-
Click the Startup tab. Remove the check in the boxes for individual applications to keep them from starting automatically with Windows.
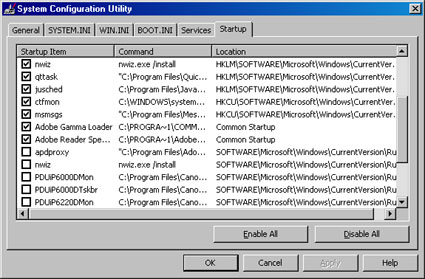
Note: Only disable applications that you are familiar with. If you are unsure of what a particular application does, do not uncheck it.
-
Select OK.
-
Select Yes when prompted to restart your computer.
-
Attempt to install, print, scan or complete the original task you began.
-
If installation, printing or scanning is unsuccessful, open System Configuration Utility again.
-
Select the Services tab.
-
In Services tab, check Hide All Microsoft Services, then un-check individual services that you wish to disable.
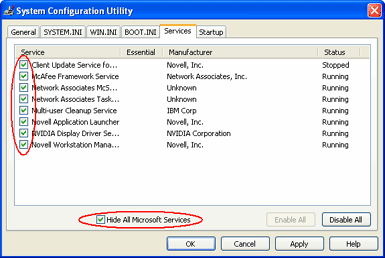
Note: Disabling certain services may have adverse effects on computer operation. Only disable services that you are familiar with. If you are unsure of what a particular service does, do not uncheck it.
-
Click OK.
-
Click Yes when prompted to restart your computer.
-
Attempt to install, print, scan or complete the original task you began.
For Windows 8 / 8.1 / 10:
- After opening the System Configuration Utility, click the Startup tab. Then, click Open Task Manager.
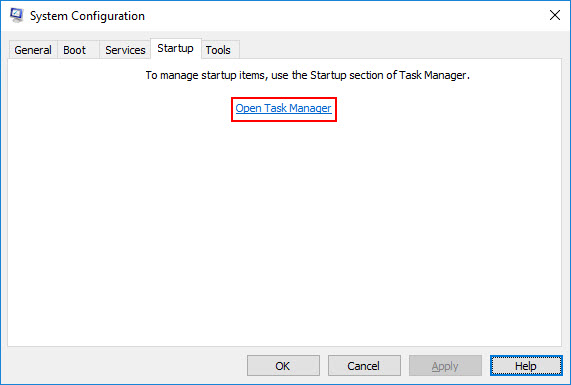
- When the Task Manager opens, the Startup tab will be displayed. A list of programs that run at startup will be listed. Right click on a program and click Disable, or click on the program to highlight it and then click the Disable button at the lower right corner of the window.

- Restart your computer.
- Continue from step 6 in the section above.
To re-enable Normal Startup:
After your installation or task is complete, you should re-enable Normal Startup.
-
Open System Configuration Utility
-
On the General tab, select Normal Startup.
-
Select OK.
-
Click Yes when prompted to restart your computer.
Printer Support Home
|
