
Using the wireless controller WL-D79 ZR65mc and ZR70mc
| Article ID: ART155000 | | | Date published: 06/09/2015 | | | Date last updated: 08/17/2015 |
Description
Solution
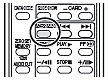
Using the Wireless Controller (WL-D82) ZR85 / ZR90
By pointing the wireless controller at the camcorder's remote sensor when you press the buttons, you can control many functions of the camcorder.
Contents
Changing the Remote Sensor Mode
Replacing Existing Scenes (AV Insert)
Returning to a Pre-marked Position
Hiding / Showing the Displays on the TV Screen
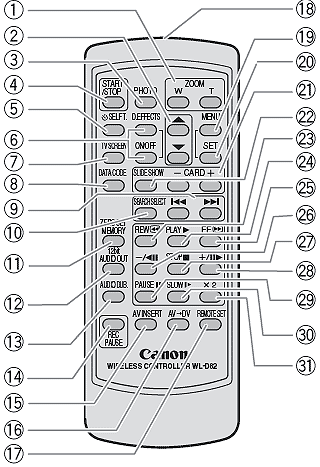
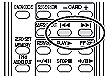
| 1. Zoom buttons | 12. 12bit AUDIO OUT button | 23. REW  button button |
| 2. Select buttons | 13. AUDIO DUB. button | 24. PLAY |
| 3. PHOTO button | 14. REC PAUSE button | 25. FF  button button |
| 4. START/STOP button | 15. AV INSERT button | 26.  button button |
| 5. SELF T. button | 16. AV |
27. STOP |
| 6. D. EFFECTS button, ON/OFF button | 17. REMOTE SET button | 28.  button button |
| 7. TV SCREEN button | 18. Transmitter | 29. PAUSE |
| 8. DATA CODE button | 19. MENU button | 30. |
9.  buttons buttons |
20. SET button | 31. x2 button |
| 10. SEARCH SELECT button | 21. CARD +/- button | |
| 11. ZERO SET MEMORY button | 22. SLIDE SHOW button |
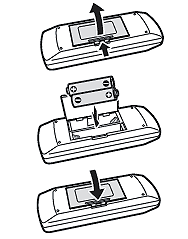
Inserting the Battery
The wireless controller operates with two AA (R6) batteries.
|
 |
|
Changing the Remote Sensor Mode
Two remote sensor modes and an off setting are available to prevent interference from other Canon wireless controllers being used nearby.
To turn the remote sensor off, open the menu and select [SYSTEM]. Select [WL. REMOTE], set it to [OFF ![]() ] and close the menu. "
] and close the menu. "![]() " appears.
" appears.
Changing the Remote Sensor Mode
|
1. On the camcorder, open the menu and select [SYSTEM]. Select [WL. REMOTE], set it to [ |
|
| 2. On the wireless controller, press and hold the <REMOTE SET> button. Press the ZOOM T button for mode 2. Keep the button pressed for over 2 seconds. | 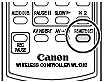 |
| If you have set the camcorder to mode 1, press the ZOOM W button for mode 1. | 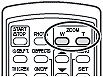 |
|
Replacing Existing Scenes (AV Insert)
You can insert and replace images and audio on the tape of the camcorder with images and audio from other video devices connected via AV terminal or DV terminal. This function is operated with the wireless controller.
| Playback tape | 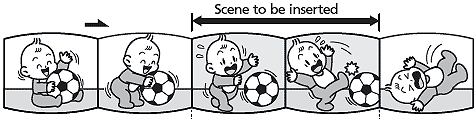 |
| Tape in the camcorder before inserting |  |
| Tape in the camcorder after inserting | 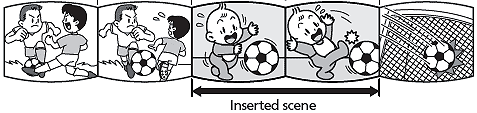 |
- Connect the camcorder to a video device.
- Connected device: Load a recorded cassette. Locate the scene you wish to insert and pause playback shortly before the scene.
- Set the camcorder to PLAY (VCR) mode and load a recorded cassette.
- Use a tape recorded in SP mode and make sure that the tape-protect switch is set to allow recording. - Locate the scene you wish to replace and pause playback shortly before the scene.
- Press the <AV INSERT> button on the wireless controller.
- "AV INSERT" and " " appear.
 - Connected device: Play back the tape.
- Press the PAUSE
 button on the wireless controller when the scene you wish to insert appears.
 - Press the STOP
 button on the wireless controller to stop inserting.
- Press the PAUSE button on the wireless controller to pause inserting. - Connected device: Stop playback.
|
Zooming
The ZR85 has a 20X optical zoom, while the ZR90 has a 22X optical zoom.
- Press <W> to zoom out (wideangle).
- Press <T> to zoom in (telephoto).
|
Playing Back a Tape
| If the playback picture is distorted, clean the video heads using a Canon Head Cleaning Cassette or a commercially available digital video head-cleaning cassette. |
- Set the camcorder to PLAY (VCR) mode.
- Set the POWER switch to PLAY (VCR) and the TAPE/CARD switch to .
. - Open the LCD panel.
- You can also close the LCD panel with the screen facing outward. - Press the
 button to rewind the tape.
 - Press the
 button to begin playback.
 - Press the button to stop playback.
Special Playback Modes
![]() (Playback Pause)
(Playback Pause)
To pause playback, press the ![]() button during normal playback.
button during normal playback.
![]() (Fast Forward Playback) /
(Fast Forward Playback) / ![]() (Rewind Playback)
(Rewind Playback)
Plays back the tape at 9.5 times normal speed (forward or reverse). Press and hold the button during normal playback or fast forward.
![]() (Reverse Playback)
(Reverse Playback)
Press the button on the wireless controller during normal playback. Press the ![]() (play) button to return to normal playback.
(play) button to return to normal playback.
![]() (Frame Advance) /
(Frame Advance) / ![]() (Frame Reverse)
(Frame Reverse)
Plays back frame-by-frame. Press the button on the wireless controller repeatedly during playback pause. Press and hold it to play back continuous frame advance/frame reverse.
![]() (Slow Forward)/(Slow Reverse)
(Slow Forward)/(Slow Reverse)
Plays back at about 1/3 normal speed. Press the button on the wireless controller during normal or reverse playback. Press the ![]() (play) button to return to normal playback.
(play) button to return to normal playback.
x2 (Forward x2 Playback)/(Reverse x2 Playback)
Plays back at 2 times normal speed. Press the button on the wireless controller during normal or reverse playback. Press the ![]() (play) button to return to normal playback.
(play) button to return to normal playback.
|
Returning to a Pre-marked Position
If you wish to return to a particular scene later, mark the point with the zero set memory and the tape will stop at that point when you rewind/fast forward the tape. This function is operated with the wireless controller.

|
 |
![]() The zero set memory may not function correctly when the time code has not been recorded consecutively.
The zero set memory may not function correctly when the time code has not been recorded consecutively.
Photo Search / Date Search
You can search for a still image recorded anywhere on the tape with the photo search function, or locate the change of the date/time zone with the date search function. This function is operated with the wireless controller.
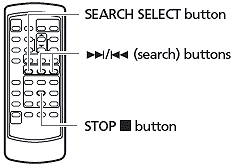
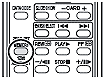
1. Press the <SEARCH SELECT> button to choose between photo search and date search.
|
|
|
2. Press the
|
 |
 or
or  button to begin searching.
|
|
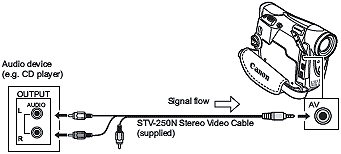
Audio Dubbing
You can add sound from audio devices (AUDIO IN) or with the built-in microphone (MIC.IN). This function is operated with the wireless controller.
Connecting an Audio Device:
Refer also to the instruction manual of the connected device.
Dubbing:
-
Set the camcorder to PLAY (VCR) mode and load a recorded cassette.
- Use a tape recorded in SP, 12-bit mode with this camcorder. -
Open the menu and select [AUDIO SETUP]. Select [AUDIO DUB.], set it to [AUDIO IN] or [MIC.IN] and close the menu.
-
Locate the scene you wish to start audio dubbing.
-
Press the <PAUSE
> button on the wireless controller. -
Press the <AUDIO DUB.> button on the wireless controller.
- "AUDIO DUB." and " " appear.
 -
Press the <PAUSE
> button on the wireless controller to begin dubbing.
- Audio device: Begin playback.
- Microphone: Speak into the microphone. -
Press the <STOP
> button on the wireless controller to stop dubbing.
- Audio device: Stop playback.
|
|
Hiding / Showing the Displays on the TV Screen
When you connect a TV for recording, you can select to hide the camcorder displays on the TV screen. For playback, you can show the camcorder displays on the TV screen.
-
To cycle through the amount of information that is displayed on the TV screen, press the <TV Screen> button on the wireless controller.
Other Precautions and Notes
|