
Fax sending methods MX700
| Article ID: ART110541 | | | Date published: 05/11/2015 | | | Date last updated: 08/17/2015 |
Description
Solution
Sending Faxes |
 |
 Flow of Sending Faxes
The operation flow of sending faxes is as follows.
Important
A PBX (Private Branch Exchange) is an on-site telephone switchboard. If your machine is connected through a PBX or other telephone switching systems, you have to dial the outside line access number first, and then the number of the party you are calling.
Step 1
Load the original to send on the Platen Glass or in the ADF.
The original documents you load on the Platen Glass or the ADF for copying, scanning, or faxing must meet these requirements:
|
Platen Glass |
ADF (Automatic Document Feeder) |
|
|---|---|---|
|
Document type |
|
Multipage documents of the same size, thickness, and weight |
|
Size (W x L) |
Max. 8.5 x 11.7 inches / 216 x 297 mm |
Max. 8.5 x 14.0 inches / 216 x 356 mm Min. 5.8 x 5.8 inches / 148 x 148 mm |
|
Quantity |
1 sheet |
|
|
Thickness |
Max. 0.39 inches / 10 mm |
0.002 to 0.005 inches / 0.06 to 0.13 mm |
|
Weight |
- |
13 to 24 lb / 50 to 90 gsm |
Step 2
Adjust the image quality (Fax resolution) and density (Scan contrast).
See Adjusting the Image Quality (Fax resolution) and Adjusting the Density (Scan contrast).
Step 3
Dial the recipient's number.
Step 4
Send faxes.
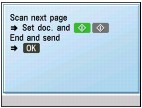
 Using the Platen Glass
(1) Press the Color or Black button.
If you have only one page of original, go to step (3).
(2) Load the next page on the Platen Glass and press the Color or Black button. In the same way, repeat this procedure until all originals are loaded.
(3) Press the OK button to send the fax.
Using the ADF
(1) Press the Color or Black button.
The machine starts sending.
Before Sending Faxes
 Adjusting the Image Quality (Fax resolution) or the Scan Contrast
You can adjust the image quality (fax resolution) of the original you send. The higher you set the image quality setting, the better the output quality will be at the other end, but the longer it will take for the transmission. Adjust the image quality according to the type of original you are sending.
1 Press the FAX button, then press the FAX Quality button.
2 Use the  or
or  button to select FAX resolution.
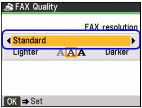
3 Use the  or
or  button to select the image quality.
Standard
Suitable for text-only documents.
Fine
Suitable for fine-print documents.
Photo
Suitable for photographs.
4 Press the OK button.
Adjusting the Density (Scan contrast)
Contrast is the degree of difference between light and dark. Increasing the scan contrast setting further blackens dark areas and whitens bright areas, whereas decreasing the contrast setting reduces the difference between bright and dark areas. You can adjust the contrast among three contrast levels.
1 Press the FAX button, then press the FAX Quality button.
2 Use the or button to select Scan contrast.
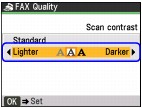
3 Use the ![]() or
or ![]() button to select the scan contrast.
button to select the scan contrast.
Pressing the  button decreases the contrast, and pressing the
  button increases the contrast.
4 Press the OK button.
Sending Faxes
This section describes methods of sending faxes and dialing functions of the machine.
Sending a Fax using the Numeric Buttons
Sending a Fax after Speaking on Telephone
Sending a Fax using the Speed Dial
Preparing for Faxing
1 Turn on the machine.
2 Load the original on the Platen Glass or in the ADF.
When sending a double-sided document, set the document on the Platen Glass. You cannot scan double-sided documents from the ADF.
3 Press the FAX button.
Confirm that the FAX button is lit and the FAX stand-by screen is displayed.
4 Adjust fax settings as necessary.
See Before Sending Faxes.
Sending a Fax using the Numeric Buttons
1 Use the Numeric buttons to dial the recipient's number.
2 Press the Color button for color sending, or the Black button for black & white sending.
Color sending requires that the recipient's fax machine supports color faxing.
When the document was loaded on the Platen Glass:
(1) When the following message is displayed, load the next page on the Platen Glass.
If you have only one page of original to scan, press the OK button to start scanning.
(2) Press the same button as you pressed in step 2.
Note
If you pressed the Black button in step 2, a colored original will be sent in black & white.
(3) Repeat the procedure from steps (1) to (2) to scan all pages of the document.
(4) Press the OK button.
The machine starts sending.
When the document was loaded in the ADF:
The machine scans the document automatically and starts sending.
To cancel automatic redialing, wait until the machine starts redialing, then press the Stop button.
Sending a Fax after Speaking on Telephone
Send a fax manually after speaking on a telephone if you want to speak to the recipient before sending a fax, or if the recipient does not have a fax machine that can receive automatically.
Dialing using a telephone connected to the machine
1 Lift the handset of the telephone connecting to the machine.
2 Use the telephone to dial the recipient's fax/telephone number.
3 Speak to the recipient.
If you hear a high-pitched signal instead of the recipient's voice, go to step 5.
4 Ask the recipient to operate the recipient's fax machine to receive faxes.
5 When you hear a high-pitched signal, press the Color button for color sending, or the Black button for black & white sending.
Color sending is available only when the recipient's fax machine supports color faxing.
6 Hang up the handset.
Sending a Fax using the Speed Dial
Registering fax or telephone numbers in speed dials enables you to send faxes easily.
1 Dial the recipient's number.
Press the Coded Dial button, use the Numeric buttons or the
,
,
2 Press the Color button for color sending, or the Black button for black & white sending.
See Sending a Fax using the Numeric Buttons.
Color sending requires that the recipient's fax machine supports color faxing.
To cancel automatic redialing, wait until the machine starts redialing, then press the Stop button.
Resending Faxes (Redialing a Busy Number)
There are two methods of redialing: Manual redialing and Automatic redialing.
Automatic Redialing
When sending a document and the recipient's line is busy, the machine will redial the number after a specified interval. Automatic redialing is enabled by default.
You can customize the following automatic redialing settings:
Whether or not your machine redials automatically
The number of times the machine redials (1 to 10 times)
The time interval between redials (1 to 99 minutes)
To change the automatic redialing settings, change the Auto redial settings in TX settings under the FAX settings screen.
Manual Redialing
1. To redial the fax number last dialed with the Numeric buttons, press the Redial/Pause button.
2. Use the 
 button to select the recipient's number to redial, then press the OK button.
3. Press the Color button for color transmission, or the Black button for black & white transmission.
Color sending is available only when the recipient's fax machine supports color faxing.
For manual redialing, the machine memorizes up to 10 recent recipients dialed using the Numeric buttons.