Loading Paper in the Stack Bypass Tray
If you are making prints on transparencies, labels, nonstandard-sized paper, or envelopes, load them into the stack bypass tray.
note:
Note the following points when using the stack bypass tray:
- Paper Quantity: one to approximately 100 sheets (20 lb (75 g/m²)).
- Paper Size: 3" x 5" to 8 1/2" x 14" (76.2 x 127 mm to 216 x 356 mm )
- Paper Weight: 16 to 47 lb (60 to 176 g/m²)
- Paper which has been rolled or curled must be straightened out prior to use, to allow the paper to feed smoothly through the stack bypass tray (allowable curl amount: less than 3/8" (10 mm) for normal paper, less than 1/4" (5 mm) for heavyweight paper).
- Depending on the paper storage conditions, it may not be possible to feed some paper into the stack bypass tray. In this case, set the amount of paper to less than 50 sheets (20 lb (75 g/m²)).
Do not load different size/type paper at the same time.
If you load multiple sheets of heavyweight paper into the stack bypass tray, a paper jam may occur depending on the type of heavyweight paper. If this happens, load only one sheet of heavyweight paper at a time.
When printing on special types of paper, such as heavyweight paper or transparencies, make sure to correctly set the paper type, especially if you are using heavyweight paper. If the type of paper is not set correctly, it could adversely affect the quality of the image. Moreover, the fixing unit may become dirty and require a service repair, or the paper could jam.
If you are printing on envelopes, do not allow more than 10 envelopes to accumulate in the output tray. Always empty the output tray once 10 envelopes have accumulated.
If you select <Custom Size> for copying, you cannot use the 1-Sided to 2-Sided, 2-Sided to 2-Sided, N on 1, or ID Card Copy mode.
If you select <COM10>, <Monarch>, <DL>, <ISO-C5>, <ISO-B5> for copying, you cannot use the 1-Sided to 2-Sided, 2-Sided to 2-Sided, N on 1, or ID Card Copy mode.
You cannot use <Custom Size> when you print from a USB memory (Direct Print). (Only for the Color imageCLASS MF9280Cdn)
Envelopes may be creased in the printing process.
For high quality printouts, use paper recommended by Canon.
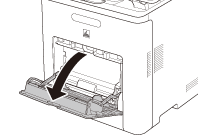
1. Open the stack bypass tray.
note:
- If the paper drawer is not set, you will not be able to print or copy from the stack bypass tray.
- If the paper size you are going to load into the stack bypass tray is different from the paper size stored in stack bypass tray Standard Settings, set stack bypass tray Standard Settings to 'Off' in Common Settings (from the Additional Functions screen).
2. Adjust the slide guides to match the size of the paper.

If you are feeding large size paper, pull out the auxiliary tray, and extend the tray extension.

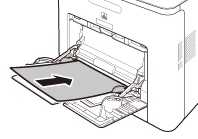
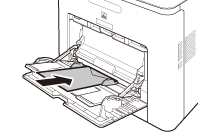
3. Load the paper into the stack bypass tray.
Insert the paper stack as far as it will go.
4. Specify the size and type of the paper loaded.
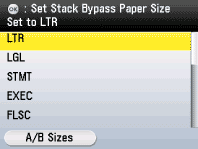

note:
If <Stack Bypass Paper (Std.)> in <Paper Settings> is set to <On>, you can load only the specified size and type of paper.
Before Inserting Paper
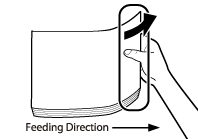
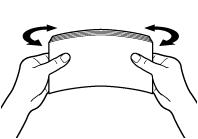
1. When you use the stack bypass tray to make copies, straighten out curled paper prior to use, as shown below. Curled paper may cause a paper jam.

2. If there is difficulty in straightening out curled paper, curl the front edges of the paper upward, as shown below.

Printing on the Back Side of Preprinted Paper
1. Load the preprinted paper face up into the stack bypass tray, as shown in the illustration below.
The screen for selecting the paper size appears.

note:
- When loading paper into the stack bypass tray, align the paper stack neatly between the slide guides. If the paper is not loaded correctly, a paper jam may occur.
- If you are printing on heavyweight paper or envelopes using the stack bypass tray, and find that the paper or envelopes are not being fed smoothly or evenly through the stack bypass tray, remove the paper or envelopes, curl the feeding edges upward approximately 1/8" (3 mm), and then reload the paper or envelopes. Curling the feeding edges enables the rollers to grip the paper or envelopes as they are fed into the machine from the stack bypass tray.
note:
- If there are instructions on the paper package about which side of the paper to load, follow those instructions.
- When the paper is loaded into the stack bypass tray, the side facing down is the one printed on.
- If problems, such as poor print quality or paper jams occur, try turning the paper stack over and reload it.
Loading Envelopes
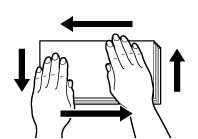
1. Take five envelopes, loosen them as shown, and then stack them together. Repeat this step five times for each set of five envelopes.
2. Place the envelopes on a clean, level surface, and press all the way around the envelopes by hand, in the direction of the arrows, to remove any curls. Repeat this step five times for each set of five envelopes.
note:
Take particular care to spread the envelopes out in the direction that they will be fed.
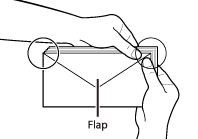
3. Hold down the four corners of the envelopes firmly, so that they and the sealed or glued portion stay flat.
note:
- Do not print on the back side of the envelopes (the side with the flap).
- If the envelopes become filled with air, flatten them by hand before loading them into the stack bypass tray.

Load the envelopes face down (flap side up) in the stack bypass so shown below.
For top opening envelopes, load them as their sealing side (flap side) is located on the left when viewed from the front.

For side opening envelopes, load them so their sealing side (flap side) is located in the back of the stack bypass tray when viewed from the front.
The screen for selecting the paper size appears.
note:
- The stack bypass tray can hold 10 envelopes at a time.
- Envelopes may be creased in the printing process.
