Print from the memory card
The following describes how to display photos in the memory card one by one and print the photos easily.
- Confirm that the printer is powered on.
- Set a sheet of letter-sized plain paper in the sheet feeder or cassette, and open the paper output tray
- Confirm the paper feeding location.
- To change the paper feeding location, press the Paper Feed switch.
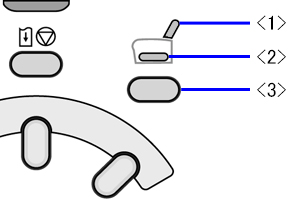
<1> Sheet Feeder lamp
<2> Cassette lamp
<3> Paper Feed switch
- Insert the memory card into the printer's card slot.
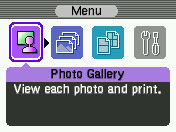
- Press the <Menu> button, and use the left and right cursor buttons to select 'Photo Gallery' on the left and then press the <OK> button.
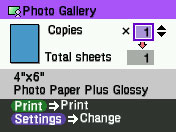
- Use the left and right cursor buttons to display the image to print on the LCD and then press the <OK> button.
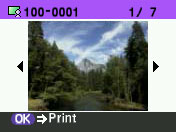
Note: To print with the current settings, skip to step 10. To change the print settings, press the <Settings> button and continue to step 8.
- Set the Basic print settings by using the up/down/left/right cursor buttons.
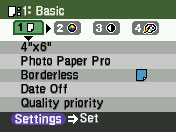
Note: Plain paper: Borderless printing is not possible. Quality priority: Be sure to select this item when using Photo Paper Pro.
- Set additional settings as desired.
- Use the up and down cursor buttons to specify the number of copies to print, and press the <Print> button to print.
Note: Once the print settings are set, it will be stored in the printer, even if the printer is powered off.
Additional Settings
- Set Optimizer by using the up/down/left/right cursor buttons.
- Set the Color adjust settings by using the up/down/left/right cursor buttons.
- Set the Effects settings by using the up/down/left/right cursor buttons.
- After confirming the settings, press the <Settings> button.
Click here to return to step number 9
Optimizer Settings
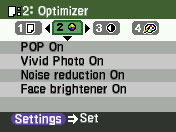
- POP: This function automatically optimizes the brightness and tone of a photo.
- Vivid Photo: This function makes green and blue more lively.
- Noise reduction: This function reduces the noise in blue areas like the sky as well as in dark areas.
- Face brightener: This function brightens darkened faces, such as in backlit photos.
Click here to return to additional settings
Click here to return to step number 9
Color Adjust Settings
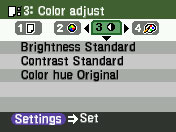
- Brightness: Can be set between +2 and -2.
- Contrast: Can be set between +2 and -2.
- Color hue: Red and yellow in skin tones can be emphasized.
Click here to return to additional settings
Click here to return to step number 9
Effect Settings
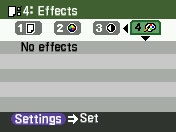
- No effect: Effect is not performed.
- Sepia: Print is performed in sepia.
- Simulate illustration: Print-like illustration is performed.
Click here to return to additional settings
Click here to return to step number 9
