
Explanation of the custom presets on the XH A1s and XH G1s camcorders
| Article ID: ART111461 | | | Date published: 05/11/2015 | | | Date last updated: 08/17/2015 |
Description
Solution
Using the Custom Preset
Setting the Custom Preset Settings
Activating the Custom Preset Settings
Copying a Custom Preset File to the Memory Card
Loading a Custom Preset File from the Memory Card
Saving the Custom Preset Settings in Use with a Still Image on the Memory Card
You can define preset levels for 23 recording specifications used when recording on tape (17 when recording still images on the memory card). Up to 6 custom presets can be stored on the camcorder, and up to 20 can be stored on the memory card. You can copy the camcorder's custom presets to the memory card. Also, while you are recording on the tape and simultaneously record a still image on the memory card, the current recording specifications can be saved as a custom preset on the card. Later you can load that custom preset from the memory card to the camcorder.
The recording specifications that can be saved in a custom preset:
Gamma curve*, knee, black stretch/press, master pedestal*, setup level*, sharpness, horizontal detail frequency, horizontal/vertical detail balance, coring, NR1*, NR2*, color matrix*, color gain, color phase, R gain, G gain, B gain, R-G matrix, R-B matrix, G-R matrix, G-B matrix, B-R matrix and B-G matrix.
*Available only when recording on the tape.
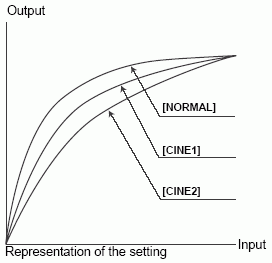
Gamma Curve (Color response range)
Select between standard gamma curve ([NORMAL]) and cine-like gamma curve ([CINE1 or CINE2]) to achieve a more film like look.
Knee Point Adjustment
Adjust the dynamic range (knee point) in the highlight area of the image to prevent overexposure. You can select from [AUTO], [HIGH], [MIDDLE] or [LOW].
Black Stretch/Black Press
Adjust the dynamic range in the black area of the image. You can select from [STRETCH], [MIDDLE] or [PRESS]. [STRETCH] emphasizes contrast in the dark area, while [PRESS] enhances or deepens darkness.

Master Pedestal [PED] (only in CAMERA mode)
Adjust the master pedestal level in the range -9 to +9.
Setup Level [SET] (only in CAMERA mode)
Adjust the setup level in the range -9 to +9.
-
Depending on the value set for the master pedestal [PED], the setup level may not be able to take a negative value. In that case, adjusting the setup value within a certain value range will have no effect.
Sharpness [SHP]
Adjust the sharpness level in the range -9 to +9.
Horizontal Detail Frequency [HDF]
You can select from [HIGH], [MIDDLE] or [LOW].
Horizontal/Vertical Detail Balance [DHV]
Adjust the horizontal/vertical detail balance in the range -9 (only horizontal) to +9 (only vertical).
Coring [COR]
Adjust the detail noise level in the range -9 to +9.
Color Matrix [CMX] (only in CAMERA mode)
Select from two color matrix settings: [NORMAL] and [CINE1 or CINE2]. Setting gamma and color matrix to [CINE] creates cine-like colors. The [CINE] setting produces a wider range of colors which may appear to have a low saturation level when viewed on a TV.
Color Gain (level)
Adjust the saturation of the color from off (black & white) (-) to oversaturated (+).
Color Phase (tint)
Adjust to [G] for adding more green to the image, and to [R] for more red.
R Gain (level)
Adjust to [-] for white balance toward cyan, and to [+] for white balance toward red.
G Gain (level)
Adjust to [-] for white balance toward magenta, and to [+] for white balance toward green.
B Gain (level)
Adjust to [-] for white balance toward yellow, and to [+] for white balance toward blue.
R-G Matrix [RGM]
Adjust the level in the range -9 to +9.
R-B Matrix [RBM]
Adjust the level in the range -9 to +9.
G-R Matrix [GRM]
Adjust the level in the range -9 to +9.
G-B Matrix [GBM]
Adjust the level in the range -9 to +9.
B-R Matrix [BRM]
Adjust the level in the range -9 to +9.
B-G Matrix [BGM]
Adjust the level in the range -9 to +9.
Vertical Detail
Adjust the vertical detail frequency for recordings in 30F or 24F mode. Select from [NORMAL] and [LOW].
-
When you play back a recording on an interlaced TV with [V DETAIL] set to [NORMAL], horizontal lines may flicker.
-
Select [NORMAL] for non-interlaced playback or editing on a computer, or for transferring to a DVD.
-
Image resolution will not change in the 60i mode.
-
When you select a custom preset setting with [V DETAIL] set to [LOW] in 60i mode, "CP" appears in yellow.
Noise Reduction 1 [NR1] (only in CAMERA mode)
Select the variable range of noise reduction from [OFF], [HIGH], [MIDDLE] and [LOW]. With [HIGH], [MIDDLE] and [LOW], the noise reduction level is adjusted according to the gain. Select [HIGH] for maximum variable range.
-
When set to [HIGH], moving subjects may leave a trailing afterimage.
-
When the noise based on the gain setting is low, the NR effect may not be noticeable.
Noise Reduction 2 [NR2] (only in CAMERA mode)
Results in an effect similar to applying the skin detail function over the whole picture. You can select from [OFF], [HIGH], [MIDDLE] or [LOW].
-
Unlike with the NR1 setting, a trailing afterimage will not appear.
Setting the Custom Preset Settings

-
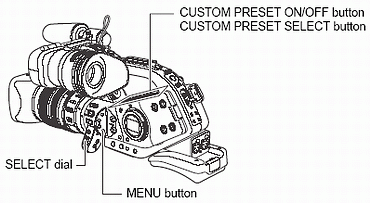
Press the <MENU> button to open the menu and select [CUSTOM PRESET].
-
Select [
 EDIT].
- The custom preset items appear. -
Select [SELECT CP] and then select the name of the custom preset file where you want to store the settings.
- After making the selection you will return to the custom preset edit submenu. -
From the edit submenu, select [TUNE].
- The custom preset items list appears. -
From the list, select an item you want to adjust and press the <SET> button. Make the adjustment or the selection as necessary and press the <SET> button.
- During the adjustment you can verify the effect of each item on the screen.
- Repeat this step to adjust all the items you want to adjust. -
When you finish adjusting all the items in the custom preset, select [
 RTN].
RTN].
- You will return to the custom preset submenu. -
Close the menu.
|
Protecting a Custom Preset File
Open the menu and select [CUSTOM PRESET], followed by [![]() EDIT]. Select [
EDIT]. Select [ ![]() /CLEAR], set it to [PROTECT
/CLEAR], set it to [PROTECT ![]() ] and close the menu.
] and close the menu.
To cancel the protection, reselect [PROTECT ![]() ].
].
Resetting a Custom Preset File
-
Open the menu and select [CUSTOM PRESET], followed by [
EIDT]. -
From the edit submenu, select [RESET].
A confirmation message appears. -
Turn the <SELECT> dial to select [YES] and press the <SET> button.
- You will return to the custom preset submenu. -
Close the menu.
Activating the Custom Preset Settings
-
Press the CUSTOM PRESET SELECT button.
- Repeatedly pressing the button will cycle through the available custom preset files. You can also set a custom key as [CP BKWD KEY] to cycle through the options in reverse order (from last to first).
- When you are not using the custom preset setting, set the camcorder to "CPOFF". -
Press the CUSTOM PRESET ON/OFF button.
The setting is activated.
Copying a Custom Preset File to the Memory Card
-
Open the menu and select [CUSTOM PRESET], followed by [
 ].
]. -
From the copy submenu, select [SELECT CP] and then select the name of the custom preset file you want to copy to the card.
-
Select [SAVE POSITION] and select the filename under which you want to store the file on the memory card.
- Up to 20 custom preset files can be stored on the memory card. If you try to save more than 20 custom preset filed one of the files on the card will be overwritten (you can select which file to overwrite).
- If there are no custom preset files saved on the memory card the file name will become NEW_FILE. -
Select [EXECUTE] and in the confirmation screen select [YES] to copy the file.
-
Close the mneu
Loading a Custom Preset File from the Memory Card
-
Open the menu and select [CUSTOM PRESET], followed by [
 ].
]. -
From the copy submenu, select [IMPORT] and then select the name of the custom preset file you want to load to the camcorder.
-
Select [SELECT POSITION] and select the preset number under which you want to store the file in the camcorder.
-
Select [EXECUTE] and in the confirmation screen select [YES] to load the file.
-
Close the menu
Loading a Custom Preset File from a Still Image to the Camcorder
-
Select the still image that contains the custom preset file you want to load.
- Use the CARD+/- buttons to move between the still images. -
Open the menu and select [META DATA CP], followed by [
]. -
Select [SELECT POSITION] and select the preset number under which you want to store the file on the camcorder.
-
Select [EXECUTE] and in the confirmation screen select [YES] to load the file.
-
Close the menu
Saving the Custom Preset Settings in Use with a Still Image on the Memory Card
In CAMERA mode, you can save the custom preset settings currently being used on the memory card along with a still image of the recording. This is very useful when you want to load the custom preset file later by selecting the still image of that specific scene.
Open the menu and select [RECORDING SETUP]. Select [STILL I. REC], set it to [ON + CP DATA] and close the menu.
While you are recording on the tape, press the PHOTO button.
The custom preset currently in effect will be saved to the memory card along with a still image of the current scene. When saving the custom preset currently in use embedded in a still image, the number of custom preset files you can save is not limited to 20 files but you can record as many still images/CP files as the free available memory on the memory card will allow you.