
Using the scanner push-buttons (3 and 4 button scanners)
| Article ID: ART158633 | | | Date published: 06/09/2015 | | | Date last updated: 08/18/2015 |
Description
Solution
Scanning with the Scanner Buttons
This method of scanning is a simple and convenient way to print, create e-mail attachments, or load images into image editing programs, all with a single push of a button. With this method, you can scan without adjusting settings each time.
![]()
Your scanner may have 3 or 4 push-buttons which will consist of the following:
- COPY button
Using the [COPY] button
- SCAN button
Using the [SCAN] button
- FILE or PDF button
Using the [FILE] or [PDF] button
- E-MAIL button
Using the [E-MAIL] button
![]() Printing with the [COPY] Button
Printing with the [COPY] Button
This button is programmed to send the scanned image to a printer.
![]() Prepare the printer for printing.
Prepare the printer for printing.
*The scanner and printer should be connected to the computer, all powered on, and the drivers should be installed properly and functioning. See your printer's instruction manual for the print preparation procedures.
![]() Position an item on the document glass of the scanner.
Position an item on the document glass of the scanner.
![]()
![]() Press the [COPY] button on the scanner.
Press the [COPY] button on the scanner.
CanoScan Toolbox will automatically start, scan the item and the scanned image will be printed. The A4/Letter paper size is automatically selected according to the default setting.
*You can scan successive items with the same settings simply by changing the item on the document glass and pressing a scanner button. You can also press a scanner button even while the CanoScan Toolbox program is running onscreen.
*To change the settings, first press the scanner button, then click the [Cancel] button on the "Scanning" dialog, and change the settings in CanoScan Toolbox's Copy window. When you are done, click the [Scan] Button in the Copy window to start the scan.
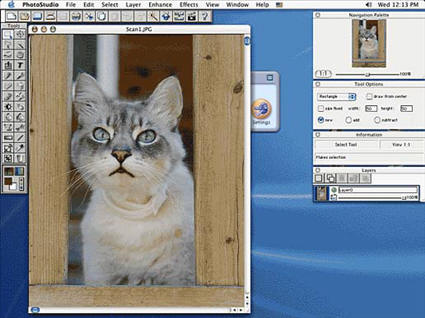
![]() Loading Images with the [SCAN] Button
Loading Images with the [SCAN] Button
This button is programmed to save the scanned image to the ArcSoft PhotoStudio image editing program.
![]() Position the item(s) on the document glass of the scanner.
Position the item(s) on the document glass of the scanner.
![]()
![]() Press the [SCAN] button on the scanner.
Press the [SCAN] button on the scanner.
CanoScan Toolbox will automatically start, scan the item(s) and open the scanned image(s) in ArcSoft PhotoStudio.
![]()

*Scanned images are saved by default in a new folder created and named with the scanning date, found in the [My Pictures] folder in the [My Documents] folder.
![]()
| * |
Scanned images are saved by default in a new folder created and named with the scanning date.
Navigate to this folder by opening the [Users] folder, logged in user account folder, [Pictures] folder, followed by the [My Pictures] folder. |
| * | You can scan successive items with the same settings simply by changing the item on the document glass and pressing a scanner button. You can also press a scanner button even while the CanoScan Toolbox program is running onscreen. |
| * | To change the settings, first press the scanner button, then click the [Cancel] button on the "Scanning" dialog, and change the settings in CanoScan Toolbox's Scan window. When you are done, click the [Scan] button in the Scan window to start the scan. |
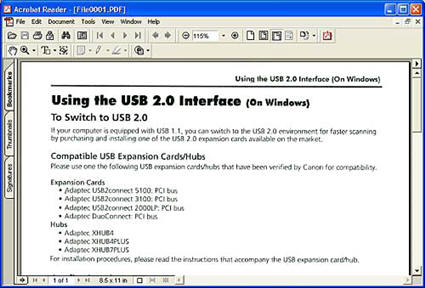
![]() Saving PDF Files with the [FILE] or [PDF] Button
Saving PDF Files with the [FILE] or [PDF] Button
This button is programmed to save the scanned image as a PDF file and pass it to Adobe Acrobat Reader.
*A PDF (Portable Document Format) document is a file format that can be displayed and printed with application programs such as Adobe Acrobat Reader / Adobe Reader. This format produces relatively small files that provide a convenient means of managing text and images. It is easy to create PDF files for your images by using the FILE or PDF button on the scanner or the File or PDF button in CanoScan Toolbox. You can also make PDF files with multiple pages and create text-searchable PDF files.
Using the [FILE] or [PDF] button.
![]() Position an item on the document glass of the scanner.
Position an item on the document glass of the scanner.
![]()
![]() Press the [FILE] or [PDF] button on the scanner.
Press the [FILE] or [PDF] button on the scanner.
CanoScan Toolbox will automatically start, scan the item, save it as a PDF file and display the file in the Adobe Acrobat Reader window.
![]()
*Scanned images are saved by default in a new folder created and named with the scanning date, found in the My Pictures folder in the My Documents folder.
![]()
| * | Scanned images are saved by default in a new folder created and named with the scanning date. |
| Navigate to this folder by opening the [Users] folder, logged in user account folder, [Pictures] folder, followed by the [My Pictures] folder. | |
| * | Next time you scan, you can scan items with the same settings simply by pressing a scanner button. You can also press a scanner button even while the CanoScan Toolbox program is running onscreen. |
| * | To change the settings, first press the scanner button, then click the [Cancel] button on the "Scanning" dialog, and change the settings in CanoScan Toolbox's File window. When you are done, click the [Scan] button in the File window to start the scan. |
![]() Attaching Images to Messages with the [E-MAIL] Button
Attaching Images to Messages with the [E-MAIL] Button
This button is programmed to attach the scanned image to a new message in an e-mail program.
| * | To use the CanoScan Toolbox Copy function, the scanner and printer should be connected to the computer, all powered on, and the drivers should be installed properly and functioning. See the printer's instruction manual for printing preparation procedures. | |
| * | To use the CanoScan Toolbox Mail function, one of the following e-mail programs should be installed. | |
| For Windows: | Microsoft Outlook Express, Microsoft Outlook, Eudora or Netscape Messenger. (Some mail programs are required to set the MAPI function on.) | |
| For Macintosh: | Mail (Mac OS X 10.2 or later), Eudora or MS Entourage. | |
| * | The scanner buttons are designed to work with CanoScan Toolbox. To change the scanner operation assigned to a scanner button, see [Settings] Button of CanoScan Toolbox. After you change a CanoScan Toolbox setting, that setting is used to scan the next time a scanner button is pressed. | |
| * | If the "Choose Application" dialog opened when a scanner button was pressed, see "Choose Application" dialog displays when a scanner button (on the scanner's front panel) is pressed in "Problems with Scanning" in the "Troubleshooting" section. | |
| * | When using Mac OS X Native mode with multiple user accounts, the scanner buttons on the scanner's front panel are limited for use only with the user account which was used to install the scanner driver. To use the scanner buttons with another user account, log in with the account you wish to use, place the CanoScan Setup Utility CD-ROM in the drive, open the [Media] folder, and double-click the [Set Button] icon to execute the command. Log out once and then log back in to enable the use of the scanner buttons with the new account. | |
![]() Position an item on the document glass of the scanner.
Position an item on the document glass of the scanner.
| * | To use this function, one of the following e-mail programs should be installed. | |
| For Windows: | Microsoft Outlook Express, Microsoft Outlook, Eudora or Netscape Messenger. (Some mail programs are required to set the MAPI function on.) | |
| For Macintosh | Mail (Mac OS X 10.2 or later), Eudora or MS Entourage. | |
![]()
![]() Press the [E-MAIL] button on the scanner.
Press the [E-MAIL] button on the scanner.
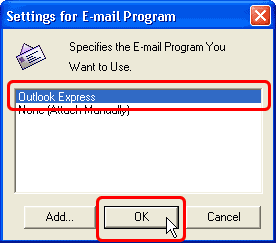
![]() Select the appropriate e-mail program in the next window the first time you perform this procedure and click the [OK] button. The program you select in this window will be automatically selected hereafter when you click the E-MAIL button.
Select the appropriate e-mail program in the next window the first time you perform this procedure and click the [OK] button. The program you select in this window will be automatically selected hereafter when you click the E-MAIL button.
CanoScan Toolbox will automatically start and scans an item, starts your e-mail program and attaches the scanned image file to a new message. The attached file can be compressed to a size appropriate for sending.
Type the recipient's address, a subject and your message, and send it.

| * | If the e-mail program you wish to use is not in the selection window, select [None (Attach Manually)] and manually attach the scanned image from the folder listed below. | |
| * | Scanned images are saved by default in a new folder created and named with the scanning date. | |
| Windows: | Navigate to this folder by opening the [My Documents] folder followed by the [My Pictures] folder. | |
| Macintosh: | Navigate to this folder by opening the [Users] folder, logged in user account folder, [Pictures] folder, followed by the [My Pictures] folder. | |
| * | You can scan successive items with the same settings simply by changing the item on the document glass and pressing a scanner button. You can also press a scanner button even while the CanoScan Toolbox program is running onscreen. | |
| * | To change the settings, first press the scanner button, then click the [Cancel] button on the "Scanning" dialog, and change the settings in CanoScan Toolbox's Mail window. When you are done, click the [Scan] button in the Mail window to start the scan. | |